
The Scheduling dashboard filter is used on the Online Student Scheduling Dashboard and Student Sectioning Dashboard pages to control the search criteria used to display data on the page. It allows selection by the academic area, major, classification, student group, student status, subject area or course, student name, etc.

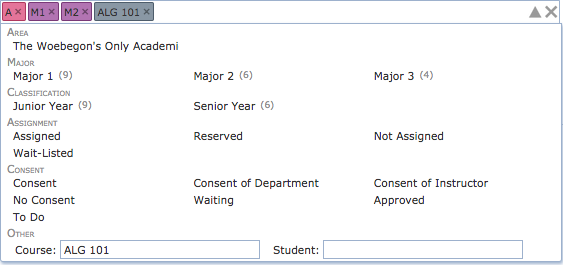
While the scheduling dashboard filter appears as a single text input area, it has a lot of functionality. Information can be entered as text using just the keyboard. While typing, a list of matching suggestions is displayed below the box. These suggestions include the matching courses or students, as well as other filtering options (e.g., an academic area that all the matching students must have). Suggestions can be browsed using the Up and Down arrow keys. A suggestion is selected by typing Enter or by clicking on a suggestion using the mouse. If a suggestion is selected, it is put into the filter as a colored box (called a Chip) just before the text entry area. This allows filtering data by several criteria at once. For instance, in the right-hand side example, we are looking for all students of academic area A and major M1 or M2 that are enrolled or are requesting course ALG 101. Some chips of the same type (e.g., major) can be combined together (meaning a student must be of one of the selected majors). Some chips are allowed only one for each type (indicated by the color of the chip, e.g., selected student status). A chip can be removed from the filter by hitting the little x at the right side of the colored box or by pressing Backspace at the beginning of the text area (i.e., when there is no character to remove). All entered data can be removed from the filter by clicking the big X button ![]() on the rightmost side of the filter box. The list of suggestions appears automatically as the text is being entered in the text field, or when Down arrow key is pressed at the end of the entered text.
on the rightmost side of the filter box. The list of suggestions appears automatically as the text is being entered in the text field, or when Down arrow key is pressed at the end of the entered text.
The filter can be also used with a mouse. By clicking on the drop-down (triangle shaped) icon ![]() on the right side of the box a window is opened displaying all of the options. This is a very useful feature for someone not very familiar with existing student statuses, academic areas, groups, etc. The window is closed by clicking on the drop-down icon
on the right side of the box a window is opened displaying all of the options. This is a very useful feature for someone not very familiar with existing student statuses, academic areas, groups, etc. The window is closed by clicking on the drop-down icon ![]() for the second time (notice that it changes its orientation when the window is opened) or when the room filter component loses its focus (e.g., when clicked outside of the component or some other component is focused by pressing Tab key). The list of available options is automatically updated based on the current content of the filter (e.g., only majors of the selected academic area are present in the popup). The number in the brackets next to the option shows the number of students (out of the students already matching the filter) that match the option. A selected chip can be also unselected by clicking on the appropriate option for the second time. For instance, if the Major 2 major is selected, clicking on the Major 2 major for the second time will remove the Major 2 major from the filter (the M2 chip will disappear).Finally, the component also allows for boolean expressions. In these, most of the chips can be used as well, in the format type:value (see the mouseover tooltip on a chip to see how to enter it as a text). For instance, the following query
for the second time (notice that it changes its orientation when the window is opened) or when the room filter component loses its focus (e.g., when clicked outside of the component or some other component is focused by pressing Tab key). The list of available options is automatically updated based on the current content of the filter (e.g., only majors of the selected academic area are present in the popup). The number in the brackets next to the option shows the number of students (out of the students already matching the filter) that match the option. A selected chip can be also unselected by clicking on the appropriate option for the second time. For instance, if the Major 2 major is selected, clicking on the Major 2 major for the second time will remove the Major 2 major from the filter (the M2 chip will disappear).Finally, the component also allows for boolean expressions. In these, most of the chips can be used as well, in the format type:value (see the mouseover tooltip on a chip to see how to enter it as a text). For instance, the following query

returns all students that are of the A academic area and are enrolled in less than 10 credit hours or in 20 or more credit hours.
Besides a name or an external ID of a student, the scheduling dashboard filter allows for the following options:
The following tags can be used, but are not visible on the popup. Some of these are shown as suggestions, e.g., when a number is entered or a particular operation is entered.
overlap:>=30 would return students who have 30 or more minutes of overlapping classes.time:8:30pm returns records for all students that have at least one class that begins at 8:30 pm.room:"CL50 224" would return all records where there is a class a student is enrolled into that meets in the room CL50 224. room:CL50 would return all records where there is a class a student is enrolled into that meets in the building CL50.limit:5 would limit the number of records displayed to 5.operation:eligibility retrieves only change log entries associated with eligibility checks.result:failure retrieves only change log entries with a result of failure.message:changed would return any change log entries whose message contains the word changed.In addition to the tags described above, it is also possible to use the following operations by typing into the filter:
credit:>=15 and overlap:>20 would return all records where students are enrolled in 15 or more credit hours and have more than 20 minutes of overlapping class time. credit:<5 or credit:>18 would return records where students were either enrolled in less than 5 credit hours or more than 18 credit hours.overlap:>5 would return all records where a student has enrolled in more than 5 minutes of overlapping classes.overlap:>=5 would return all records where a student has enrolled in 5 or more minutes of overlapping classes.credit:<5 would return all records where a student has enrolled in less than 5 credit hours.credit:<=5 would return all records where a student has enrolled 5 or fewer credit hours.credit:15..20 would return students enrolled in from 15 through 20 credit hours.| Back to UniTime Online Documentation | © UniTime 2026 | Content available under GNU Free Documentation License 1.3 |