| Examination Timetabling Manual | |
| Last Updated: September 2025 | |
UniTime can be used to build an examination schedule that minimizes the number of conflicting exam placements for all students and instructors. Besides direct conflicts, it also minimizes the number of back-to-back exams or students with more than two exams in a day.
Multiple examination problems can be defined, such as final exams, mid-term exams, or evening exams.
For more details about the examination timetabling problem and the available constraints, please see the Examination Timetabling document.
For examination timetabling to be enabled, the following administration tasks are required. A Session Administrator or the Examination Timetabling Manager typically performs these tasks. The examination timetabling usually happens at the central (academic session) level. The Department Schedule Managers can indicate which courses or classes need an exam, the instructor(s) for the exams, and their preferences and requirements. The examination solver is run by the Examination Timetabling Manager at the central/academic session level for all the departments together. This is because many students may have courses across multiple departments, and it is usually imperative to ensure there are as few student conflicts as possible.
The list of available examination problems can be adjusted on the Administration > Other > Examination Types page. The System Administrator typically configures the examination types. The page is visible to users with Examination Types permission, and changes can be made with Examination Type Edit permission.
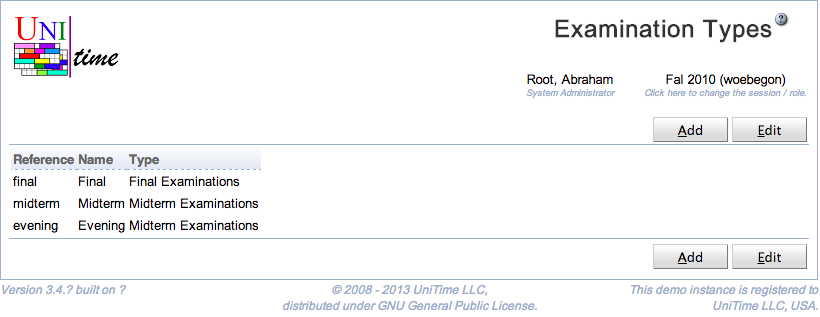
Multiple examination types can be defined on the Examination Types page. The examination types are academic session independent; however, only examination types that have some examination periods defined will show on examination pages (e.g., Examinations page, Type drop down). Similarly, a set of rooms that are available for a particular examination problem (together with their availabilities and default period preferences) can only be defined for examination types that already have some examination periods defined in the academic session.
Examinations of each examination type are timetabled separately. So, for instance, there can be a different examination timetable for midterm and for evening exams during a term, or there can be multiple final examination timetables produced during the summer session (e.g., one for the first half and another for the second half).
Examinations of each examination type can also be published at different times and/or managed by different Examination Managers. This can be defined on the Examination Statuses page.
If the Highlight In Events is checked, examination days (days during which there are examination periods) for this examination type are highlighted in the events.
While there can be many examination types defined, all of them are either of final or of midterm examination type. This type determines how examination period preferences are displayed, whether midterm or final examination events are created (see the Events page), and is used in the status types (see the Status Types page). This needs to be taken into consideration when a new examination type is being created.
The list of non-overlapping examination periods for each examination type can be defined on the Administration > Academic Sessions > Examination Periods page. The Session Administrator usually configures the examination types. The Examination Periods permission is needed to access this page.
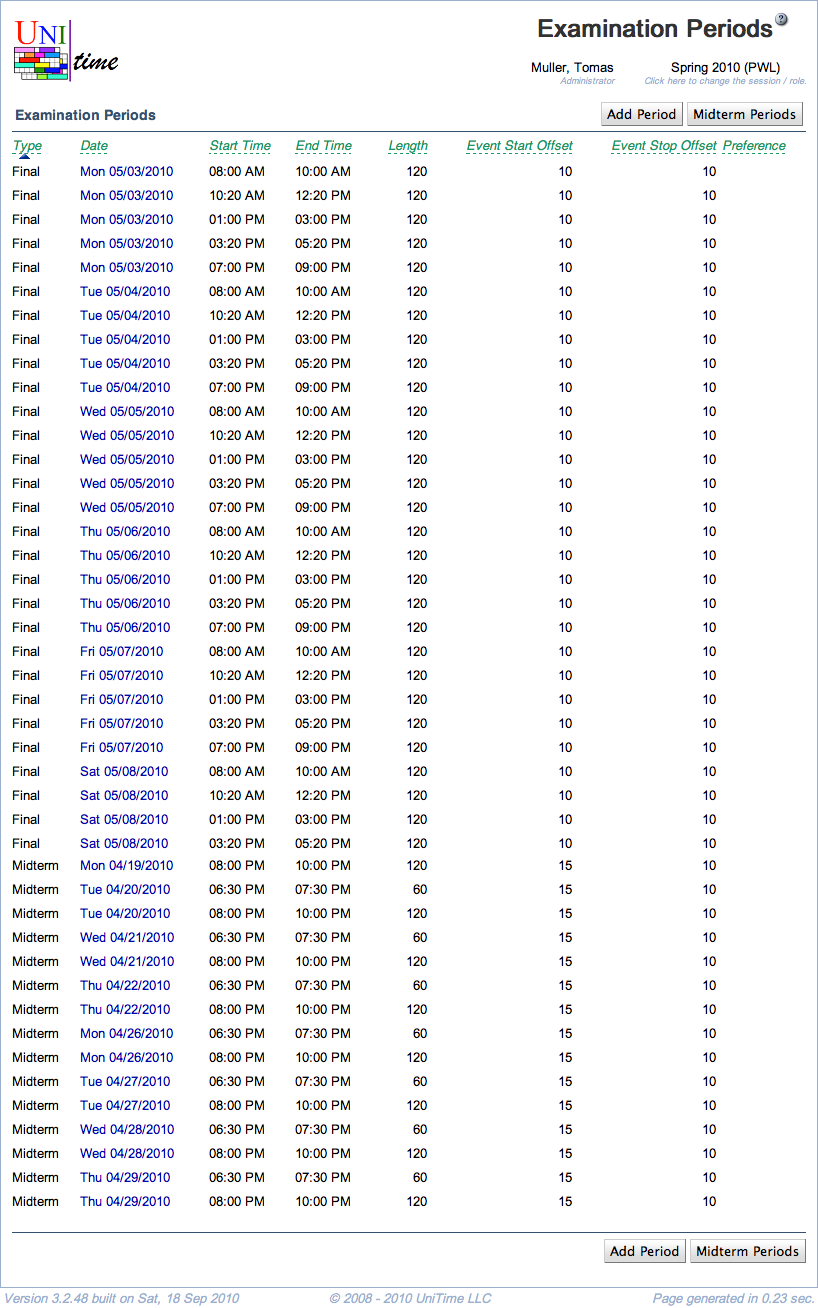
The examination periods can also be rolled forward from the previous academic session, using the Administration > Academic Session > Roll Forward Session page, in the Roll Exam Configuration Data Forward step.
All examination periods are relative to the Exams Begin date set on the Academic Sessions screen. If this date is moved, all periods are automatically moved as well.
The Event Start Offset can be used to indicate how many minutes before the examination should the room be available for students to enter and sit down, or to prepare the room (rearrange chairs, etc.). Similarly, the Event Stop Offset indicates how many minutes after the examination should the room be available for the students to leave the room or to return the room to the state where it was before the examination.
Please note that the Examinations menu is only available when there is at least one examination period defined for the current academic session.
Besides the examination periods, the list of available rooms needs to be configured for each examination problem. This can be done on the Examination > Input Data > Rooms page. The Session Administrator or the Examination Scheduling Manager typically performs this task.
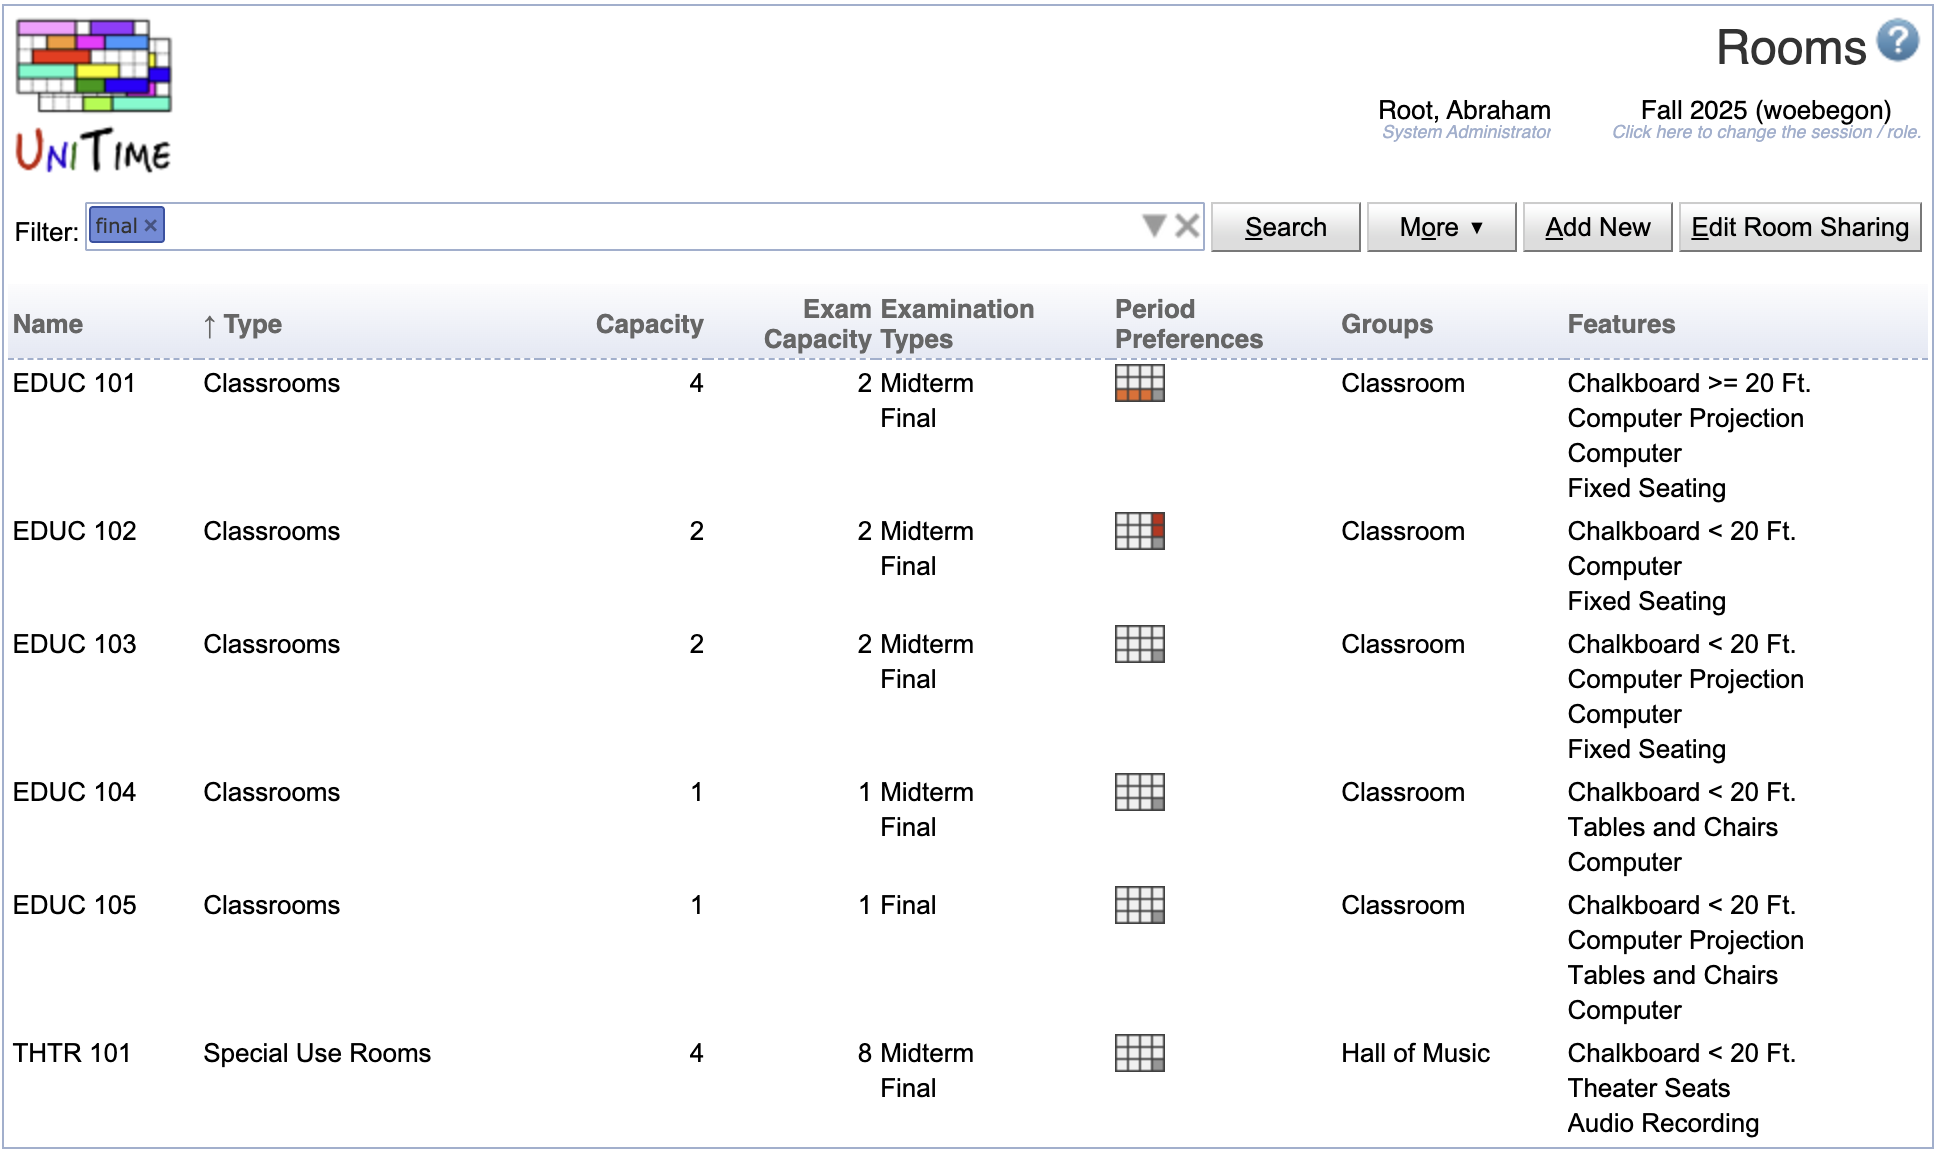
The page can be filtered by examination type (listed under the Department), and it can list both the normal and examination seating capacities, as well as the period preferences for the selected examination type. When an examination type is selected in the filter (possibly with some other options, such as a room type or a building), the Edit Room Sharing button can be used to easily select which of the rooms can be used for the examination timetabling (of the selected type).
Click on a room to see more details on the Room Detail screen or make changes using the Edit Room screen. On the Edit Room screen, there is a checkbox for each examination type (to indicate whether the room can be used for this problem) and the additional examination seating capacity.

The examination timetabling can utilize two capacities: normal and examination seating capacity. An exam that requires normal seating must fit into one or more rooms, considering the room capacity. An exam that requires examination seating must fit into one or more rooms, considering the room’s examination seating capacity.
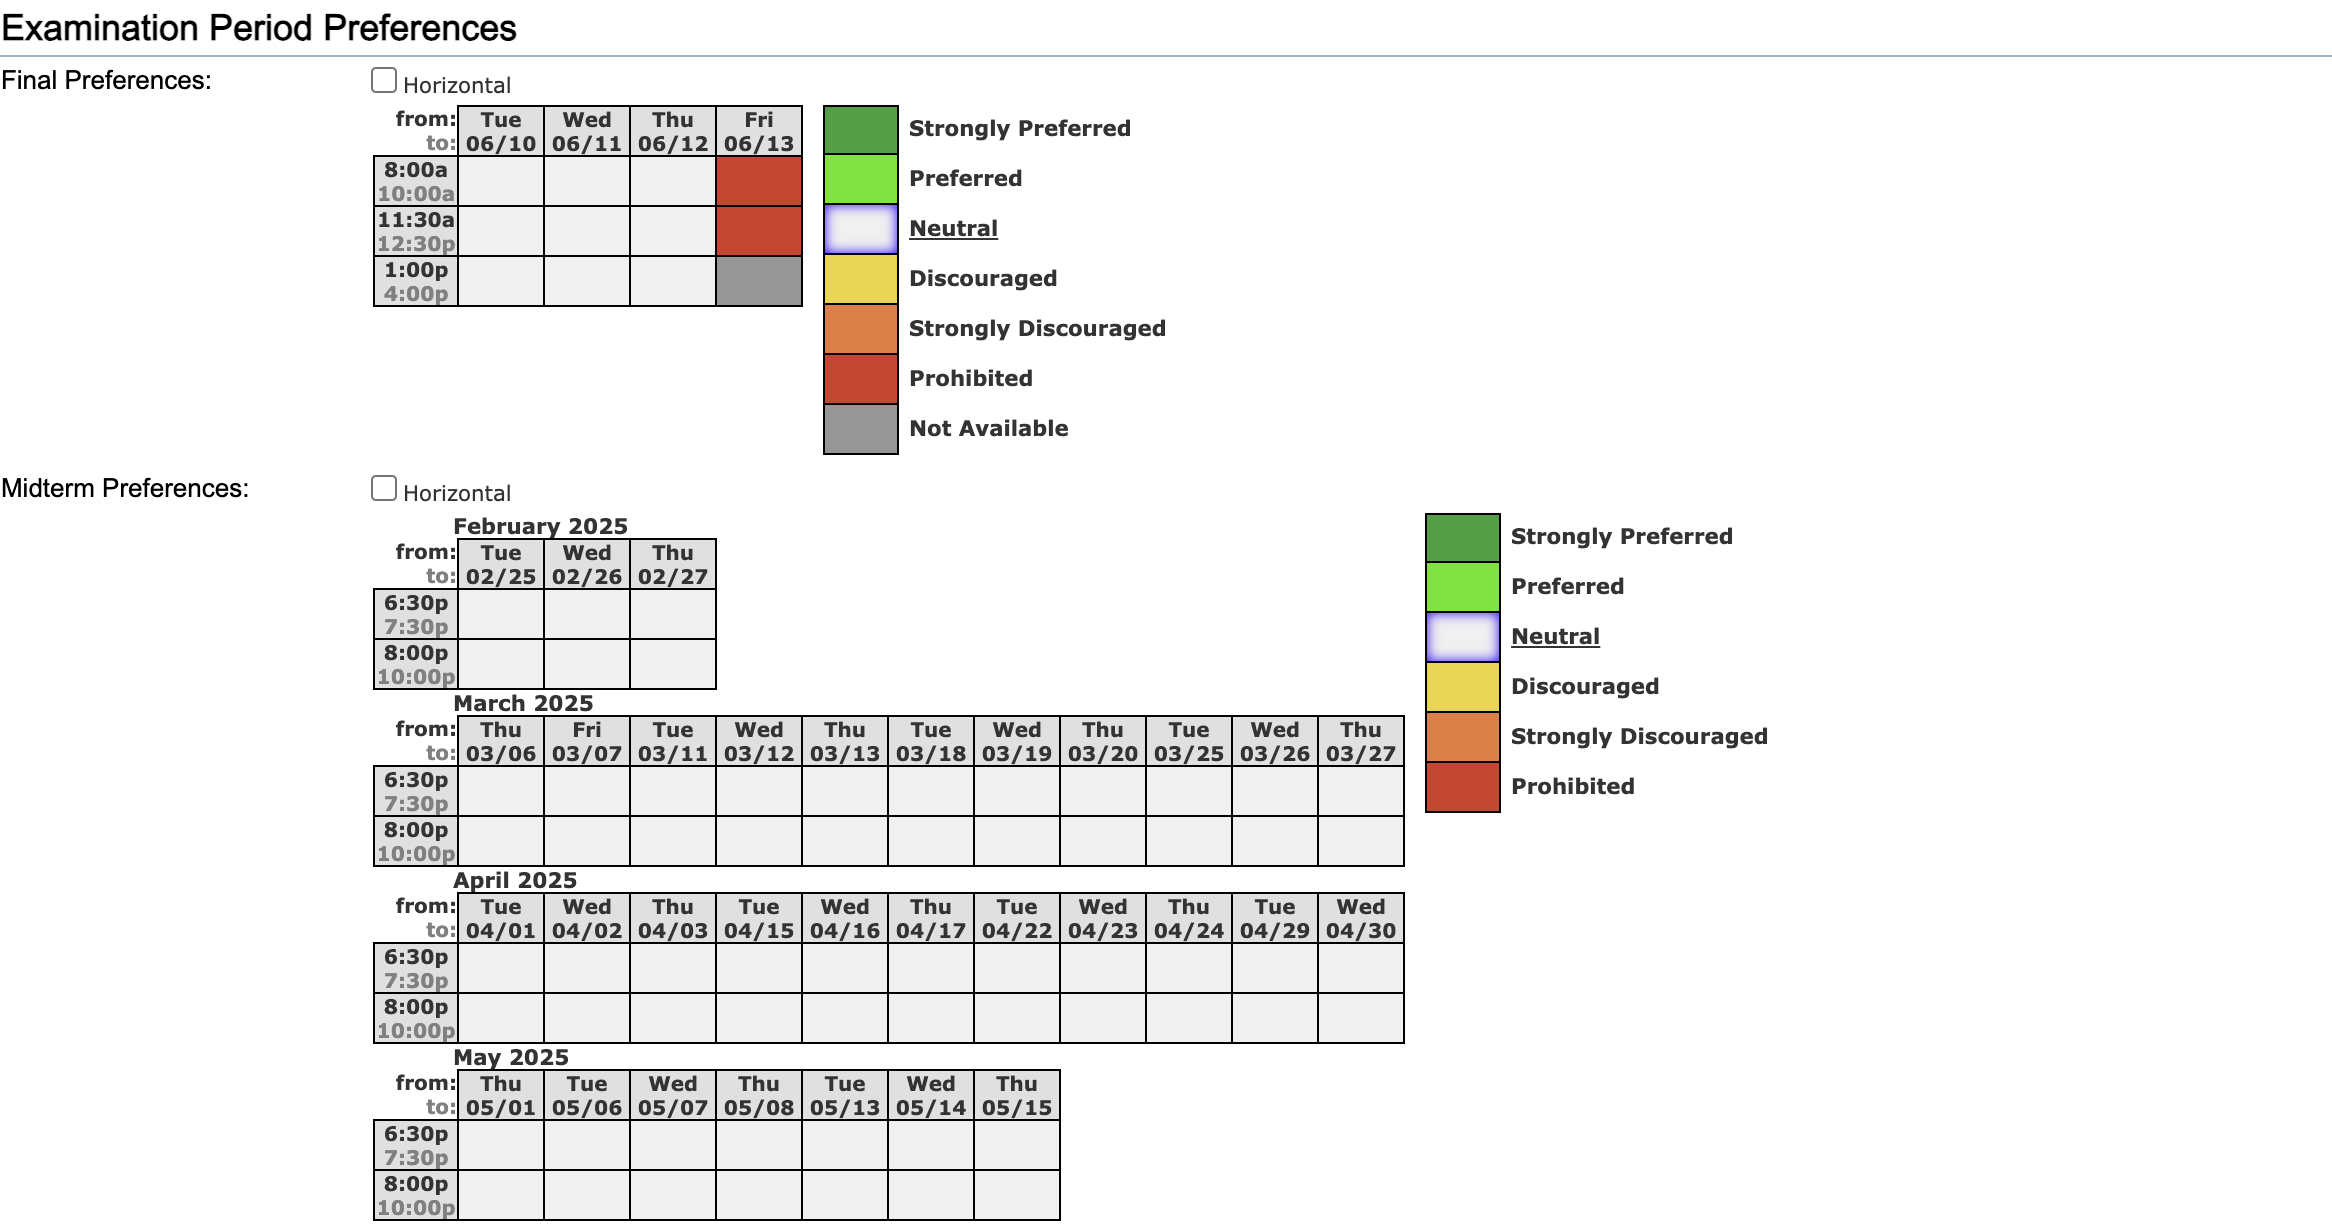
An examination room can also have a preference set for each examination period defined on the Edit Room screen. When a period is marked as Prohibited, the room cannot be used for examination timetabling during that period. A Strongly Discouraged period can only be used if there is a direct preference for the room on the exam. The use of the room during the Discouraged periods is minimized.
Any global room features and room groups can be used for examination timetabling for setting up preferences. There are no separate room features or groups that could be used only for exams.
The Examinations > Input Data > Room Availability page provides a list of events that overlap with the examination periods of the selected examination problem. This screen is useful when an institution does not use the Event Management section of UniTime and imports information about room availability from external resources (see more about that here).
To minimize student conflicts, the examination solver requires student class enrollment data to exist in UniTime. Students attending an exam are computed from the examination’s association with one or more classes or courses.
The student class enrollment data are produced by the Student Scheduling component of UniTime.
Alternatively, student class enrollment data can be imported from an external system using the Administration > Academic Sessions > Data Exchange page, using the Student Class Enrollment XML data format (see the XML Interfaces for more details). The Student Course Requests XML format can also be used, provided it includes class enrollment data.
The Administration > Academic Session > Examination Statuses page can be used to change the examination status individually for each examination type. This examination status, if set, overrides the academic session status (for all users).
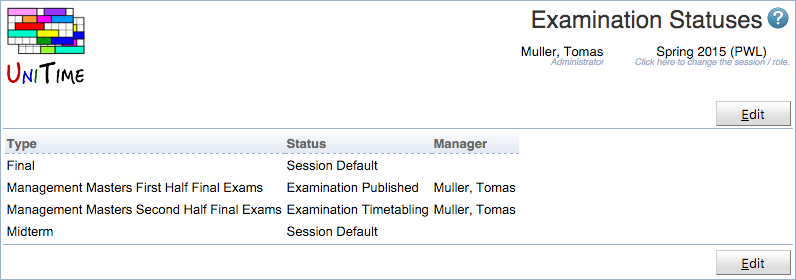
Examination statuses can be defined on the Administration > Other > Status Types page, by setting the Apply to Examinations. The following statuses are created by default:
This allows for each examination problem to be viewed, edited, timetabled, and published at a different time. Session Defaults falls back to the former behavior (using the status of the academic session instead).
It is also possible to attach examination managers to each examination type (for the current academic session). If this relation is defined, only the selected manager(s) can view, edit, or timetable the given examination problem (based on the status). If this relation is NOT defined, all examination managers can view, edit, or timetable all examination problems. Only managers with a role that is academic session dependent and that allows access to the examination solver are listed.
The Examination Statuses permission is needed to access the page. Permission Examination Status Edit is needed to make changes.
The individual exams can be seen and configured on the Examinations > Input Data > Examinations screen. Additional distribution constraints between individual exams can be configured using the Examinations > Input Data > Distribution Preferences screen.
The Examinations screen provides a list of examinations for the selected problem (examination type), for one, more, or all subject areas at once. The page can also be used to add a new exam, but an exam can also be added directly from the Instructional Offering Detail or Class Detail page for the particular course or class, respectively. The two mentioned detail pages also display a list of exams currently configured for the appropriate course or class.
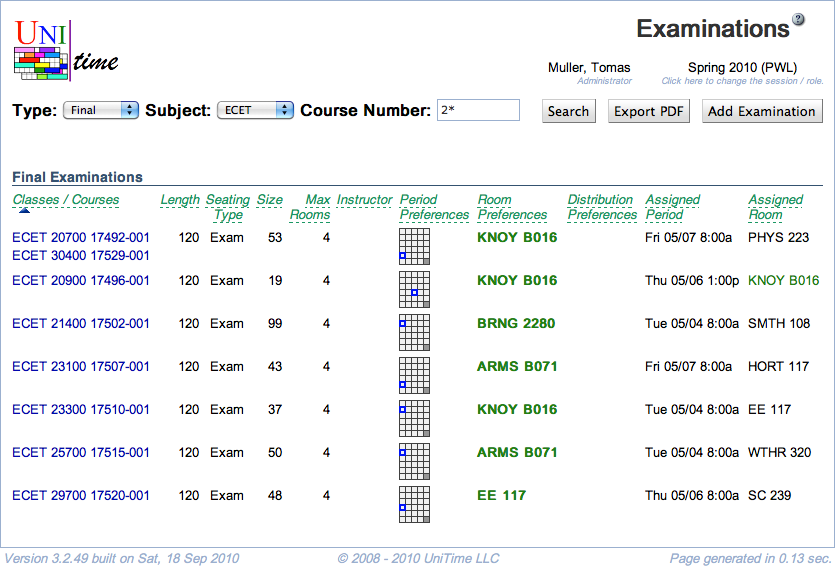
Each examination has
The Print Offset can be used to shift the examination time by a given number of minutes in the reports. For example, a printed starting time of an exam can be 10 minutes into the examination period.
If an exam has one or more instructors assigned, the possible conflicts for the instructors will be considered.
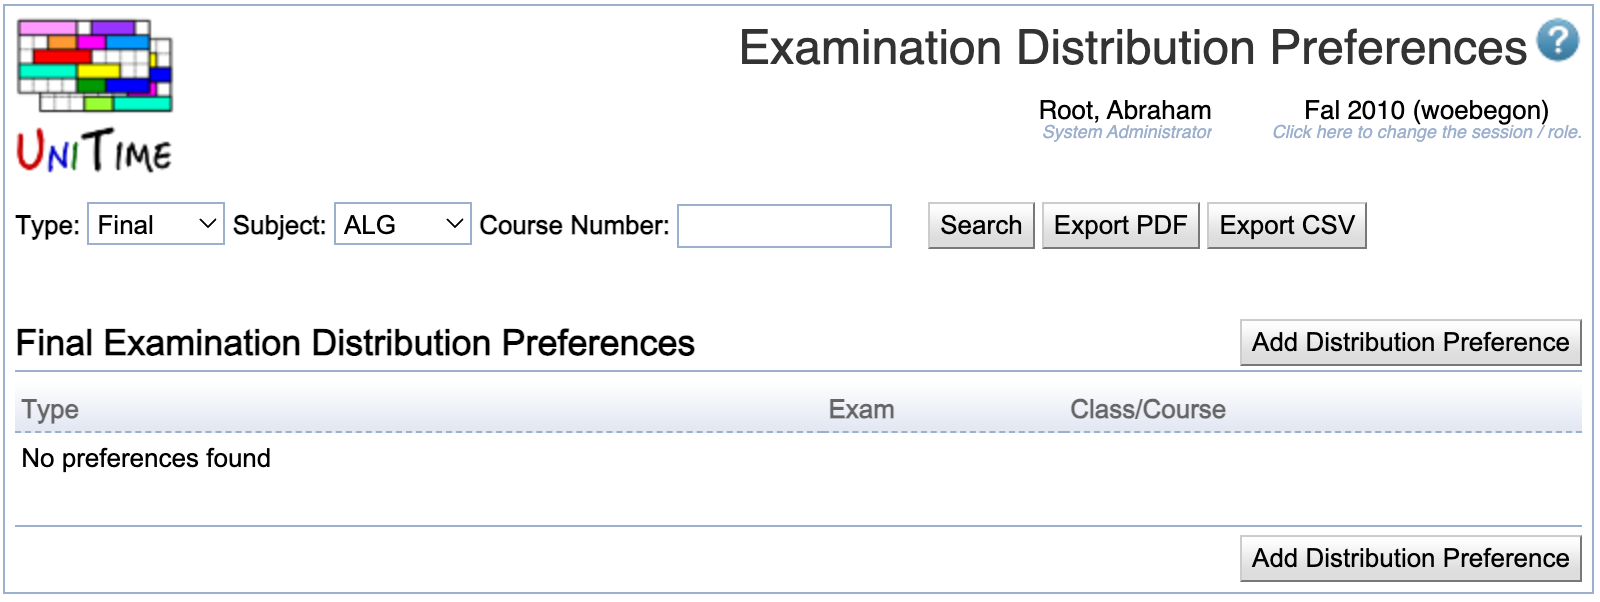
Possible distribution preferences:
Click on any distribution preference to get to the Edit Examination Distribution Preference screen. A new distribution preference can be created by clicking the Add Distribution Preference button.
Prohibited or required preferences must be satisfied by the solver (also referred to as hard constraints). The (strongly) discouraged or preferred preferences are optimized (the solver tries to satisfy as many as possible, also referred to as soft constraints). In the case of distribution preferences set between three or more exams, each violated examination pair is penalized separately, allowing the solver to satisfy as many examination pairs as possible.
The examination solver can be run using the Examination > Examination Timetabling > Examination Solver page. Unlike with the course timetabling, only one solution can be saved in the database, directly populating the examination assigned period and room(s). If a solution is already saved, it gets automatically loaded in as well. After loading the data into the solver, please check all the warnings, either directly on the Examination Solver page or on the Examination Solver Log page.

There are the following properties that can be selected
The data can be loaded into the solver using the Load button, and the solver can be started using the Start button. When no data are loaded into the solver, using Start will first load the solver and then start it. This can be combined with the When finished parameter, for example, to save and unload the solver once it is done automatically.
The Stop button can stop a running solver, or it can be left running until it stops itself. The solver run is typically 30 minutes, which can be adjusted with the other examination solver parameters on the Administration > Solver > Configurations page. The solver works with two timetables: the current one (displayed on other pages and manually changeable using the Examination Assignment page) and the best timetable that the solver uses to record the best solution it has seen during the search. To save the current timetable, click the Save button. The solver can be unloaded from memory using the Unload button.
The Clear button will unassign all exams, allowing the solver to start from scratch, even when an existing timetable has been loaded. It can also be used to unassign all exams in the database (delete the existing solution) by using the Load, Clear, and Save buttons in this order.
The Reload Input Data button can be used to reload the input data (periods, rooms, examinations, and all their requirements and preferences) without losing the current timetable. This will load everything into the solver, using the newly selected configuration, except for the saved timetable. Afterward, the current timetable will be reassigned to the newly loaded exams. This is very useful if any changes have been made to the input data, without the need to perform Save, Unload, and Load again. Please note that some exams may be left unassigned if their current assignment is incompatible with the changes made to the input data. Please check the solver warnings for any such cases once the reload is done.
The Save To Best and Restore From Best buttons at the bottom of the page can be used to manually copy the current timetable over to the best or the best to current, respectively.
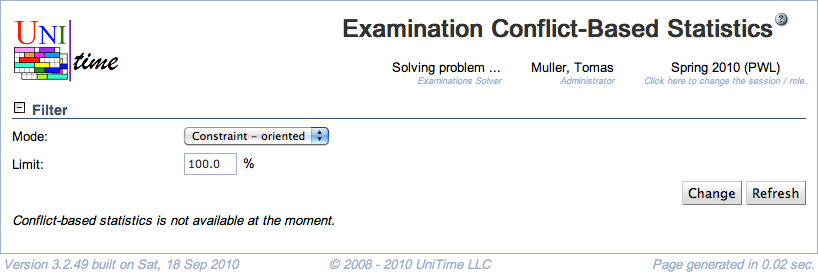
If a complete solution (all examinations are assigned) cannot be found, the Examination > Examination Timetabling > Conflict Statistics page can be used to identify the problems.
Please note that many optimizations occur only after a complete solution has been found, so it is essential to ensure that the problem is not over-constrained and that the solver can find a complete solution with all examinations assigned.
The Examination > Examination Timetabling > Assigned Exams and Examination > Examination Timetabling > Not-assigned Exams pages can be used to see which exams have been assigned or not. The page can display examinations of all or the selected subject area.
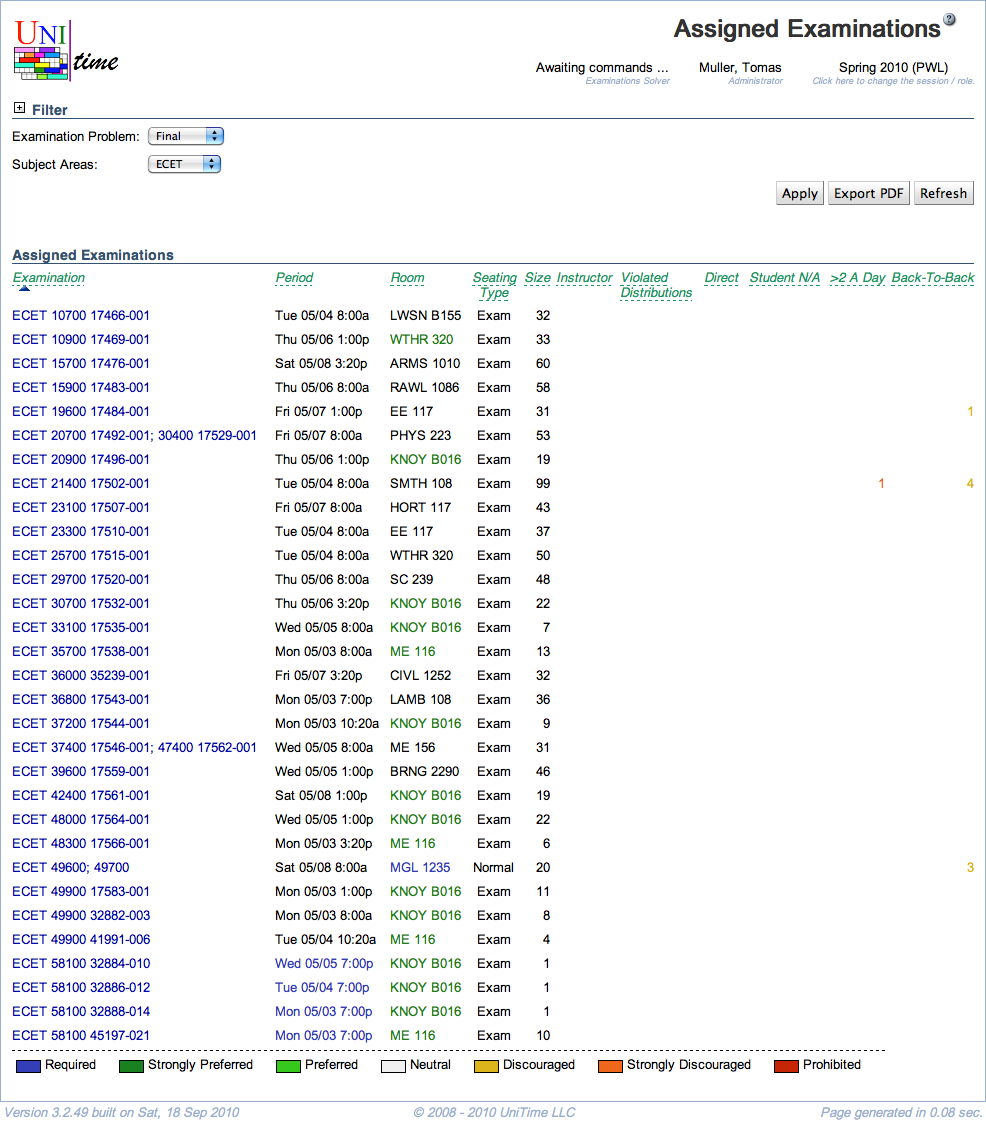
Besides the assigned period and room(s), additional information about the assigned examination is displayed. This includes the requested seating type, size of the exam, exam instructor(s), soft distribution preferences that are violated, and the number of student conflicts:
Back-to-back distance parameter in the Solver Configuration)The counts indicate the number of conflicts in which the listed exam is participating. Additional details are shown on the Examination Assignment page that is opened by clicking on an exam.
The Show classes/courses toggle (when the Filter is open) allows switching between using the examination name or the list of classes/courses that the exam is put on.
Please note that when the solver is loaded, only exams that have been loaded into the solver will be displayed on the solver-related pages.
The assigned examinations can also be displayed in a grid using the Examination > Examination Timetabling > Timetable Grid page.
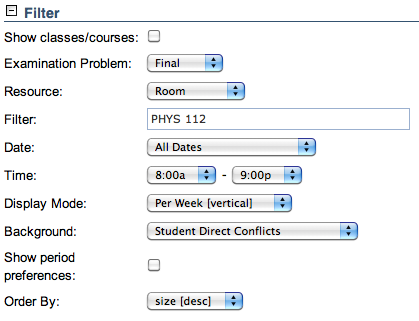
The grid can be displayed for a room, an instructor, or a subject area (Resource selection). A text Filter can filter the rooms, instructors, or subject areas. All periods can be displayed, or they can be restricted to a specific date or week (Date selection) and Time. The Display can be vertical or horizontal, with all periods in one row, or split by week or day. The Background can be used to color-code student or instructor conflicts or satisfaction with room, period, or distribution preferences.
The three numbers below each exam indicate the number of direct, >2 exams a day, and back-to-back student conflicts. The direct conflict count also includes cases when the student is not available during the period.
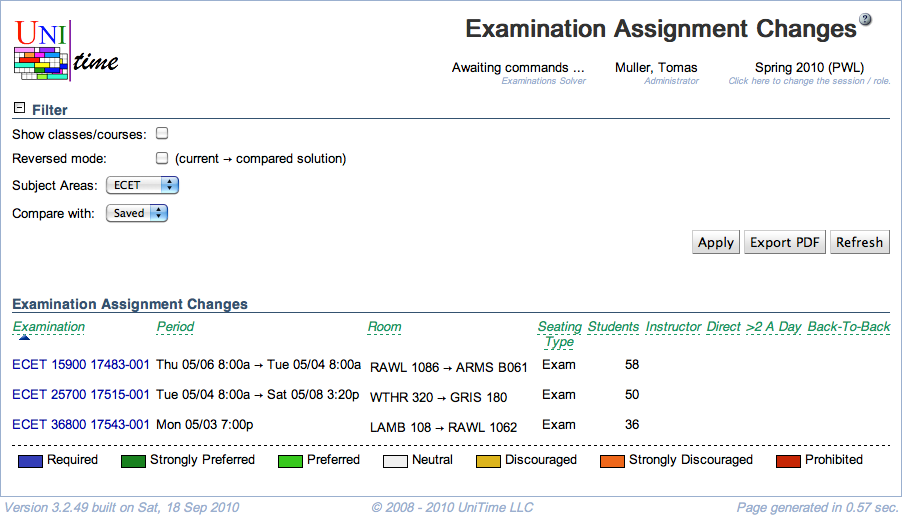
The Examination > Examination Timetabling > Changes page can be used to compare the current timetable with the Best timetable (seen by the solver), the Initial timetable (original timetable as it was loaded into the solver), or the timetable that is currently Saved in the database.
The Examination Assignment dialog can be used to manually assign an exam or change its assigned period and/or room(s). It opens when an exam on any of the Examination > Examination Timetabling pages is clicked, or when the Assign button is used on the Examination Detail page.
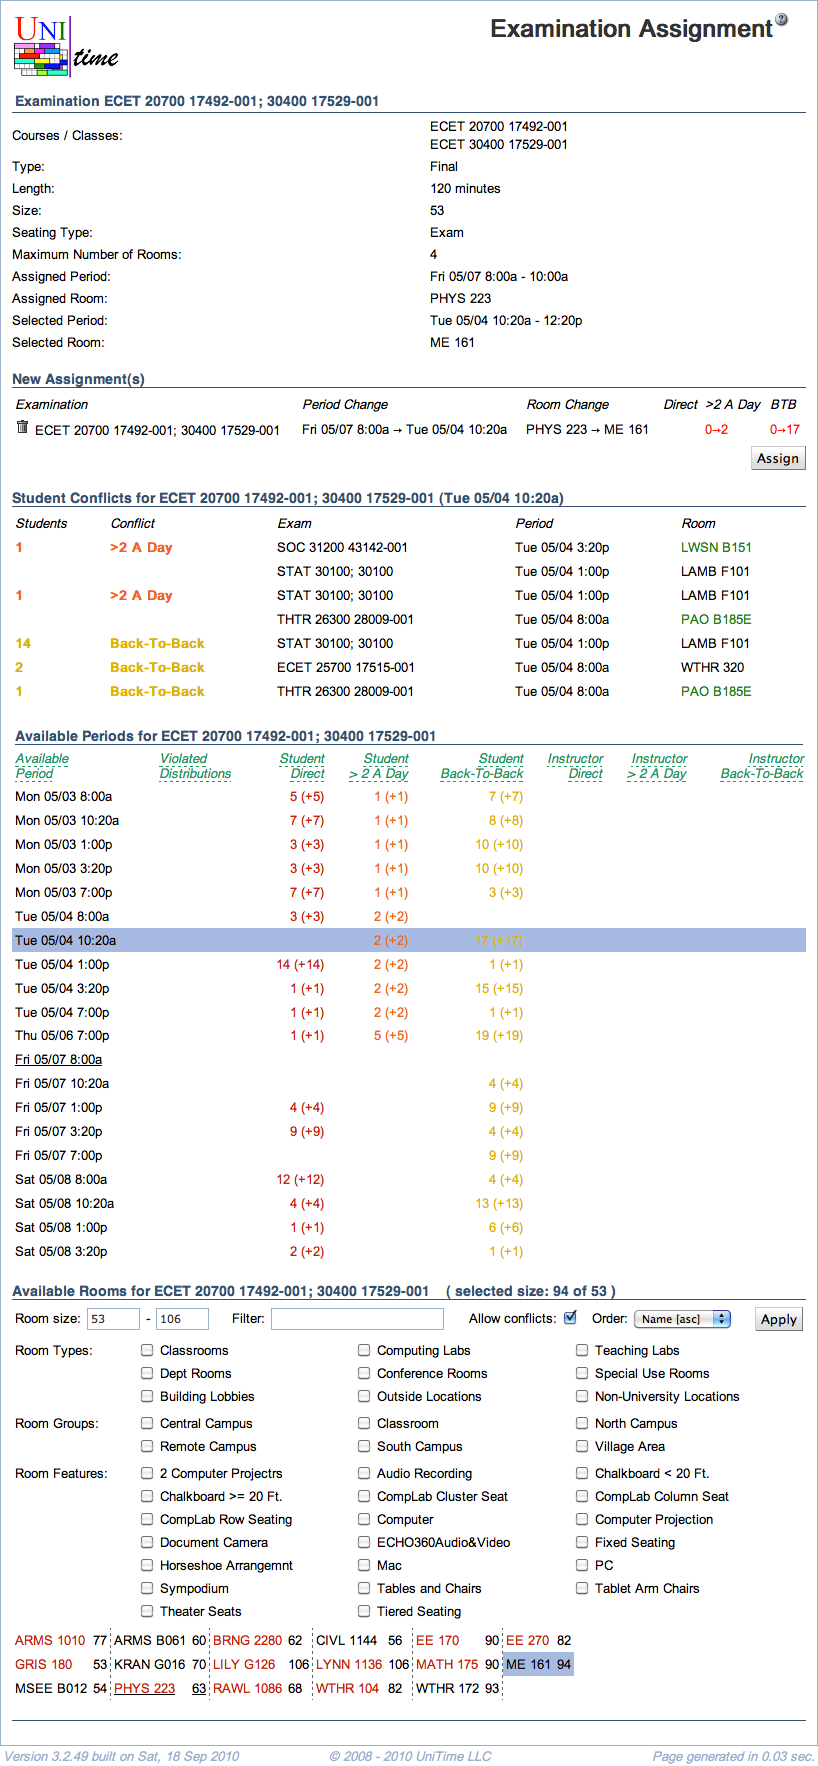
Important: Please note that when the data are loaded into the solver, the in-memory assignments from the current timetable are displayed and can be modified. No changes are made directly in the database, and the user must use the Save button on the Examination Solver page once done in order to persist the manual changes made. On the other hand, when the page is used while the data are not loaded in the solver, the actual examination assignments stored in the database are displayed and modified.
For the selected examination, a new period and/or rooms can be selected on this page. If an examination allows for two or more rooms, multiple rooms that are smaller than the room size can be selected in the Available Rooms section. The page also displays the number of conflicts that would occur for each period, with more detailed information available when the period is selected.
When one or more examinations conflict with the new assignment, they will be listed in the New Assignment(s) table as unassigned, along with this change. The user can then select them and choose a new period and/or room(s) for them. No changes are made until the Assign button is clicked, and it is possible to make changes that involve multiple examinations. A typical example is a room swap between two exams.
There are three pages that can be used to provide examination timetabling reports.
First, there is the Examinations > Examination Timetabling > Reports page.
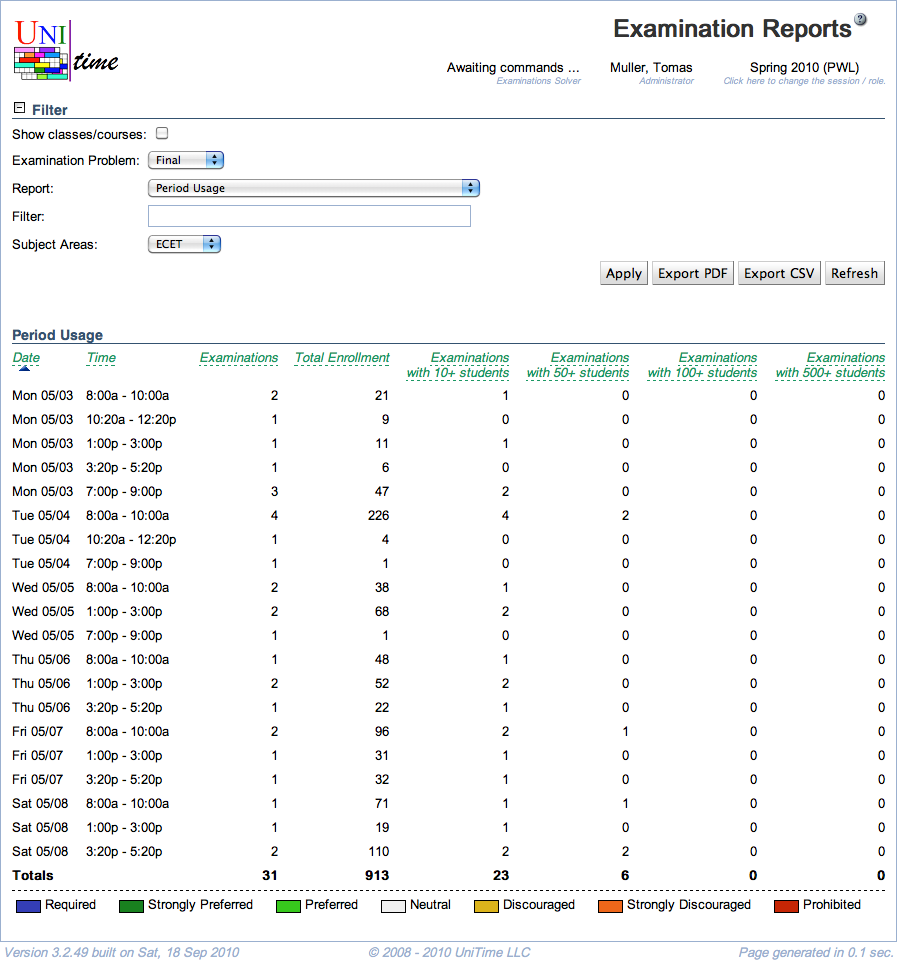
This page provides a set of reports generated by the examination timetabling solver, which can also be computed directly from the database when the solver is not loaded into memory. The following reports are currently available
Second, there is the Examinations > Pdf Reports page.
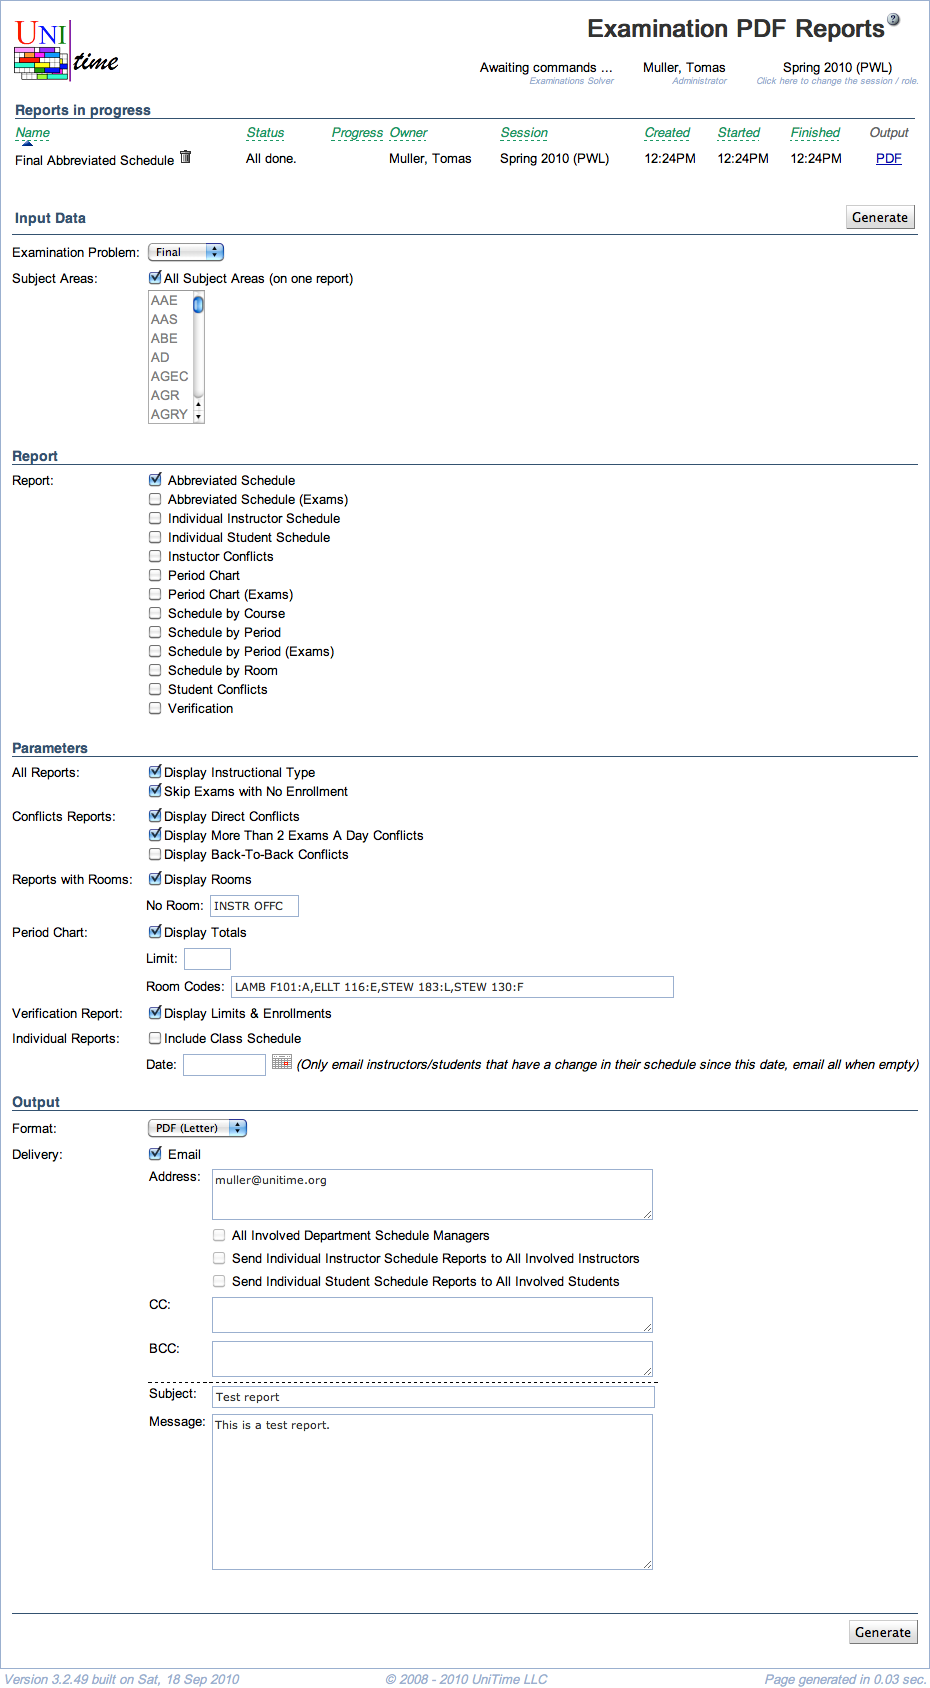
These reports are inspired by the legacy reporting that was done at Purdue University, using a PDF or a text file with a monospaced font with hard character limits on field sizes. However, new proportional font Formats with no character limits are now also available, including CSV, PDF (new), and XLS. The page can also be used to distribute the report(s) to timetabling schedule managers, instructors, and/or students via email.
Lastly, there is the Examinations > Reports page. This page can be used to create custom reports that are computed using HQL (Hibernate Query Language) to directly query the database. The creation of such reports requires a working knowledge of UniTime’s database structure and the Hibernate model.
The Examinations > Reports option menu is only available when at least one examination HQL report has been created or imported.
The solver weights and parameters can be customized using the Administration > Solver > Configurations page. This section includes additional customization options for the solver and/or parameters that are not available by default.
A lot of examination-related parameters exists in the Application Configuration, starting with tmtbl.exam.. In particular, there are
tmtbl.exam.name. parameters, see Exam Naming Convention for more details)tmtbl.exam.eventConflicts.<exam_type>, where <exam_type> is the Examination Type reference)
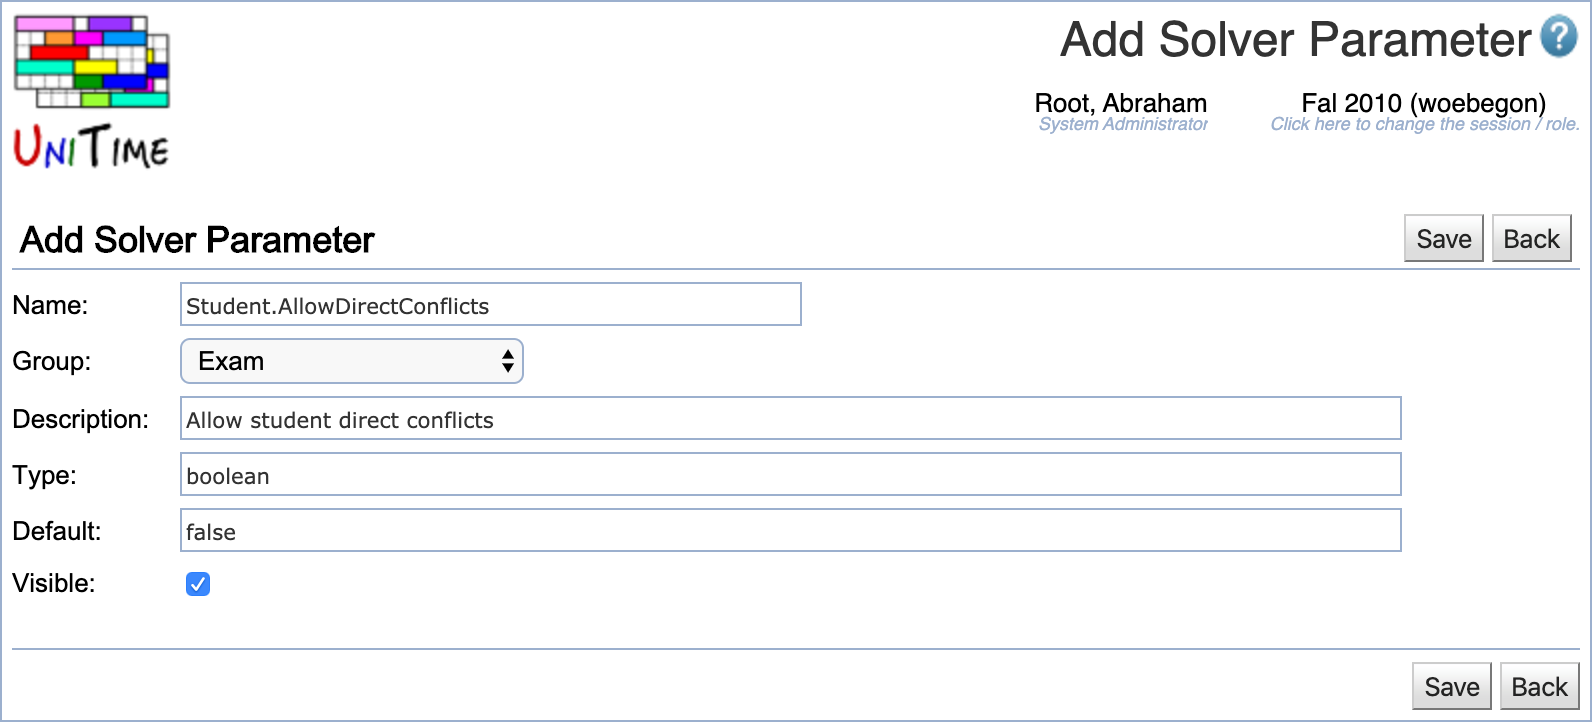
tmtbl.exam.eventConflicts.travelTime.classEvent) and travel time between exams and course-related events with mandatory attendance (tmtbl.exam.eventConflicts.travelTime.courseEvent)tmtbl.exam.defaultStartOffset.<exam_type> and tmtbl.exam.defaultStopOffset.<exam_type> respectively)tmtbl.exam.defaultPrefs.* properties)By default, direct student conflicts are allowed and only minimized. If direct student conflicts should not be allowed, they can be made hard by setting the Student.AllowDirectConflicts to false in the solver configuration. You may need to create a solver parameter for that (using Administration > Solver > Parameters page).
By default, the solver does not allow two or more exams to be placed in the same room during the same period. This can be changed either on an individual basis (by using Can Share Room distribution preference between exams that are allowed to be placed in the same room, assuming that the room is big enough) or it can be changed globally for all exams (no exceptions). To allow any two (or more) exams of the same length to share a room, you can use the SimpleExamRoomSharing model instead of the default one. To do so,
Go to Administration > Solver > Parameters and create Exams.RoomSharingClass parameter set to org.cpsolver.exam.model.SimpleExamRoomSharing (in the Exam group, see the attached screenshot)
 Also, you need to remove all the existing Can Share Room distribution preferences, or the solver will fall back to using the default room-sharing model.
Please note that the SimpleExamRoomSharing only allows exams of the same length to share a room. The room must be big enough to accommodate all the exams.
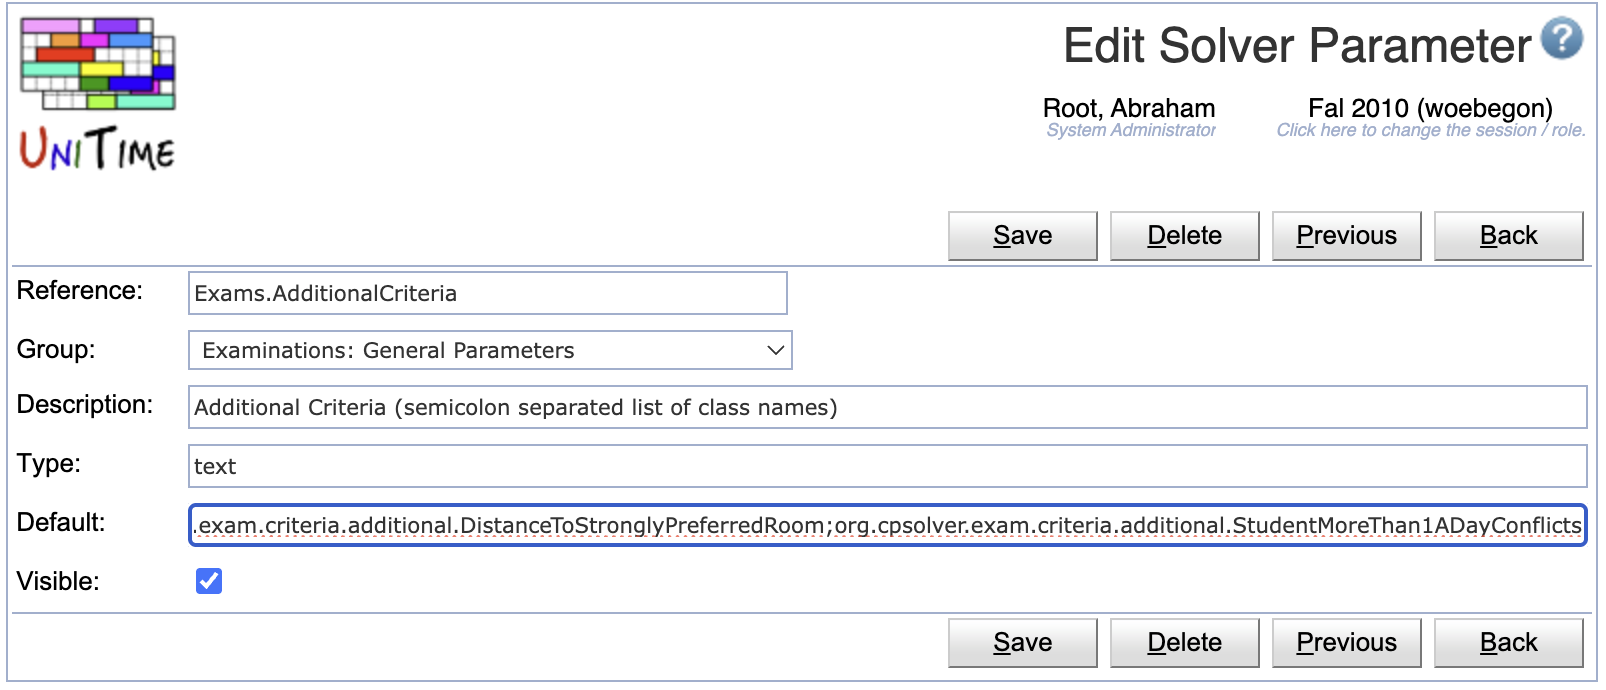
If the number of cases when a student has two exams on a day should be minimized, we do have the StudentMoreThan1ADayConflicts additional criterion. If enabled, the solver will also minimize these cases. Conflicts with more than one exam on a day will only be displayed as a total on the Examination Solver page (More Than 1 A Day Conflicts line in the Current/Best Timetable section).
To enable, the org.cpsolver.exam.criteria.additional.StudentMoreThan1ADayConflicts class needs to be added to the Exams.AdditionalCriteria parameter. On the Administration > Solver > Parameters page, select the Examinations: General Parameters group and update the Exams.AdditionalCriteria parameter to
org.cpsolver.exam.criteria.additional.DistanceToStronglyPreferredRoom;org.cpsolver.exam.criteria.additional.StudentMoreThan1ADayConflicts
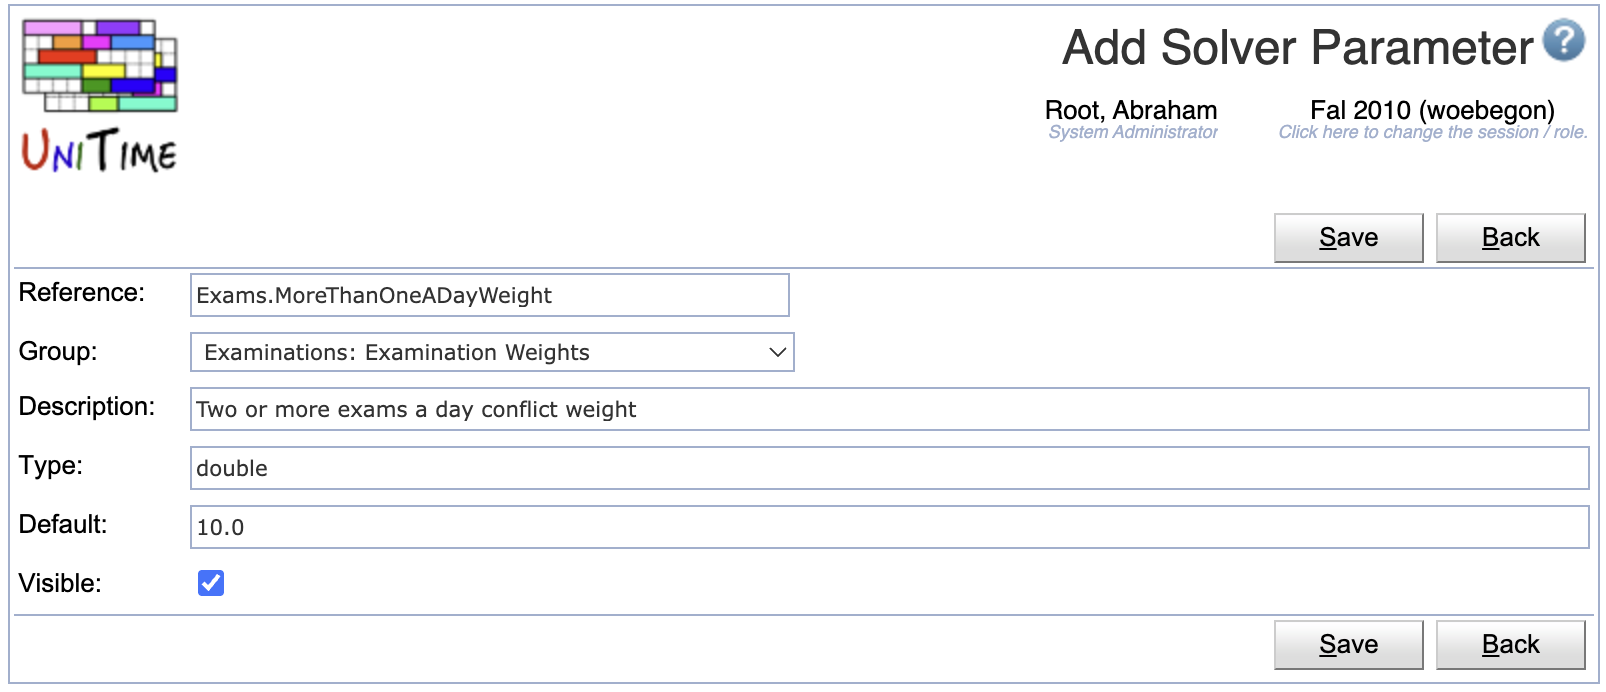
Additionally, a new parameter Exams.MoreThanOneADayWeight can be created to allow setting a custom weight for these conflicts.
There is an optional distribution preference type that can be used to require or prefer exams to be placed on the Same Day, or to be placed on different days when prohibited or discouraged. To enable this constraint, an admin needs to register it with the Examination Same Day Constraint.xml script. To register the constraint, download the XML file and import it on the Data Exchange page, then run the Distribution Types: Same Day (Examination) script on the Scripts page.
Once registered, the Same Day distribution type will appear on the Administration > Solver > Distribution Types page and become available on the Examination Distribution Preferences page.
| Back to UniTime Online Documentation | © UniTime 2026 | Content available under GNU Free Documentation License 1.3 |