 |
Online Student Scheduling Dashboard Manual |
|
| Last Updated: January 2026 |
|
Table of Contents
The purpose of this document is to provide a user guide for the functionality in the UniTime Online Student Scheduling Dashboard. The Online Student Scheduling Dashboard is available to users with various User Roles in the UniTime system. The Scheduling Dashboard is only available to users with the following roles:
- Administrative Roles
- Student Advisor
- Department Schedule Manager
- Instructor
- View All
- View Department
Depending on the User Role used to access the Online Student Scheduling Dashboard, different functionality is available. In general, the Online Student Scheduling Dashboard allows users to see data in the following broad categories:
- Course Schedule Data
- Student Data
- Change Log Data Related to Student Registrations
Depending on the User Role assigned to a user, access to the data in the above categories may be limited or not available. This guide will aim to point out which data and actions are available to the various User Roles an individual may have.
Note: This documentation may use the terms UniTime Student Scheduling Dashboard, UniTime Scheduling Dashboard, Student Scheduling Dashboard, and Online Student Scheduling Dashboard interchangeably.
Important: Difference with Batch Student Solver Dashboard
The Batch Student Solver Dashboard offers similar functionality; the data displayed on the batch dashboard is related to the Student Scheduling Solver. For users that do not directly interact with the solver, the Batch Student Solver Dashboard shows the data from the last published solver run. During pre-registration, these are typically the results of the previous night’s simulation. After the batch is complete, the page displays the final run of the batch student scheduling solver, i.e., the final students’ schedules as they have been pushed to Banner.
The batch dashboard also shows the courses, including their limits, reservations, and timetable, as they were loaded in the solver. This means that the limits (and the remaining available space in the courses/classes) are based on the amount of space that was available to the students included in the solver run. The batch dashboard also only shows students who were included in the solver run, and only course requests for courses that they were allowed to take. This means that students who did not pre-register, did not match the solver settings (e.g., were not included in the New Beginners/Continuing UG Students group), or had a HOLD at the time of the solver run will not appear. Similarly, courses for which the student had a pending override request are not considered. The order of the courses listed for a student will also reflect any adjustments made by the solver, e.g., Vital course requests are typically moved above all other course requests. Students’ curricula and other information (such as student priority) will also reflect the data as it was loaded into the solver.
On the other hand, the Online Student Scheduling Dashboard shows the data as it is right now, so users can see how spaces are being filled, check waitlists, etc. Hence, the distinction of batch versus online.
That said, the Batch Student Solver Dashboard is typically only useful during pre-registration
- to Student Advisors, if they want to check whether the students are getting the courses they requested,
- to Departmental Schedule Managers and Student Scheduling Admins, to see how the courses are filling up or if any time conflicts need to be addressed.
After the batch is done, the Batch Student Solver Dashboard can still be used to see the initial schedule of a student.
Accessing the Student Scheduling Dashboard
When a user logs into UniTime, if the user’s default user role has access to the Scheduling Dashboard in the academic session in which the user is logged in, then a menu item for the Online Scheduling Dashboard should be visible. If the Online Scheduling Dashboard is not visible, the user may need to switch to a different role or academic session.
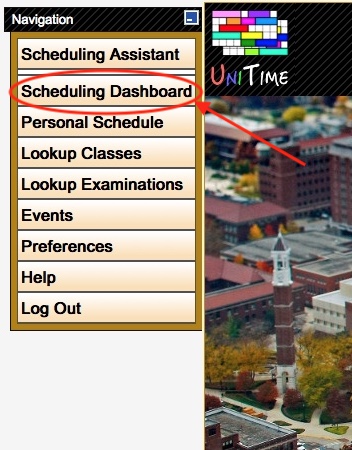
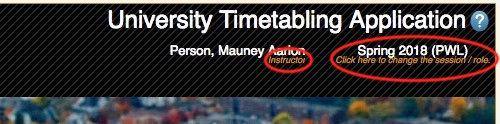
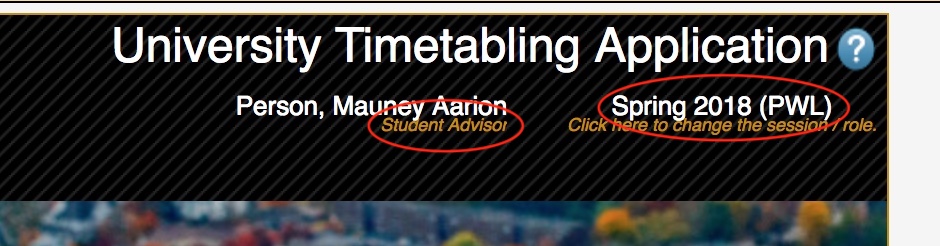
The user can see their role listed under their name at the top of the page and the academic session in the top right-hand corner.
The role listed under the user’s name determines the functionality available to the user in the Online Student Scheduling Dashboard. Before selecting the Online Scheduling Dashboard menu item, the user should review their user role and academic session to ensure they are accessing the Online Student Scheduling Dashboard with the functionality appropriate to their role and the academic term they wish to work with.
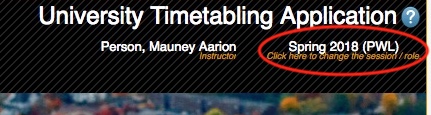
If a user needs to change the role or academic session, they can do so by clicking the label for the academic session.
This brings up the Select User Role page. The user can then review the available combinations of roles and academic sessions and select the one to use. For purposes of this documentation, the user will choose their Student Advisor role.
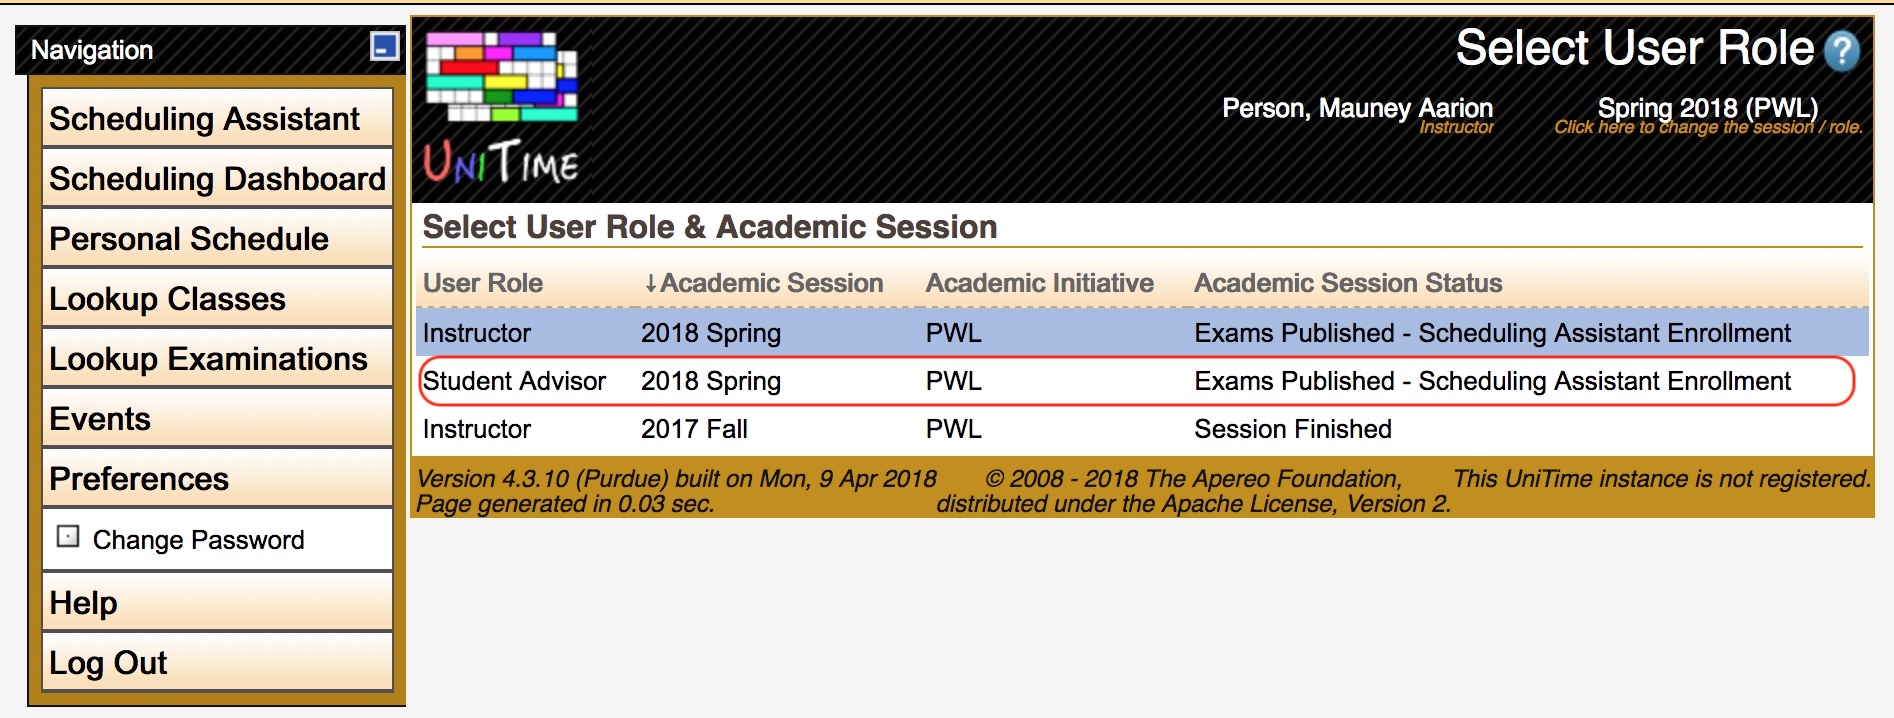
Once a role is selected, the role listed under the user’s name will be updated to reflect the chosen role. The academic session listed in the upper right-hand corner will reflect the selected academic session.
Once the user has determined they are using the desired user role and academic session, they can click the Online Scheduling Dashboard menu item.

This will take the user to the Online Student Scheduling Dashboard page.
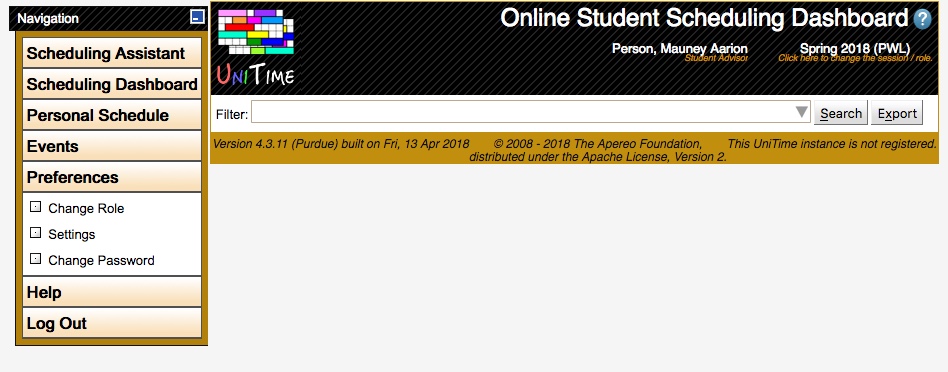
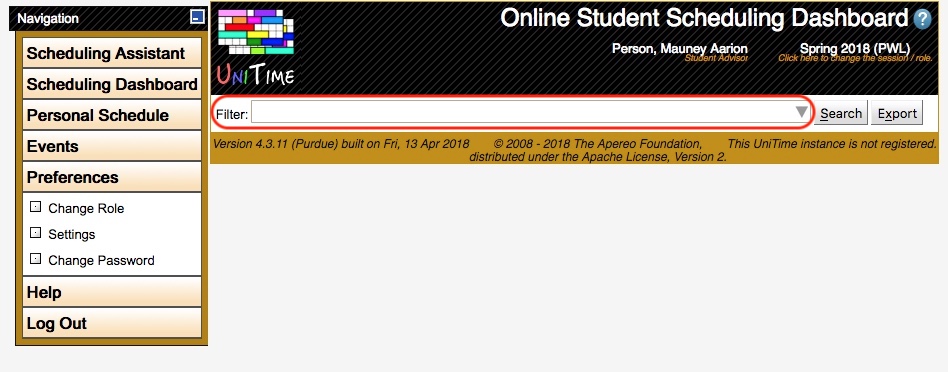
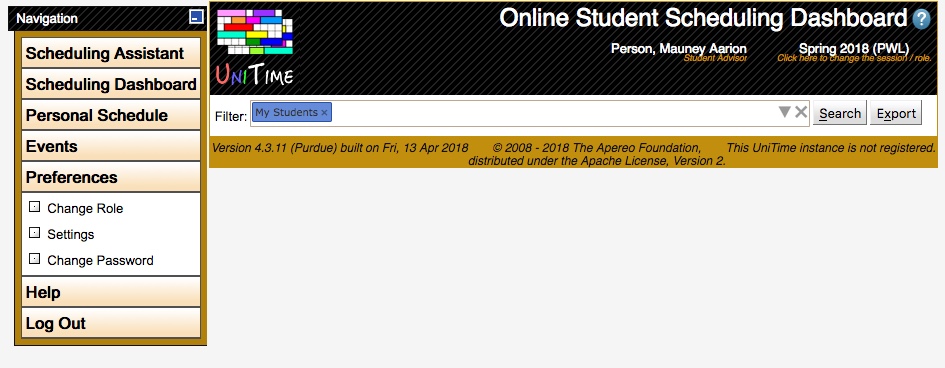
Using the Student Scheduling Dashboard Filter
The filter at the top of the Online Student Scheduling Dashboard page controls the search criteria used to display data on the page. When the user accesses the Online Student Scheduling Dashboard page for the first time, the filter will be blank. Once the user enters a search criterion in the filter and performs a search, the page will remember the user’s last search and automatically populate the filter with that criterion the next time the user accesses the page.
Note: In addition to any search criteria entered into the Filter, the data displayed in the Scheduling Dashboard is also filtered by the access to the data granted by a user’s role.
Note: It is very important for the user to enter search criteria into the filter.
If the user enters no search criteria, the Online Student Scheduling Dashboard will return data for all students and all courses. This returns a massive volume of data and may take a while.
Typing into the Filter
If the user knows the data they wish to search for, they can type the search criteria directly into the filter, and it will begin to show “suggestions” for filter parameters.
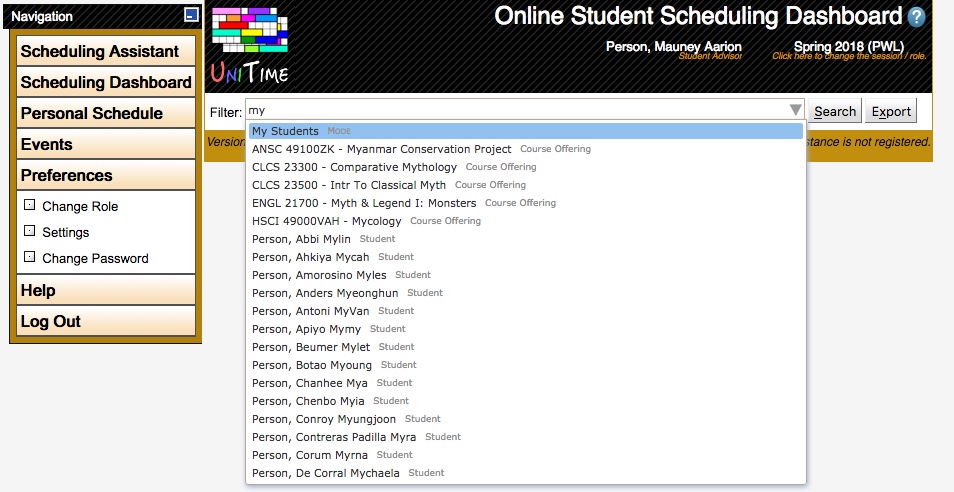
The user can then select an item from the suggestions, or continue typing and pressing Enter. This will then show the search criteria item with a colored background indicating that the search criteria have been added to the filter.
Typing into the filter also allows you to add search criteria that are not available in the Filter drop-down. The following tags are the additional tags (search categories) available to the user when typing into the Filter:
- credit: - this tag allows the user to filter on the number of credits the students are registered for, e.g., credit:18..22` would return data for students who are registered for 18 through 22 credits.
- overlap: - this tag allows the user to filter on the amount of time the students have overlapping classes in their schedules, e.g.,
overlap:>=30 would return students who have 30 or more minutes of overlapping classes.
- time: - this tag allows the user to filter on the start time of classes, e.g.,
time:8:30pm returns records for all students that have at least one class that begins at 8:30 pm.
- room: - this tag allows the user to filter on the building or room a class is in, e.g.,
room:"CL50 224" would return all records where there is a class a student is enrolled into that meets in the room CL50 224. room:CL50 would return all records where there is a class a student is enrolled into that meets in the building CL50.
- crn: - this tag allows the user to filter on a specific section using its Banner CRN, e.g.,
crn:10023 would return the course that has the class that corresponds to Banner CRN 10023.
- limit: - this allows the user to limit the number of records displayed to a maximum of the number specified, e.g.,
limit:5 would limit the number of records displayed to 5.
- operation: - this is only valid for the Change Log tab. It allows the user to filter data on the Change Log tab by operation; e.g.,
operation:eligibility retrieves only change log entries associated with eligibility checks.
- result: - this is only valid for the Change Log tab. It allows the user to filter the data on the Change Log tab by result; e.g.,
result:failure retrieves only change log entries with a result of failure.
- message: - this is only valid for the Change Log tab. It allows the user to filter the data on the Change Log tab by a substring of the message returned, e.g.,
message:changed would return any change log entries whose message contains the word changed.
- over: - this is only valid for the Change Log tab. It allows the user to filter the data on the Change Log tab by the time, in seconds, the API call associated with the action in the change log took to complete; e.g., over:30 returns any actions that took over 30 seconds to complete.
In addition to the tags described above, it is also possible to use the following operations by typing into the filter:
- and - used to indicate the statements on each side of the “and” must be true, e.g.,
credit:>=15 and overlap:>20 would return all records where students are enrolled in 15 or more credit hours and have more than 20 minutes of overlapping class time.
- or - used to indicate that one of the statements on each side of the “or” must be true, e.g.,
credit:<5 or credit:>18 would return records where students were either enrolled in less than 5 credit hours or more than 18 credit hours.
- () - used to group a set of “and” or “or” operations to create more complex queries, e.g., “(credit:<5 or credit:>18) and overlap:>10” would return records where students were enrolled in classes that overlapped for more than 10 minutes and were enrolled in either fewer than 5 credits or more than 18 credits.
- > - used with tags that take numbers. This will return records with a value greater than the number that follows, e.g.,
overlap:>5 would return all records where a student has enrolled in more than 5 minutes of overlapping classes.
- >= - used with tags that take numbers. This will return records with a value greater than or equal to the number that follows, e.g.,
overlap:>=5 would return all records where a student has enrolled in 5 or more minutes of overlapping classes.
- < - used with tags that take numbers. This will return records with a value less than the number that follows, e.g.,
credit:<5 would return all records where a student has enrolled in less than 5 credit hours.
- <= - used with tags that take numbers. This will return records with a value less than or equal to the number that follows, e.g.,
credit:<=5 would return all records where a student has enrolled 5 or fewer credit hours.
- .. - used with tags that take numbers. This allows the user to specify a range of values, e.g.,
credit:15..20 would return students enrolled in from 15 through 20 credit hours.
The user can repeat this process to add as many search criteria to the filter as desired. The user can also use the Filter drop-down to add additional search criteria. When the user is satisfied with their search criteria, they press the Search button to perform the search.
Using the Filter drop-down
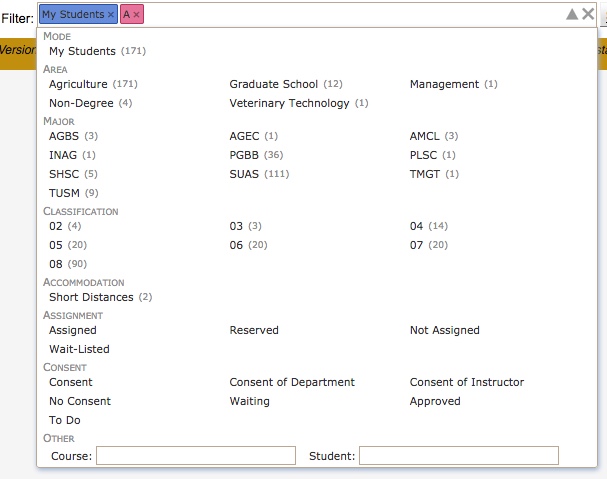
If the user is unsure of the search they need to use, they can use the drop-down within the filter to enter their search criteria. To access the drop-down within the filter, the user clicks the inverted triangle icon.triangle on the right-hand side of the filter box.

This causes the Filter Drop-Down to appear.
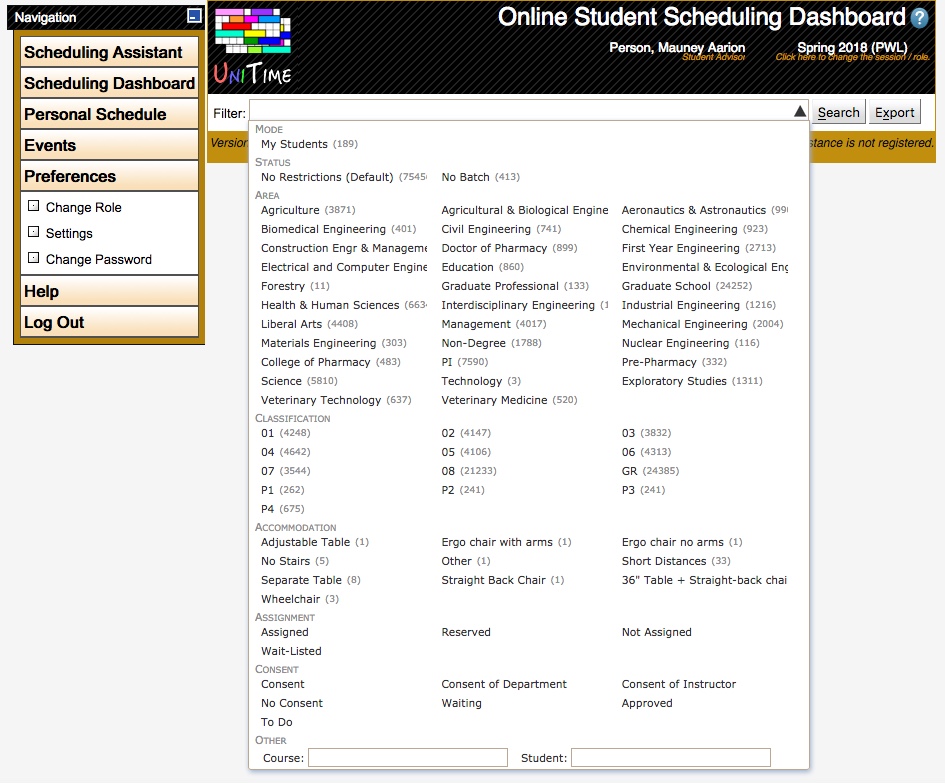
The filter drop-down lists the various pieces of data available to be used as search criteria for retrieving data within the Scheduling Dashboard. When known, next to each item that can be selected is a count of records that will be returned as a result of using that item as a search criterion in conjunction with the other items already selected in the search criteria.
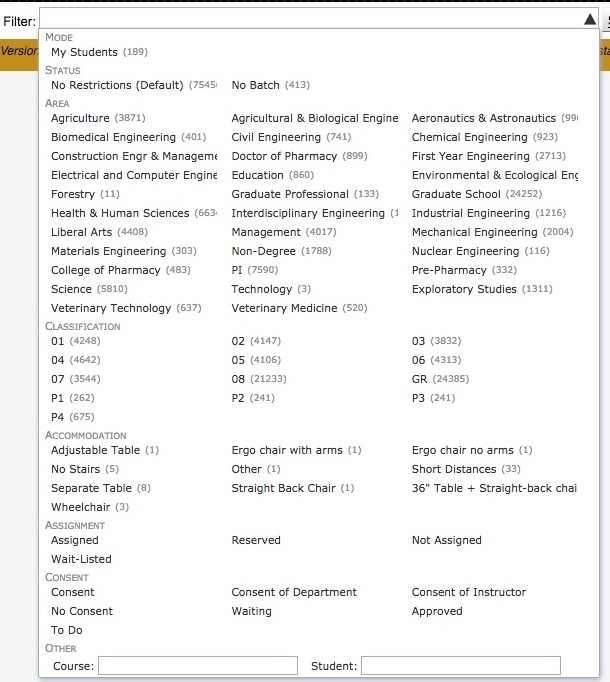
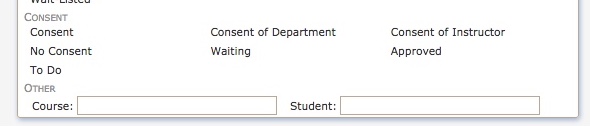
At the bottom of the filter is a text box for entering Course search criteria (e.g., COM 11400) and a text box for entering Student search criteria (e.g., John Doe).

To build a query, the user selects items from the Filter drop-down. As the user selects items in the Filter drop-down, the possible items to select within the drop-down change dynamically to reflect the restrictions placed on the search.
When the user is done building their search criteria, they click outside of the Filter Drop-Down or the triangle icon  to return to the Filter Box.
The user can then type in additional search criteria if they wish. When the user is satisfied with their search criteria, they press the “Search” button to perform the search.
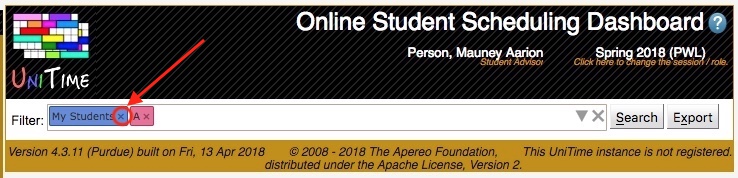
Clearing the Filter
The search criteria entered in the Filter can be cleared by either backspacing over the criteria or by pressing the x icon  on the right-hand side of the filter box.
In addition to backspacing over a search criterion item, it is also possible to remove a single search criterion item by clicking the x icon on the right side of the item.

Using the Student Scheduling Dashboard
The data retrieved by doing a search using the criteria entered in the Filter is available to the user in a set of tabs. Each tab provides a specific view into the data. The Enrollments tab shows the data organized by Course Offering. The Student tab shows the data organized by Student. The Change Log tab, which is not available to all users, shows the change log data associated with the information retrieved by the search criteria. The user can switch between the Enrollments tab, the Students tab, and the Change Log tab by clicking the desired tab name.
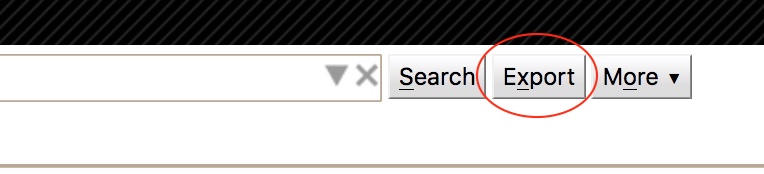
The data displayed on the selected tab of the Student Scheduling Dashboard may be exported in comma-separated format by pressing the Export to the right of the Filter.

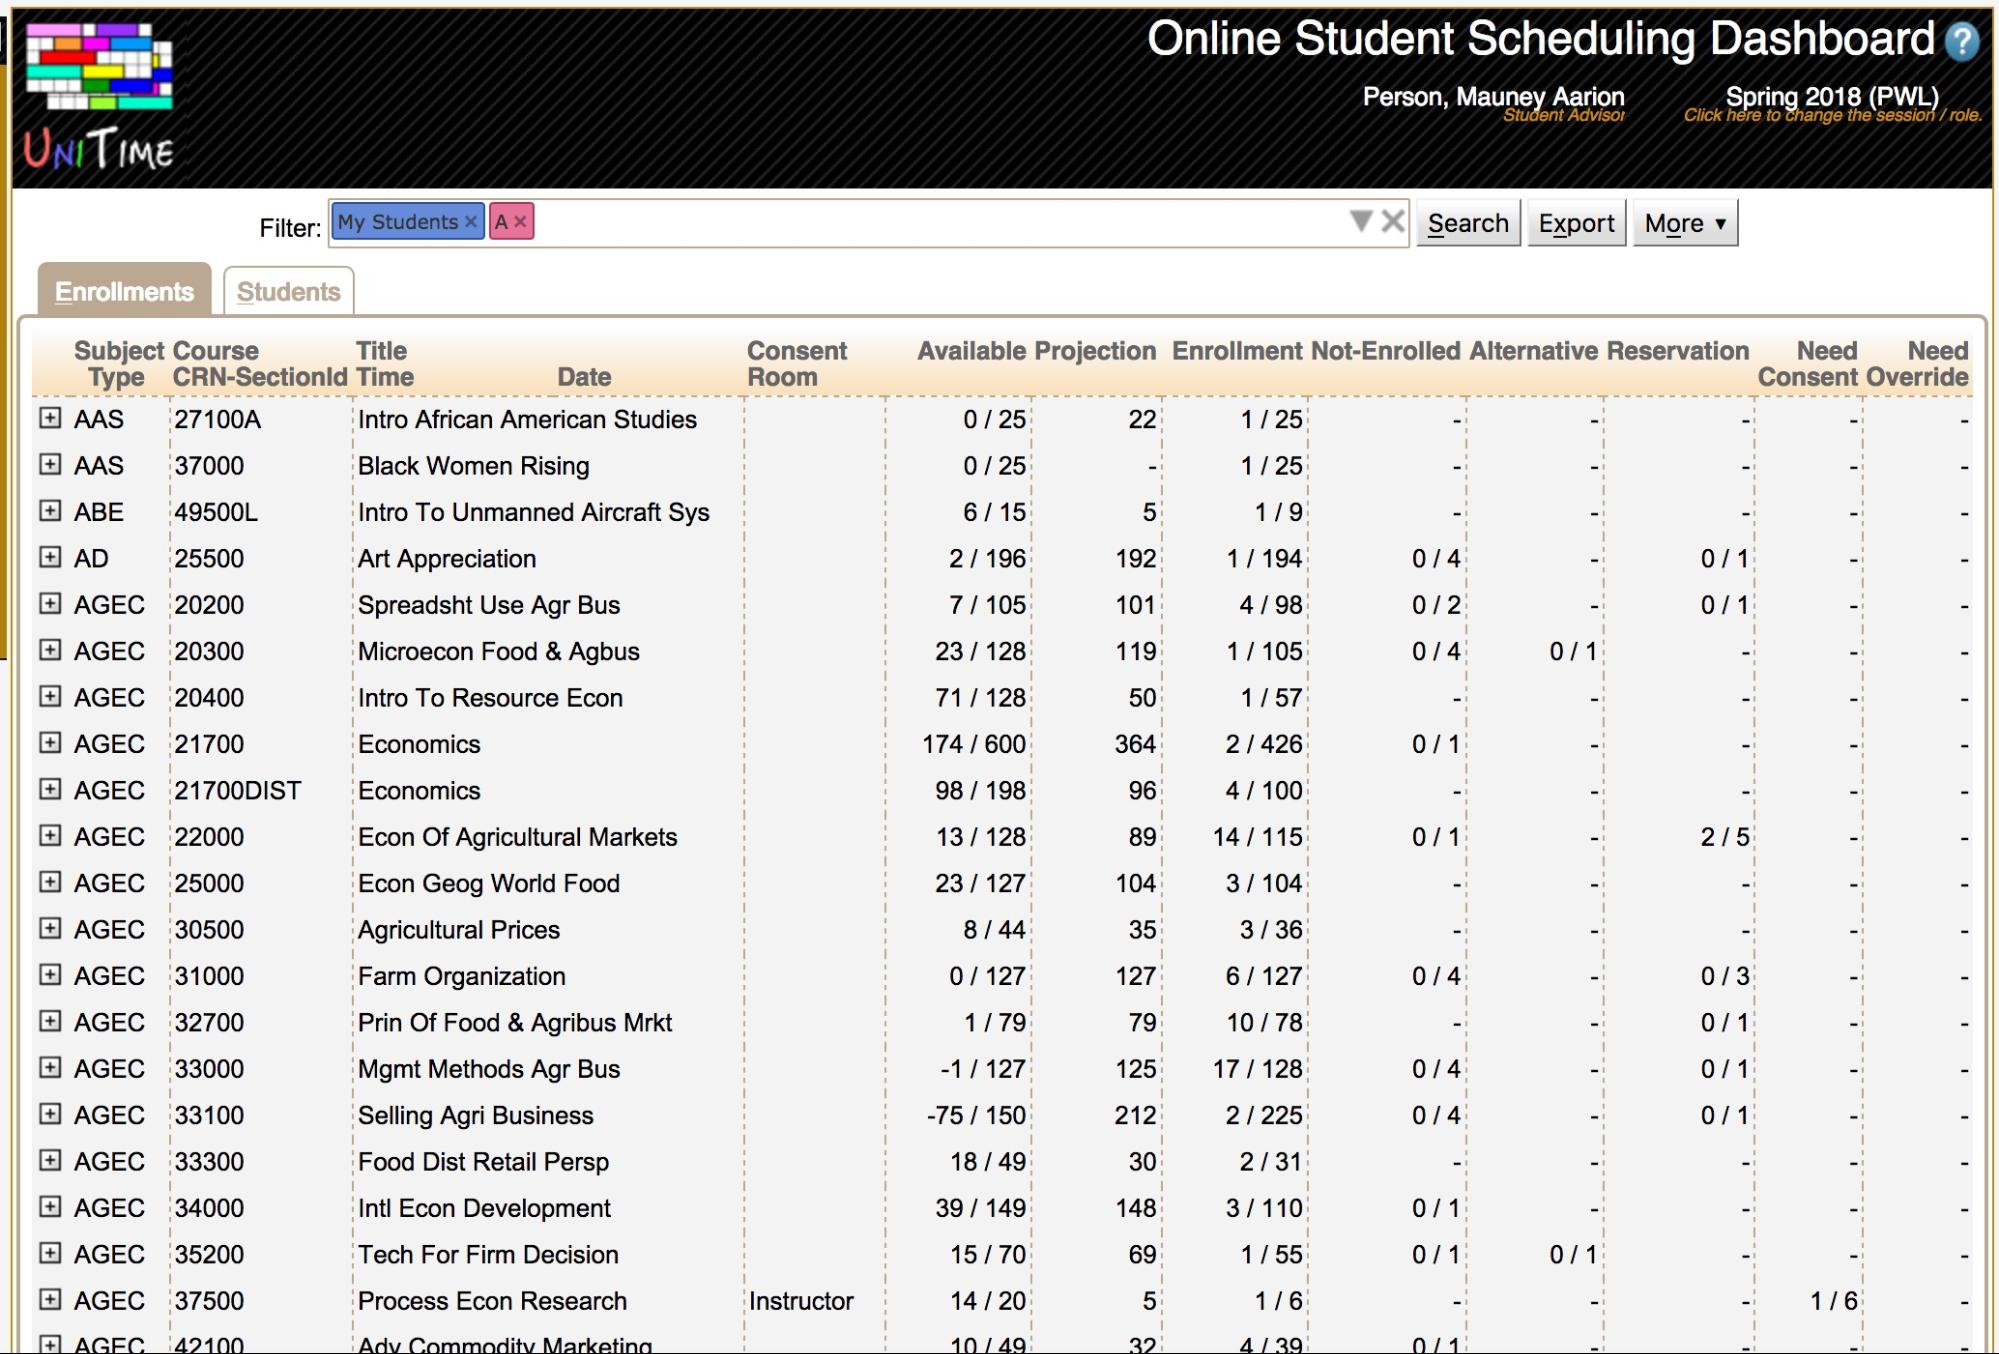
Using the Enrollments Tab
The Enrollments tab provides a course-centric view into the student scheduling data displayed in the Dashboard. This tab displays the data grouped by course.
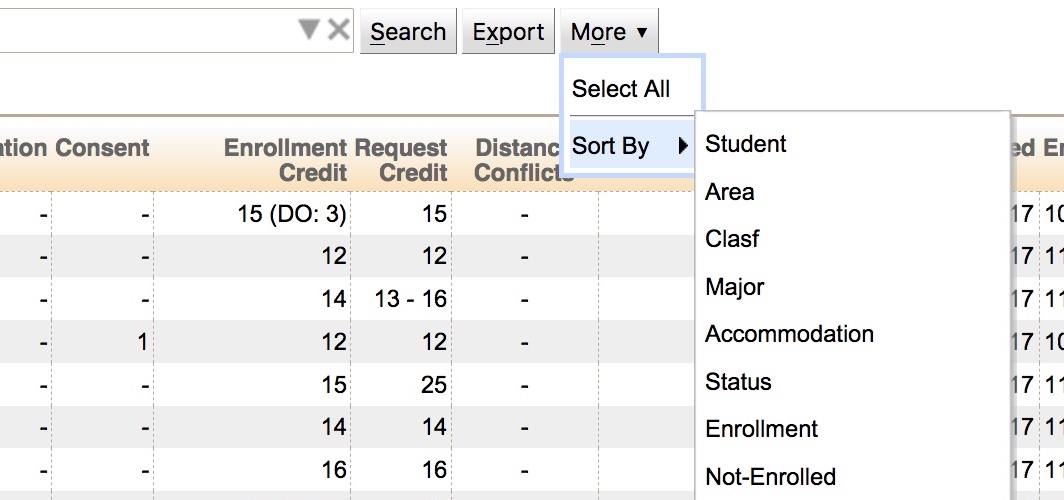
The data on the Enrollments tab can be sorted by any column listed in the table. To do this, click on the column label for the column and use the Sort by option. The first Sort on the column sorts the table by the data in ascending order. The second Sort on the column sorts the table by the data in descending order.
It is also possible to use the drop-down menu on the More button to select the column to sort under the Sort By option.
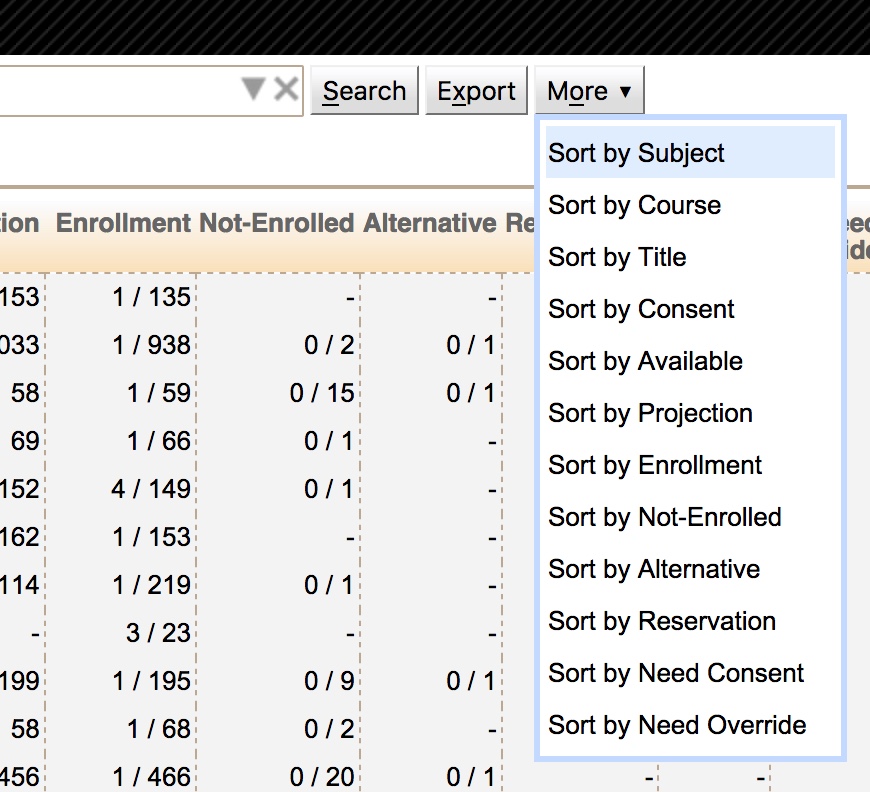
To show/hide a certain column, use the drop-down menu on the More button to select the column to sort under the Column option.

Suppose the user clicks on the plus icon  next to a course, it will expand the data displayed to include each class section that makes up the course.
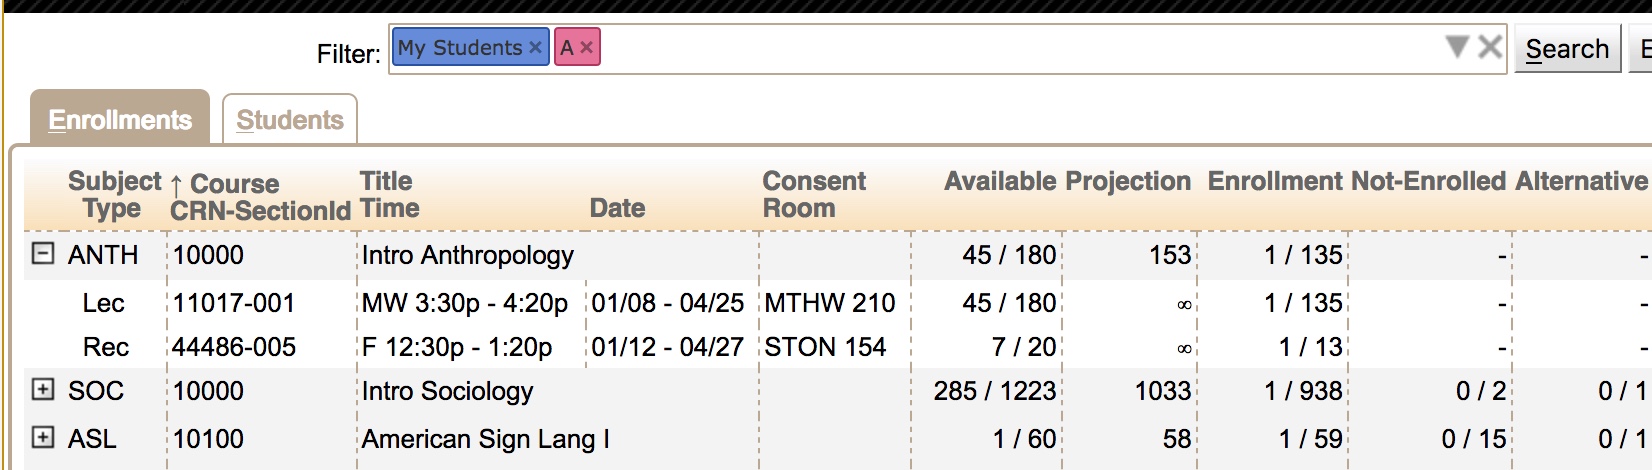
Once the class data is expanded, if the user clicks on the minus icon  next to a course, it will hide the class section data.
Interpreting the Data on the Enrollments Tab
The Enrollments tab was designed to display a large amount of data in a compact format. The following is a description of each data column displayed on the page:
- Subject - This label applies to the course level data displayed. This is the subject area abbreviation for the course displayed.
- Type - This label applies to the individual class sections listed under a course if the plus icon next to it has been clicked to show the class section data. If a class section is displayed, its instructional type will be listed in this column.
- Course - This label applies to the course level data displayed. This is the course number for the course displayed.
- CRN-SectionId - This label applies to the individual class sections listed under a course if the plus icon next to it has been clicked to show the class section data. If a class section is displayed, its CRN and Banner Section ID are listed in this column with a dash (-) separating the two values.
- Title - This label applies to the course level data displayed. This is the title for the course displayed.
- Time - This label applies to the individual class sections listed under a course if the plus icon next to it has been clicked to show the class section data. If a class section is displayed, its time statement is listed here.
- Date - This label applies to the individual class sections listed under a course if the plus icon next to it has been clicked to show the class section data. If a class section is displayed, the dates it is offered are listed here.
- Consent - This label applies to the course-level data displayed. If a course requires a student to obtain consent from the department or instructor, the type of consent required is listed here.
- Room - This label applies to the individual class sections listed under a course if the plus icon next to it has been clicked to show the class section data. If a class section is displayed and it is assigned to a room, the room is listed here.
- Available - This label applies to both the course and class level data. The column has two numbers separated by a slash (/). The first number is the total number of unused spaces in the course or class. The second number is the size limit for the course or class. For example, 5 / 25 would mean there are 5 available spaces in a class that holds 25 students.
- Projection - This label applies to both the course and class level data. The column lists the UniTime projected number of enrollments for a course or class.
- Enrollment - This label applies to both the course and class level data. When the search criteria used in the filter do not restrict the student population, then a single number, which is the total number of students enrolled in the course or class, is displayed. For example, if there are 20 students enrolled in a class, then the number 20 would be displayed. When the search criteria used in the Filter restricts the student population for the data displayed in this column, there will be two numbers separated by a slash (/). For example, if 3 of the students in the population retrieved by the search criteria in the Filter are enrolled in the class and in total there are 20 students enrolled in the class, then the number displayed would be 3 / 20.
- Not Enrolled - This label applies to both the course and class level data. When the search criteria used in the Filter does not restrict the student population, then a single number equal to the total number of students who have the course listed in their course request but are not enrolled in the course is displayed. For example, if there are 2 students who requested a course but did not receive it, then the number 2 would be displayed. When the search criteria used in the filter restricts the student population for the data displayed in this column, there will be two numbers separated by a slash (/). For example, if 1 of the students in the population retrieved by the search criteria in the Filter requested the course but did not receive it, and in total, there are 2 students who requested the course but did not receive it, then the number displayed would be 1 / 2.
- Alternative - This label applies to both the course and class level data. When the search criteria used in the filter do not restrict the student population, then a single number, which is the total number of students who have the course listed in their course request as an alternative, is displayed. For example, if there are 5 students who requested a course as an alternative, then the number 5 would be displayed. When the search criteria used in the filter restricts the student population for the data displayed, this column will have two numbers separated by a slash (/). For example, if 2 of the students in the population retrieved by the search criteria in the Filter requested the course as an alternative, and in total, there are 5 students who requested the course as an alternative, then the number displayed would be 2 / 5.
- Reservation - This label applies to both the course and class level data. When the search criteria used in the Filter does not restrict the student population, a single number equal to the total number of students who have been placed into the course or class as a result of a reservation is displayed. For example, if there were 3 students who were placed into a course as a result of a reservation, then the number 3 would be displayed. When the search criteria used in the filter restricts the student population for the data displayed in this column, it will be two numbers separated by a slash (/). For example, if 1 of the students in the population retrieved by the search criteria in the Filter was placed into a course as a result of a reservation, and in total, there are 3 students who were placed into a course as a result of a reservation, then the number displayed would be 1 / 3.
- Need Consent - This label applies to both the course and class level data. When the search criteria used in the filter do not restrict the student population, then a single number, which is the total number of students who required some form of consent to enroll in the course or class, is displayed. For example, if there were 4 students who required some form of consent to enroll in a course, then the number 4 would be displayed. When the search criteria used in the filter restricts the student population for the data displayed in this column, it will be two numbers separated by a slash (/). For example, if 2 of the students in the population retrieved by the search criteria in the Filter required some form of consent to enroll in a course, and in total, there are 4 students who required some form of consent to enroll in a course, then the number displayed would be 2 / 4.
- Need Override - This label applies to both the course and class level data. When the search criteria used in the filter do not restrict the student population, then a single number, which is the total number of students who require an override to enroll in the course or class, is displayed. For example, if there were 6 students who require an override to enroll in a course, then the number 6 would be displayed. When the search criteria used in the filter restricts the student population for the data displayed in this column, it will be two numbers separated by a slash (/). For example, if 2 of the students in the population retrieved by the search criteria in the Filter require an override to enroll in a course, and in total, there are 6 students who require an override to enroll in a course, then the number displayed would be 2 / 6.
Drilling Down into the Student Data in the Enrollments Tab
Depending on the permissions granted to a user by their user role, a user may be able to drill down deeper into the data displayed on the Enrollments tab.
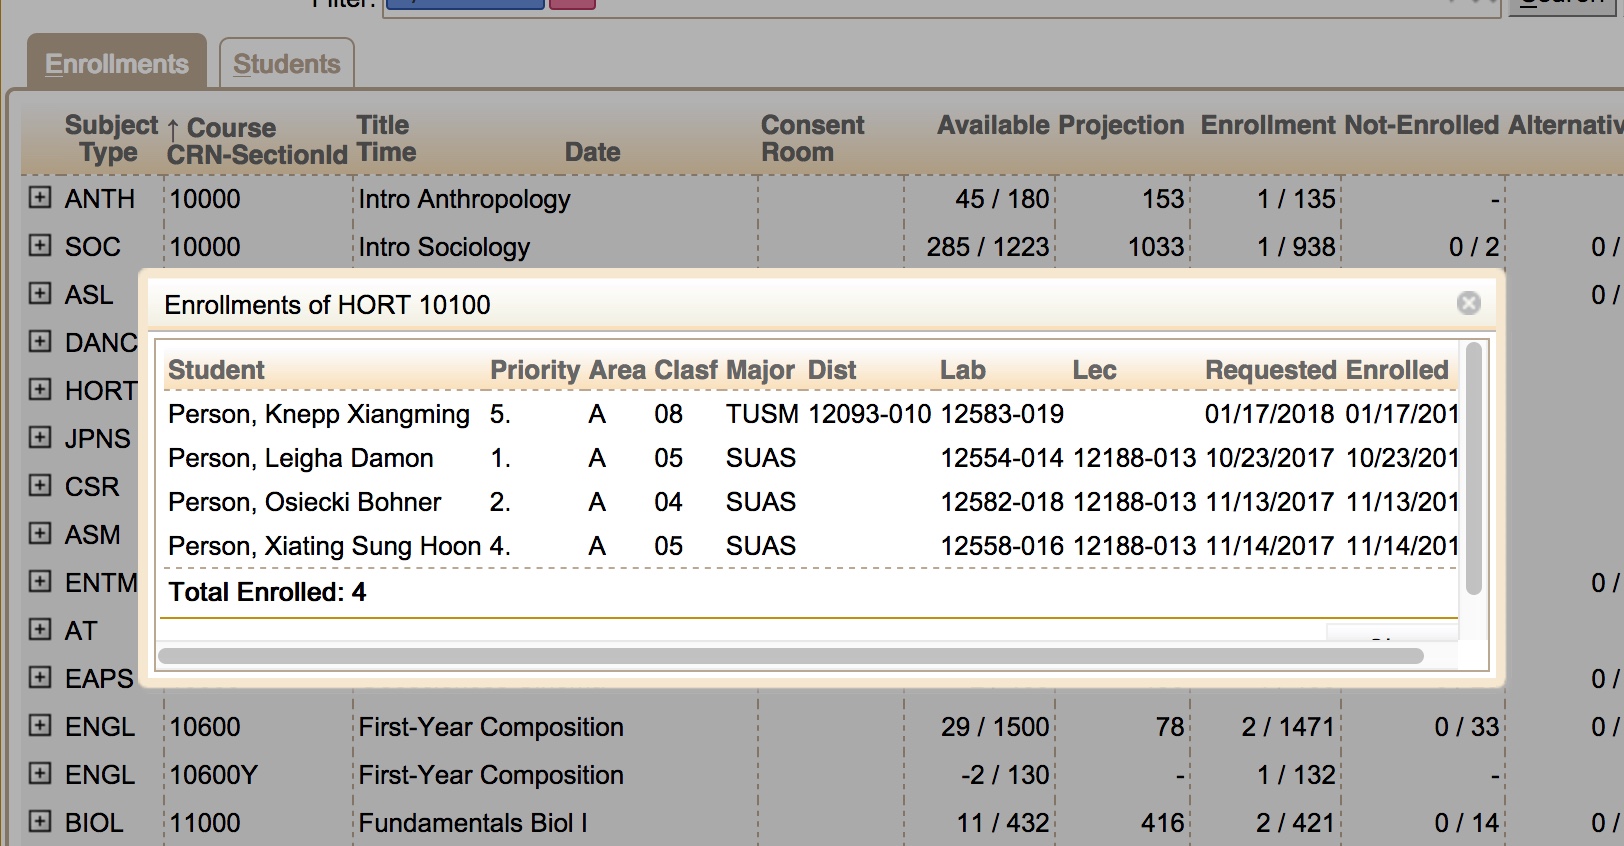
The Enrollments Pop-Up
When the user clicks on a course or class that is listed on the page, an Enrollments pop-up window listing the students retrieved by the search criteria in the Filter is displayed.
Note: This pop-up may not display all students enrolled in the course or class if the search criteria in the Filter has restricted the set of students returned.

The Enrollments pop-up lists the following basic information about the students enrolled in the course or class that meet the search criteria in the Filter.
- External Id - the student’s PUID (when allowed)
- Student - the name of the student
- Course (only when the course is cross-listed) - course for which the enrollments/requests are listed
- Priority - the priority the student listed the course in their course request.
- Alternative - if the course was provided as an alternative to some other course, this column lists the first-choice course for the student.
- Campus - the campus of the student
- Area - the college of the student
- Clasf - the classification of the student
- Degr - the degree of the student
- Program - the program of the student
- Major - the major of the student
- Conc - the major concentration of the student
- Minor - the minor of the student
- Accommodation - the accommodation(s) of the student
- Groups - student groups that the student is affiliated with (a column for each student group type that contains any students from the table).
- Lec, Lab, Rec, Dist, etc. - the instructional type of the section is the column label for the section the student is enrolled in. The data is the CRN-Section Id of the section the student is enrolled in.
- Priority - course request priority, such as LC, Vital, Critical, etc.
- Requested - the date the student added the course to their course request.
- Enrolled - the date the student was enrolled in the course or class.
- Advisor - the advisor(s) of the student
Note: The data in this pop-up can be sorted by clicking on any column label displayed.
Note: Columns that do not have relevant data may be omitted.
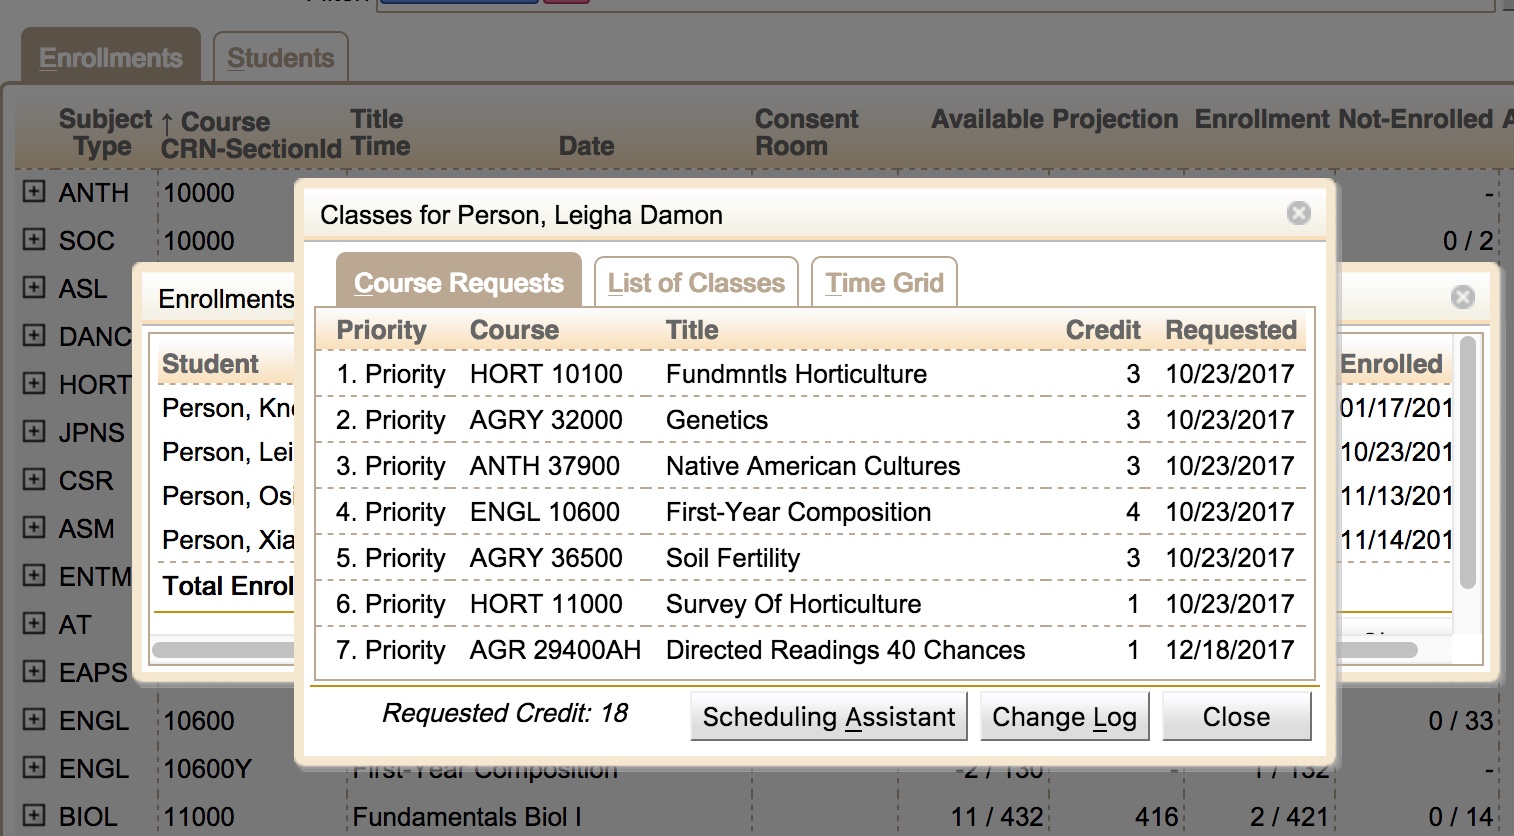
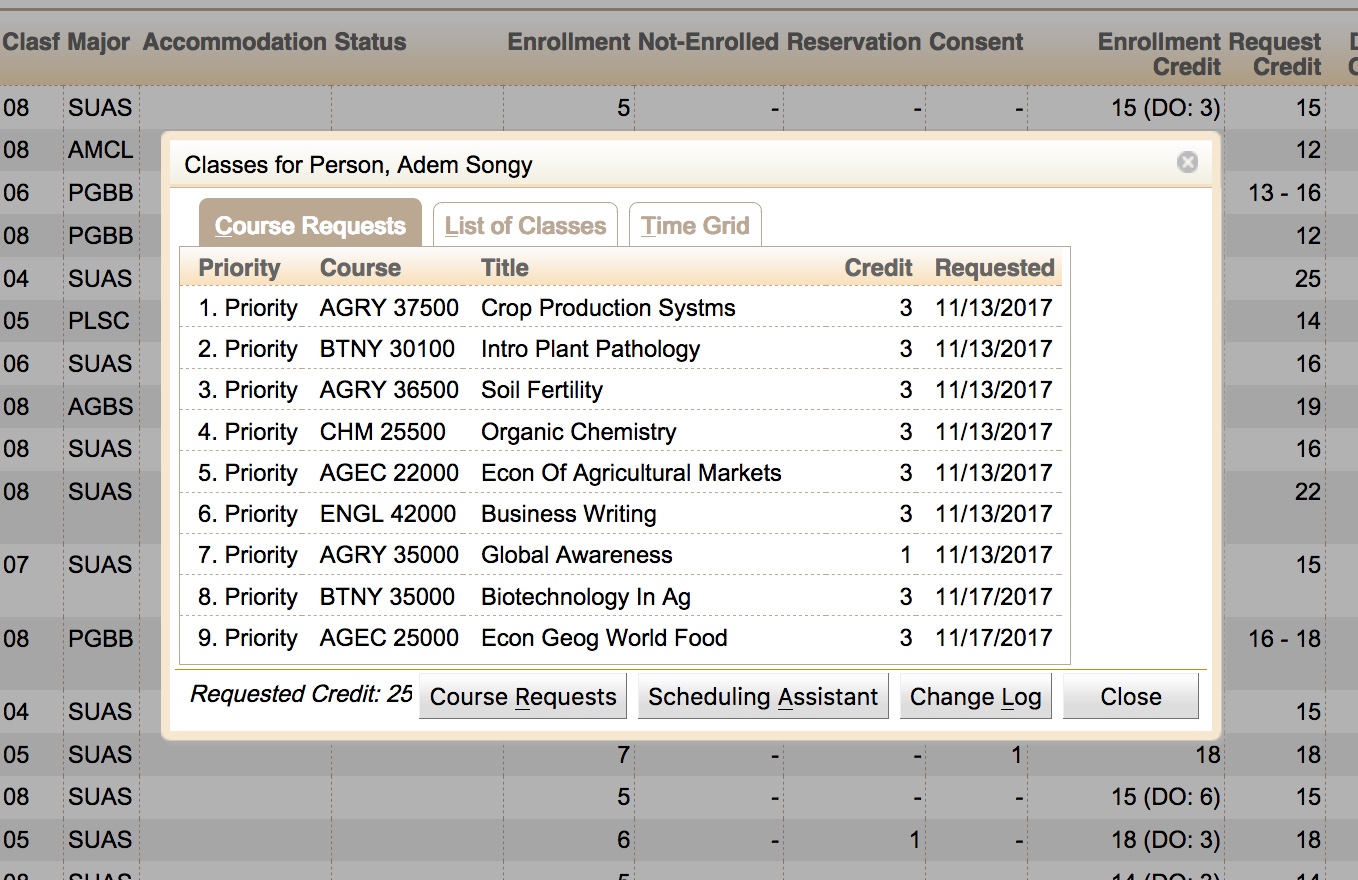
The Classes Pop-up
From the Enrollments pop-up, depending on the privileges granted in the user’s role, the user may be able to click on an individual student listed in the Student Detail pop-up and drill down to see the student’s course requests and/or schedule.

The Student Detail pop-up has multiple tabs and various buttons that may be displayed to a user depending on the permissions granted by their user role. The possible tabs and buttons that may be displayed are as follows:
- Advisor Recommendations - This tab lists the student’s advisor course recommendations when these exist
- Course Requests - This tab lists the student’s course requests with alternates in priority order.
- List of Classes - This tab displays the student’s course schedule in text format as the student would see it in the Scheduling Assistant.
- Time Grid - This tab displays the student’s course schedule in time grid format as the student would see it in the Scheduling Assistant.
- Approvals - Student’s approval requests during open registration.
- Wait-Listed Courses - Student’s wait-listed courses during wait-listing.
There are also the following buttons:
- Advisor Recommendations - If advising is enabled, opens the **Advisor Course Recommendations page for the student
- Course Requests - If the student has a student status that allows the use of the Student Course Requests page and the user’s role has the permission to view the Student Course Requests page as the student, then this button will be visible to the user.
- Scheduling Assistant - If the student has a student status that allows the use of the Student Scheduling Assistant page and the user’s role has the permission to view the Student Scheduling Assistant page as the student, then this button will be visible to the user.
- Change Log - If the user’s role allows the user to view the student scheduling change log for the student, then this button will be visible to the user.
- Registration Workflow - Opens the Registration Workflow showing the current approval requests for the student.
- Close - This button closes the pop-up.
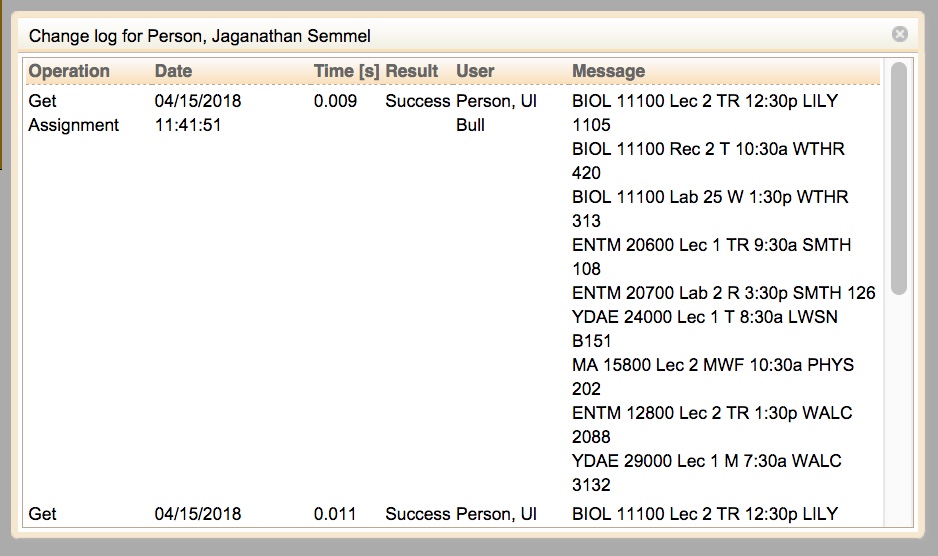
The Change Log Pop-up
From the Student Detail pop-up, depending on the privileges granted in the user’s role, the user may be able to click the Change Log button in the Student Detail pop-up and drill down to see the change log associated with a student’s course requests and/or schedule.

The Change Log pop-up lists the following information about the changes associated with a student:
- Operation - The operation used to make the change.
- Date - The date and time the change was made.
- Time - If the operation was timed, the amount of time it took to complete the operation.
- Result - An indicator of whether an operation was successful or not.
- User - The user who performed the operation.
- Message - A message associated with the operation that was performed.
Note: The data in this pop-up can be sorted by clicking on any column label displayed.
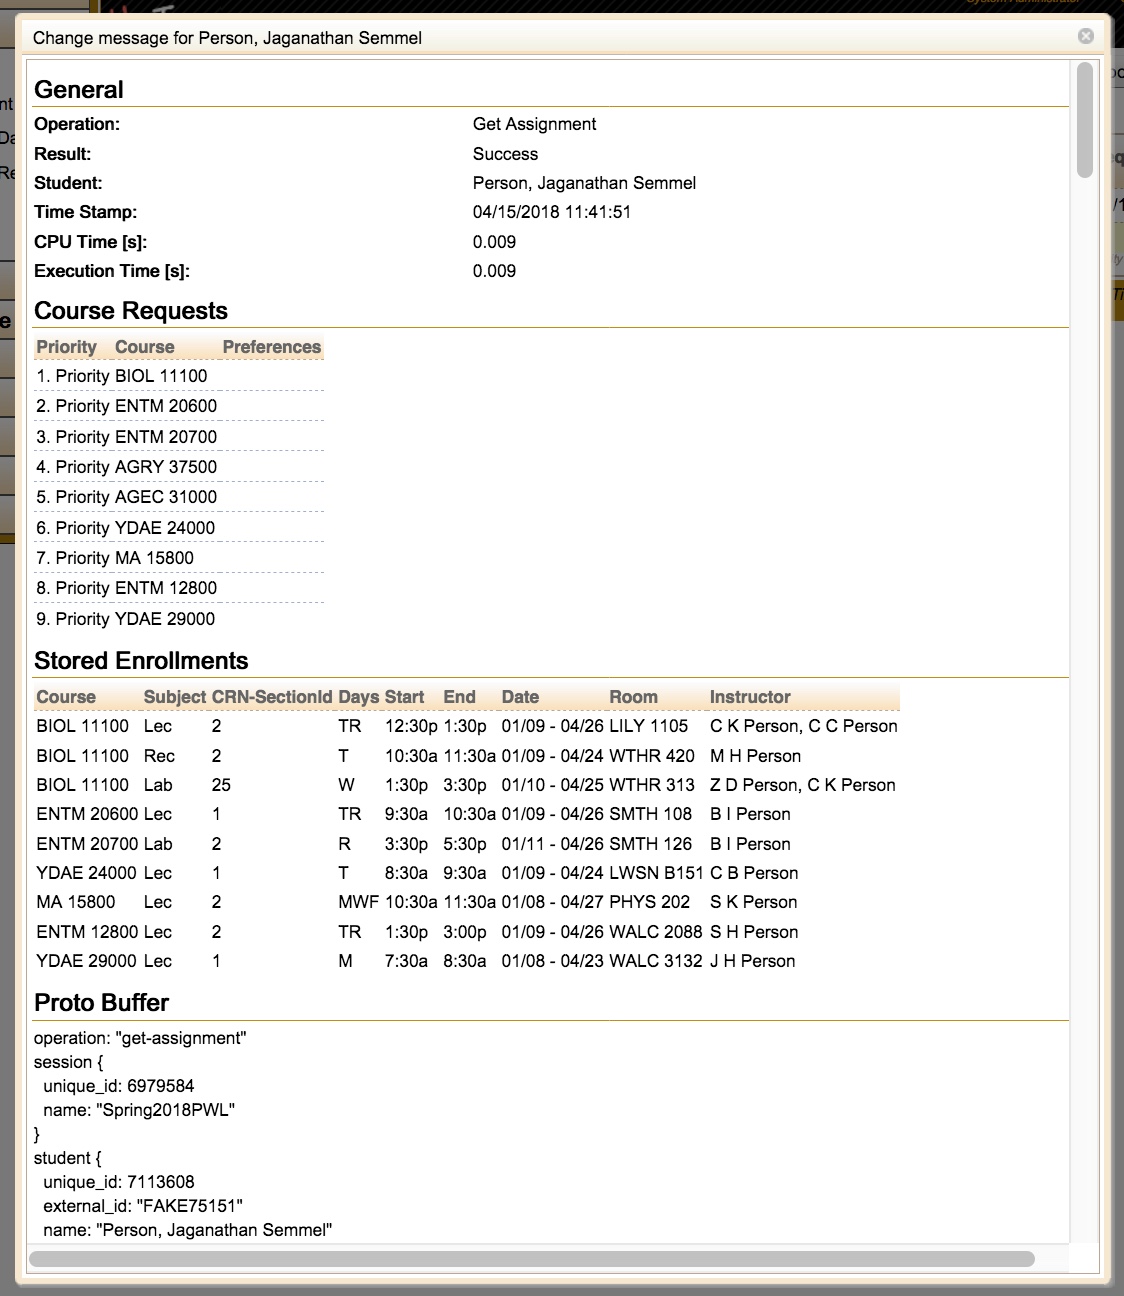
To get more detailed information about a change, the user can click on the change, which will bring up the Change Message pop-up.

The data displayed on the Change Message pop-up for a change log entry will vary based on the change that occurred. If the change log entry is associated with a student’s schedule, the entry will contain detailed information about the schedule before and after any changes were made. The change log entry will also contain the JSON Proto Buffer of the message used to make the change.
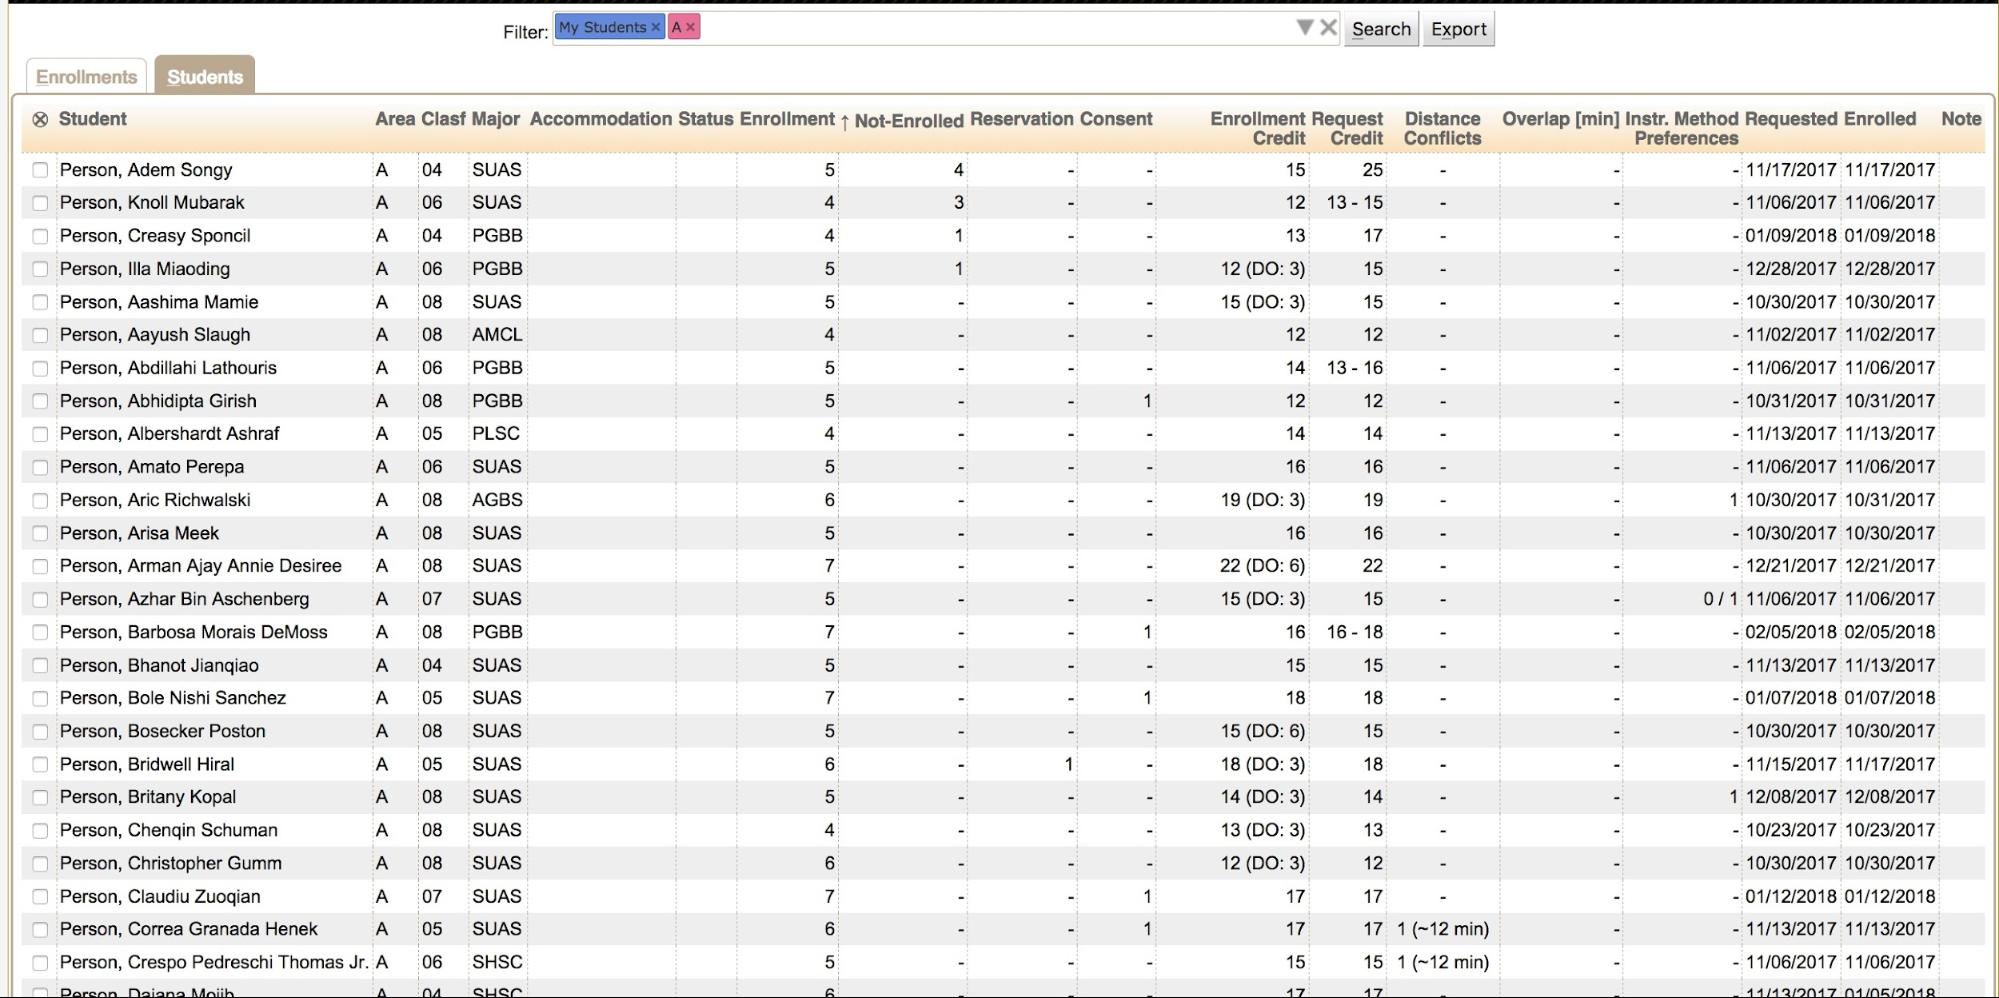
Using the Students Tab
The Students tab provides a course-centric view into the student scheduling data displayed in the Dashboard. This tab displays the data grouped by student. In addition, depending on the permissions granted to the user by their user role, it allows the user to perform actions on selected students listed in the Dashboard.

The data on the Students table can be sorted by any column listed on the table. To do this, click on the column label for the column and use the Sort by option. The first Sort on the column sorts the table by the data in ascending order. The second Sort on the column sorts the table by the data in descending order.
It is also possible to use the drop-down menu on the More button to select the column to sort under the Sort By option.

To show/hide a certain column, use the drop-down menu on the More button to select the column to sort under the Column option.

Interpreting the Data on the Students Tab
The Students tab was designed to display a large amount of data in a compact format. The following is a description of each data column displayed on the page:
Note: Some columns need not be displayed in the table if they are not applicable to the current situation.
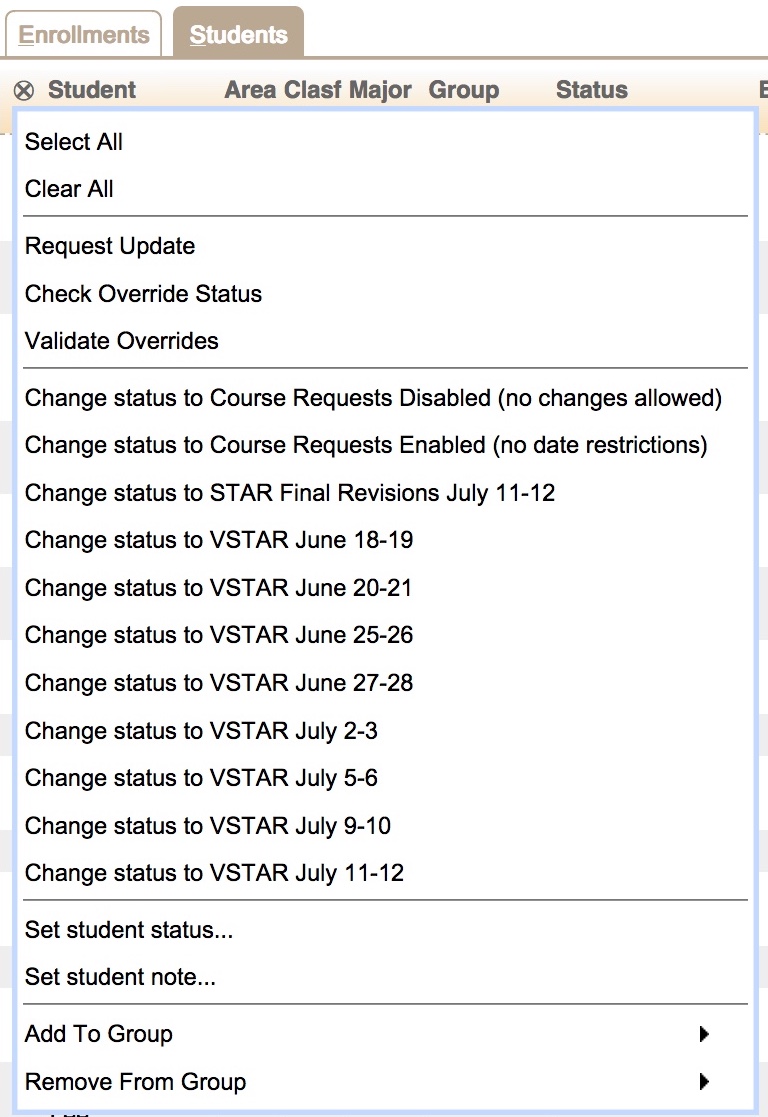
- ⊗ - This column contains a check box for each student that the user can perform an action on. Clicking the ⊗ label after students have been selected brings up a list of actions the user can perform. Once one or more students are selected, the actions are also available under the More button.
- Click on this column header to open a menu with possible actions (most actions are available only when at least one checkbox in this column is checked for some student)
- Select All
- Select all students in the list (check all the checkboxes)
- Clear All
- Send email…
- Send email to the selected students via Send email… screen that will pop up
- Change Status to Status
- Set student status…
- Change student status using the Set student status… dialog, which provides additional information about the selected Status.
- Set student note…
- External Id - The PUID of the student (when allowed)
- Student - The name of the student
- Campus - The campus of the student
- Area - The college of the student
- Clasf - The classification of the student
- Degr - The degree of the student
- Program - The program of the student
- Major - The major of the student
- Conc - The major concentration of the student
- Minor - The minor of the student
- Accommodation - If a student requires an accommodation that affects their course schedule, then the code for the accommodation is displayed in this column. This column is only visible if there is at least one student in the data returned by the search criteria in the filter that requires an accommodation.
- Groups - student groups that the student is affiliated with (a column for each student group type that contains any students from the table).
- Status - If the student has a student scheduling status that has been set to a value other than the session default, then the value is displayed in this column.
- PIN - student’s PIN if the student has their PIN released (using the Advisor Course Recommendations page).
- Enrollment - The number of courses the student is enrolled in. This column is only visible if there is at least one student in the data returned by the search criteria in the filter who has an enrollment
- Not-Enrolled - The number of courses the student has requested but is not enrolled in. This column is only visible if there is at least one student in the data returned by the search criteria in the filter who has at least one course request that the student is not enrolled in.
- Reservation - The number of reservations provided to a student to place the student into a particular course or class. This column is only visible if there is at least one student in the data returned by the search criteria in the filter that required a reservation.
- Consent - The number of courses the student is enrolled in that require some form of consent for the student to enroll in the course. This column is only visible if there is at least one student in the data returned by the search criteria in the filter that requires consent.
- Pending Overrides - The number of pending override requests that the student has. This column is only visible if there is at least one student in the data returned by the search criteria in the filter that has a pending override.
- Enrollment Credit - This column displays the total number of credits in which a student is enrolled. If the student is enrolled in a configuration of a course that is online (DO) or hybrid (B/H), then the total credit of courses labeled online or hybrid will be broken out inside of parentheses. This column is only visible if there is at least one student in the data returned by the search criteria in the filter who is enrolled in a course.
- Request Credit - This column displays the range of credits that may be generated by a student’s course request. This column is only visible if there is at least one student in the data returned by the search criteria in the filter that has saved course requests.
- Distance Conflicts - This column displays the number of distance conflicts a student has, and next to it in parentheses, the number of minutes of the longest distance conflict. This column is only visible if there is at least one student in the data returned by the search criteria in the filter who has a distance conflict.
- Overlap [min] - This column displays the number of minutes of overlapping classes a student has. This column is only visible if there is at least one student in the data returned by the search criteria in the filter that has overlapping classes.
- Free Time [min] - This column displays the number of minutes that the student is in class during a window of time the student has requested as Free Time. This column is only visible if there is at least one student in the data returned by the search criteria in the filter that has a class overlapping their Free Time request.
- Instr. Method Preferences - This column displays the number of instructional method preferences a student listed in their course request. If the student is not enrolled in any courses or has not received all of their instructional method preferences, the number of instructional method preferences is displayed. If the student is enrolled in courses and is not enrolled in a class that matches their instructional method preferences, then the number displayed will be the number of instructional method preferences the student had that were met, followed by a slash (/) and the number of instructional method preferences the student requested, e.g., 1 / 2. This column is only visible if there is at least one student in the data returned by the search criteria in the filter who has an instructional method preference.
- Section Preferences - This column displays the number of class section preferences a student listed in their course request. If the student is not enrolled in any courses or has not received all of their class section preferences, the number of class section preferences is displayed. If the student is enrolled in courses and is not enrolled in a class that matches their class section preferences, then the number displayed will be the number of class section preferences the student had that were met, followed by a slash (/) and the number of class section preferences the student requested, e.g., 0 / 1. This column is only visible if there is at least one student in the data returned by the search criteria in the filter that has a class section preference.
- Requested - The last date the student added a course to their course request.
- Enrolled - The last date the student enrolled in a course.
- Advisor - This column displays the advisor or advisors that the student has assigned. This column is only visible if there is at least one student in the data returned by the search criteria in the filter who has an advisor.
- Advised Credit
- For the students who have been advised, this column displays the credit number provided by the advisor (the Total Priority Credit Hours from the Advisor Course Recommendations page), but the color indication shows how the recommendations are followed.
- So, the student can have a similar number of credits requested, but when he/she puts different courses in the color, it will go from green to orange to red based on the percentage we no longer show.
- More details are available on mouse-over and when the student line is clicked.
- This column is only visible if there is at least one student in the data returned by the search criteria in the filter who has been advised.
- Missing Courses
- This column displays the number of courses the student did not place on their Student Course Requests page that the advisor recommended.
- Missing critical courses are marked in red (with critical or cr next to the number in superscript), other missing primary courses are listed after the number. There is also a mouse-over that will explain the numbers, together with listing the key changes.
- The Missing Courses will sort by the critical numbers first, and other missing primary courses second.
- This column is only visible if there is at least one student in the data returned by the search criteria in the filter who has been advised.
- Not-Enrolled Courses
- This column lists the number of courses that the advisor recommended and the student put on the Course Requests form; however, the student is not enrolled in the course (or any of the advisor-provided alternatives).
- The number of not-enrolled critical courses is highlighted the same way as in the Missing Courses column (in red with cr superscript). The courses are listed on the mouse-over.
- This column is only visible if there is at least one student in the data returned by the search criteria in the filter who has been advised.
- Note - If someone has placed a note on the student, this column displays the Note.
- Emailed - Information about emails sent to the student
Drilling Down into the Student Data in the Students Tab
Depending on the permissions granted to a user by their user role, a user may be able to drill down deeper into the course data for a student. The user may be able to click on an individual student listed on the Students tab and drill down to see the student’s course requests and/or schedule.
This is the same Student Detail pop-up that can be reached from Drilling Down into the Student Data in the Enrollments Tab.
Depending on the permissions granted to a user by their user role, a user may be able to take an action on a select student or set of students.
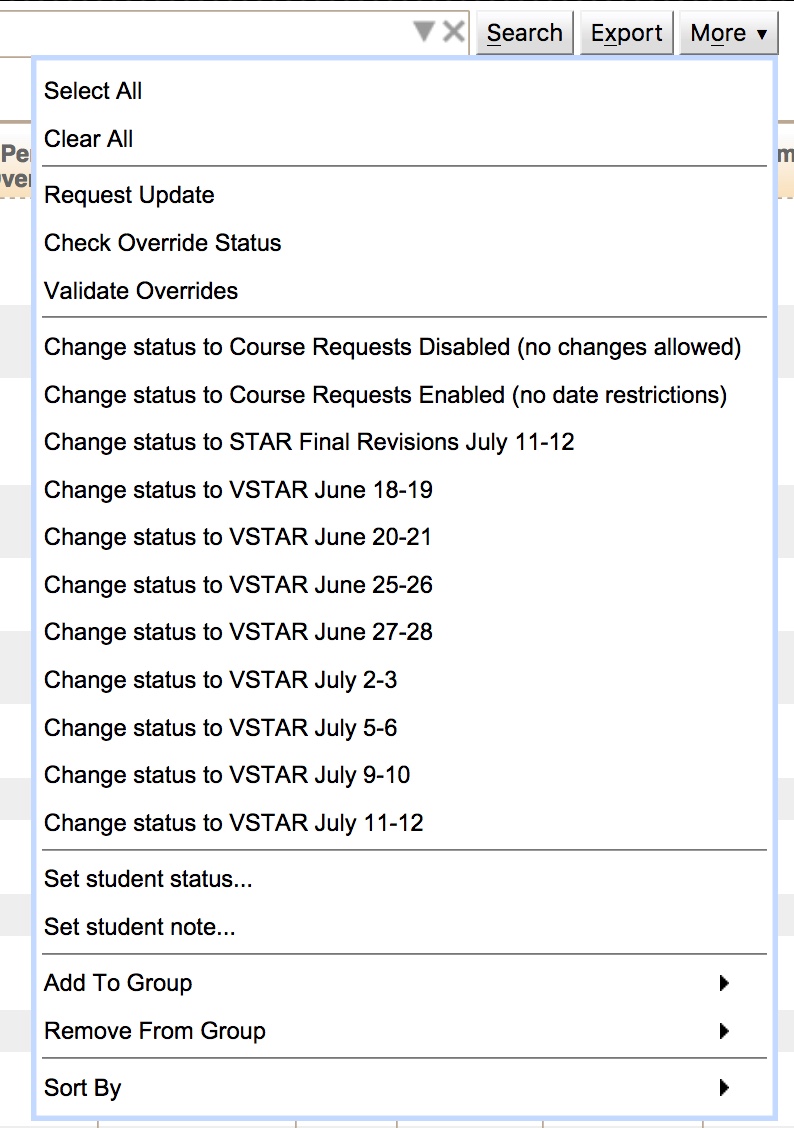
In order to see the actions available to take on a student, the user can select the checkbox in the leftmost column next to the student’s name and then click the ⊗ icon at the top of the column of checkboxes, or use the More button. This will bring up a menu that lists the actions the user can take.
Another option to see the actions available to take on a student is to select the checkbox next to the student’s name and then click the “More” button on the right-hand side of the Filter at the top of the page. This will also bring up the menu that lists the actions the user can take.
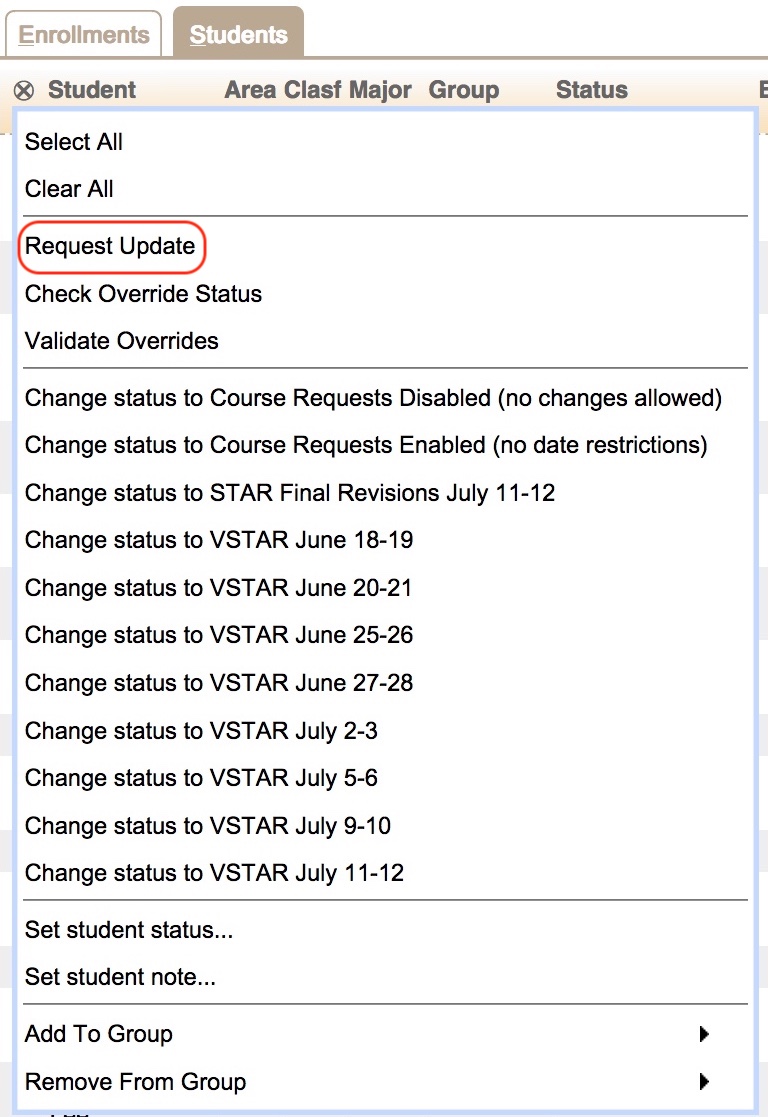
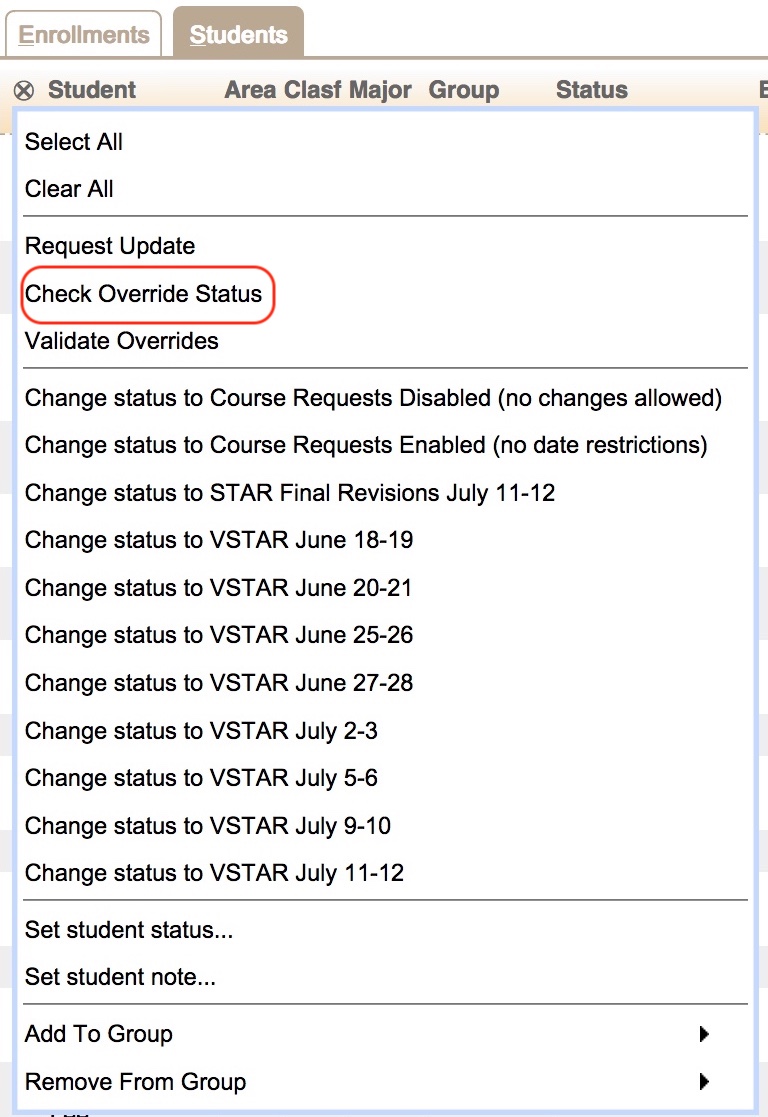
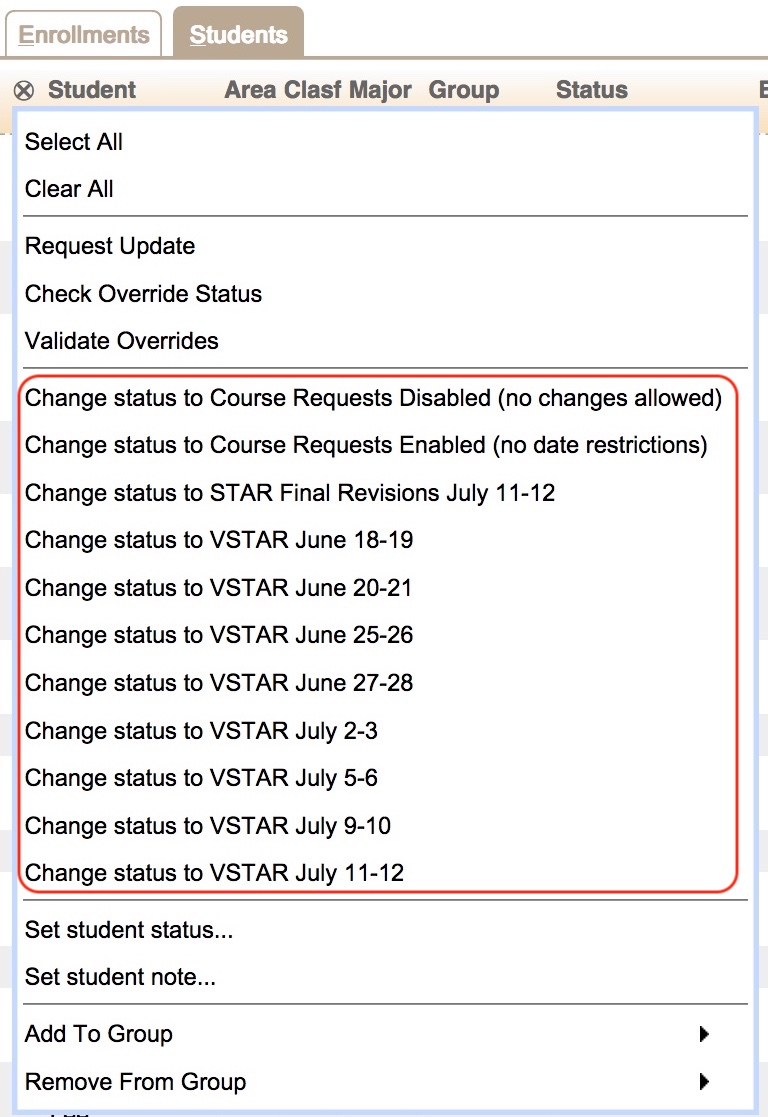
There are eight basic actions that can be performed from the Students tab. They are as follows:
- Send Email
- Request Update
- Check Override Status
- Validate Overrides
- Change Student Scheduling Status
- Set Student Note
- Release/Suppress PIN
- Add/Remove Student to/from a Student Group
Note: The actions available to a user depend on the permissions granted to the user by their user role.
Send Email
Selecting the Send Email action allows a user to send email to the selected student(s).
- The
%session% in the Subject line will get automatically replaced with the current academic session.\
- An additional email address can be placed in the CC.
- Besides the Message, an email may include a table with Advisor Recommendations, student Course Requests, or the current student’s Class Schedule.
- There is also a Purdue-specific option to send the email via BoilerConnect.
Request Update
Selecting the Request Update action allows a user to send a message to Banner requesting that an update message be sent from Banner to UniTime containing the data for the selected students.
The update message may take a few seconds to be received and responded to by Banner. The next time the user presses the search button after the message and its response have been processed, the data displayed to the user should contain the latest information about the student from Banner.
Check Override Status
Selecting the Check Override Status action triggers UniTime to send a message to the Registration Workflow system for each known override request of the selected students, requesting the current Status of the override request.
Validate Overrides
Selecting the Validate Overrides action triggers UniTime to send a message to the Registration Workflow system for each of the selected students that revalidates whether the course request or overrides are still needed.
Change Student Scheduling Status
Three options are available for setting the Scheduling Status of the student or set of students that have been selected.
The first option is to select the Change Status to … option that corresponds with the Status that the user wishes to set on the students.
The second option is to select the Set student status … option.
This will open the Set student status… dialog. The Set student status… dialog provides more detailed information about each Status available when the user selects the Status in the Status drop-down.
The Set student status… dialog provides the following information about each status:
- Permissions
- The first shows the permissions for the Student Course Requests page, the second line for the Student Scheduling Assistant
- Can Open: The page can be opened (master switch)
- Student: The student can make changes
- Advisor: An advisor can make changes
- Admin: An administrator can make changes
- Course Wait-List
- Wait-listing is enabled for the student.
- Allow No-Subs
- The student can indicate that the course cannot have any substitutes (when there are courses listed in the Substitute Course Requests table)
- Typically, either Course Wait-List or Allow No-Subs are used, but not both at the same time
- Emain Notification
- Email notifications are enabled
- Enabled Notifications
- Lists the notification types enabled
- Course Request Validation
- Enables the course request validation, when the custom course request validation is configured (i.e., the ability to check for registration errors and request overrides during pre-registration)
- Registration Workflow
- Enables the registration workflow, when the custom approval workflow is configured (i.e., the ability request overrides and other approvals during open registration)
- Require Sections / Instr. Methods
- The student is allowed to require (not only prefer) individual sections and instructional methods
- Personal Schedule
- Re-Scheduling
- The re-scheduling is enabled
- That is for courses that allow for re-scheduling or wait-listing, automatically re-schedule students with a problem after a course change (while it is unlocked)
- For example, if a class is cancelled the students in the cancelled class will automatically moved to an alternative class (of the same course) or dropped when there is no alternative class that fits their schedule. If wait-listing is enabled, the student is automatically put on a wait-list for the course in this case.
- Effective Period
- Effective period for this status, when set
- Fallback Status
- Student status that the selected status will fall back to outside the Effective Period
- Message
The Set Status button in the bottom right-hand corner of the dialog is used to update the selected students with the selected Status. The Close button in the bottom right-hand corner of the dialog exits the dialog without making any changes to the selected students.
The third option is to set the Status at the same time a note is added to the student or group of students. This is described later in this document under the Set a Note on a Student section.
Set Student Note
Clicking the Set student note… action brings up a dialog where the user can add or edit a note that is displayed in the Scheduling Dashboard for the selected students. The dialog also allows the user to set the Scheduling Status for the selected students.
The Set student note… dialog provides a text box for the user to enter or edit a note that will be displayed for the selected students on the Scheduling Dashboard. If the user does not select a Status (a Status of `-’) and clicks the Set Note button, then the Note will be stored, and no changes will be made to the scheduling statuses of the selected students. If the user selects the Close button, no changes will be made.
If the user selects a Status, the dialog will show the same information about the selected Status as is shown in the Set student status… dialog. If the user clicks the Set Note button with a Status selected, the Note and the Scheduling Status for the selected students will be updated. If the user clicks the Close button, then no changes will be made.

Release/Suppress PIN
The Release or Suppress PIN option gives the user the ability to release or suppress PIN for all the selected students, respectively. This is the same as checking (or un-checking) the PIN on the Advisor Course Recommendations page for all the selected students.
For students with their PIN released, you can see their PIN in the PIN column. If the PIN column does not show because originally there was no student with a PIN released shown on the page, you can click Search to refresh the page.
Add/Remove Student to/from a Student Group
The user can click on either the Add To Group or Remove From Group action to add the selected students to a Student Group or remove the selected students from a Student Group.
Note: A user can only add or remove students from a Student Group if the user has permission to take that action on the selected students.
Clicking the Add To Group or the Remove From Group actions brings up a list of groups available to the user to assign to the student. Clicking a Group makes the change.
Using the Change Log Tab
The Change Log tab provides users with an administrative role the ability to view the change log for the student scheduling data displayed in the Dashboard. This tab displays the data grouped by change.
The data on the Change Log table can be sorted by any column listed on the table. To do this, click on the column label for the column and use the Sort by option. The first Sort on the column sorts the table by the data in ascending order. The second Sort on the column sorts the table by the data in descending order.
It is also possible to use the drop-down menu on the More button to select the column to sort under the Sort By option.
To show/hide a certain column, use the drop-down menu on the More button to select the column to sort under the Column option.
Interpreting the Data on the Change Log Tab
The Change Log table was designed to display a large amount of data in a compact format. The following is a description of each data column displayed on the page:

- External Id - the student’s PUID (when allowed)
- Student - The name of the student associated with the change.
- Operation - The operation used to make the change.
- Date - The date and time the change was made.
- Time - If the operation was timed, the amount of time it took to complete the operation.
- Result - An indicator of whether an operation was successful or not.
- User - The user who performed the operation.
- Message - A message associated with the operation that was performed.
Drilling Down into the Change Log Data in the Change Log Tab
A user can drill down deeper into the change log data for a student. The user can click on an individual student listed on the Change Log tab and drill down to see the detailed information for the change listed. Clicking on a change brings up the Change Message pop-up.
The data displayed on the Change Message pop-up for a change log entry will vary based on the change that occurred. If the change log entry is associated with a student’s schedule, the entry will contain detailed information about the schedule before and after any changes were made. The change log entry will also contain the JSON Proto Buffer of the message used to make the change.
User Roles and the Student Scheduling Dashboard
The documentation above mentions many times that the data and actions available to a user are governed by the user role used to access the Student Scheduling Dashboard. The roles covered are as follows:
- Administrative Roles
- Student Advisor
- Department Schedule Manager
- Instructor
- View All
The goal of this section is to provide some guidance on what data and actions should be available for the various roles listed above.
Administrative Roles
Users who access the Student Scheduling Dashboard with one of the various Administrative roles defined in the system have access to all data and functionality available within the Dashboard.
Student Advisor
Users who access the Student Scheduling Dashboard with the Student Advisor role will have access to the Enrollments and Students tabs. Users with the Student Advisor role can see data for all students. They have the ability in the filter to restrict the data to “My Students”. The Student Advisor role users will be able to drill down into the data on both of these tabs and can perform a subset of the actions available. They can set the scheduling status for a student to any scheduling status that has been marked as usable by advisors. If no scheduling statuses of this type are available, then Student Advisors cannot change a student’s scheduling status. Student Advisors can add or remove their students from any student group that is of a type that is manageable by advisors. If no student groups of this type exist, then functionality to Add or Remove Student Groups is not available. Student Advisors can see the change log for individual students.
Department Schedule Manager
Users who access the Student Scheduling Dashboard with the Department Schedule Manager role will have access to the Enrollments and Students tabs. Users with the Department Schedule Manager role can only see data for the courses in the subject areas they manage and for the students enrolled in those courses. The Department Schedule Manager role users are able to drill down into the data on both of these tabs, but cannot perform any actions on the students.
Instructor
Users who access the Student Scheduling Dashboard with the Instructor role will be able to see the Enrollments and Students tabs of the Dashboard, but may not see any data unless they are listed on a course as a coordinator at the offering level. If the user is listed on a course as a coordinator at the offering level, then they can only view data for that course. Users with the Instructor role cannot drill down to see an individual student’s schedule. Users with the Instructor role cannot perform any actions on the students.
View All
Users who access the Student Scheduling Dashboard with the View All role will have access to the Enrollments and Students tabs. Users with the View All role can see data for all students. The View All role users are able to drill down into the data on both of these tabs, but cannot take any action on the students.
View Department
Users who access the Student Scheduling Dashboard with the View Department role will have access to the Enrollments and Students tabs. Users with the View Department role can only see data for the courses in the subject areas for their department and for the students enrolled in those courses. The View Department role users are able to drill down into the data on both of these tabs, but cannot perform any actions on the students.