| Event Management Manual | |
| Last Updated: November 2025 | |
Log in to the UniTime website using your customary university username and password or the password provided by your system administrator. The URL of the login page should be provided by the organizational unit responsible for scheduling events in the locations of interest.
The Event Management application is available under the Events menu.
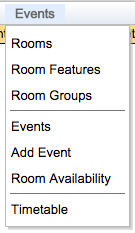
To view an event or set of events, open Events > Events in the menu. The Events page will look similar to the screen capture below:
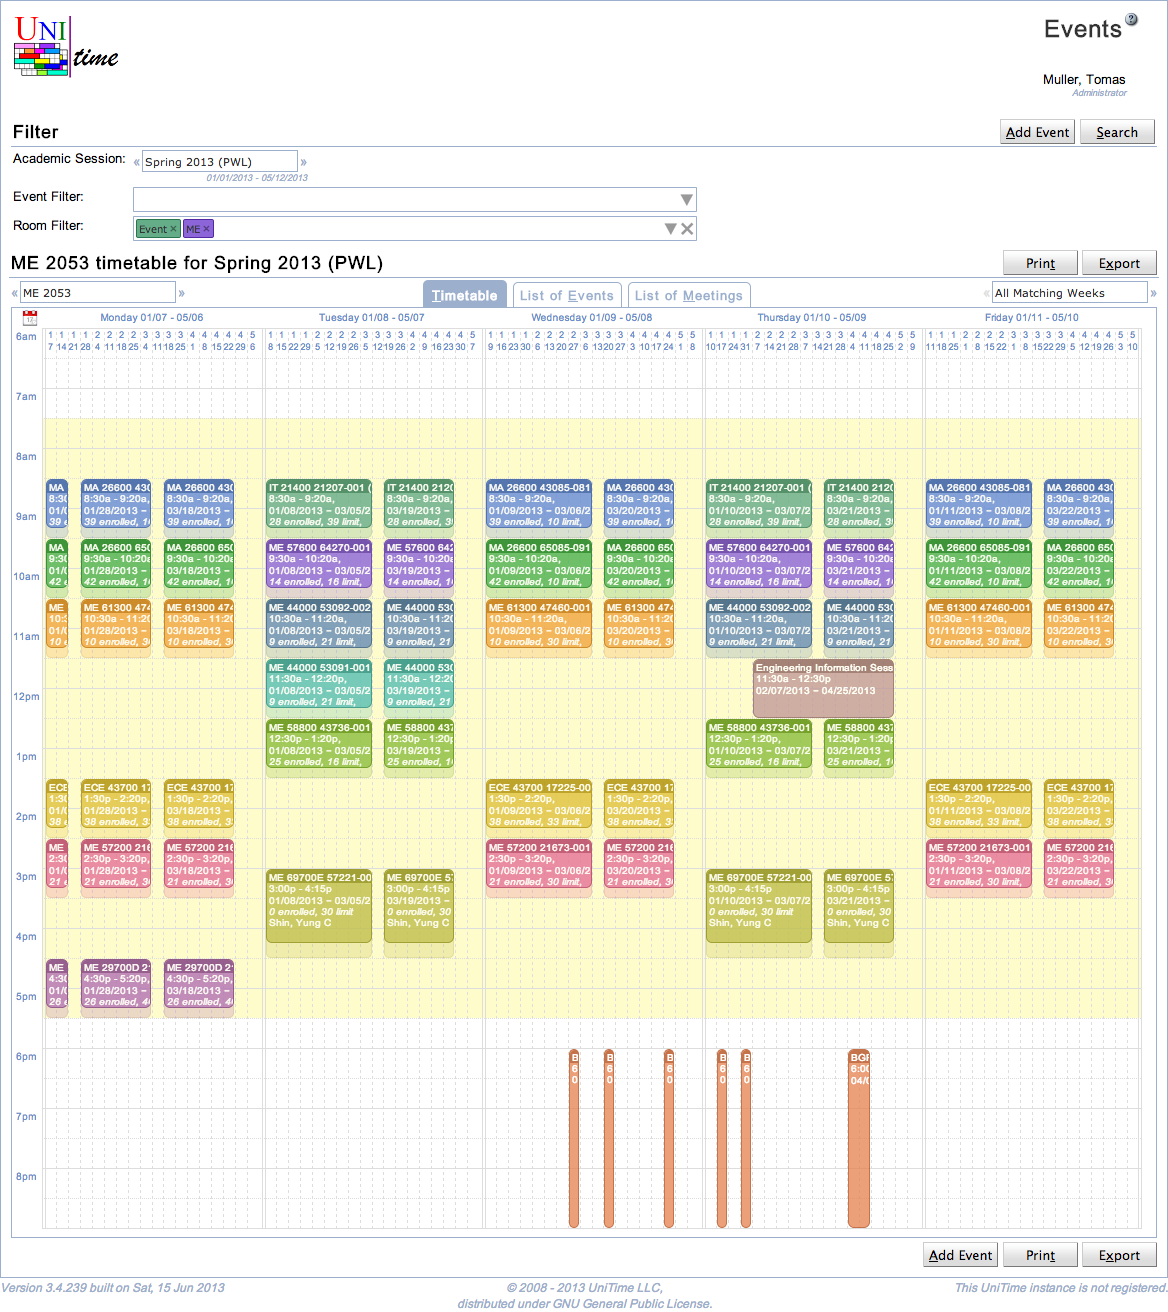
The Events screen is the primary starting place for anybody interested in events and associated meetings - be it a student looking for activities of a student organization or an event manager looking for room reservation requests requiring approval.
Searches for events scheduled in the system are filtered by academic session and by information entered into two additional filters. The Event Filter input area allows selection of events by name, type, sponsoring organization, mode, date, day of week, and time. The Room Filter input area allows selection of events by their room placement. Rooms can be filtered by name, department, room type, room feature, room group, building, and occupant capacity. Filter criteria can be entered directly in the input area or selected from a dialog box opened by clicking the triangle symbol on the right-hand side of the input area. The event filter defaults to “My Events” (i.e., all events requested by the user), and the room filter defaults to “Events” (i.e., only rooms enabled for event management in the selected academic session). The last selection in these input boxes is reflected in the page URL and is stored in the browser’s cookies. This allows the page to be refreshed without losing the last selection.
The listed events can be displayed in a grid (Timetable tab), as a list of events (List of Events tab), or as a list of individual meetings (List of Meetings tab). The events can also be filtered down to a particular room or week in the semester. The search output is limited to 10,000 meetings.
The Event filter is a component used on the Events page and several other pages to select a list of events (and their meetings) to be displayed on the page. It allows selection of events by their name or sponsoring organization, by their type (e.g., class events), in a particular manner (all events, my events, approved events, etc.), by a requestor, before or after a given date, by a day of the week, or by the meeting time. It can also notify the page that conflicting events are to be displayed as well, or it allows the display of events from other academic sessions.

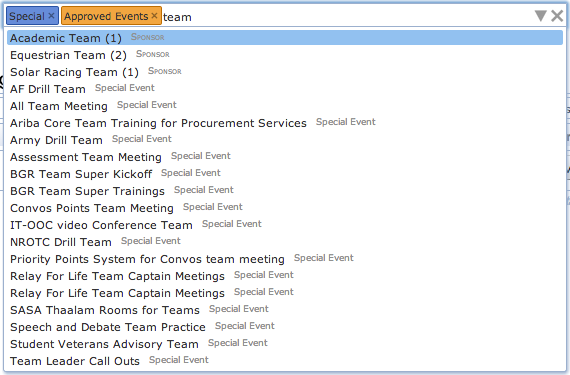
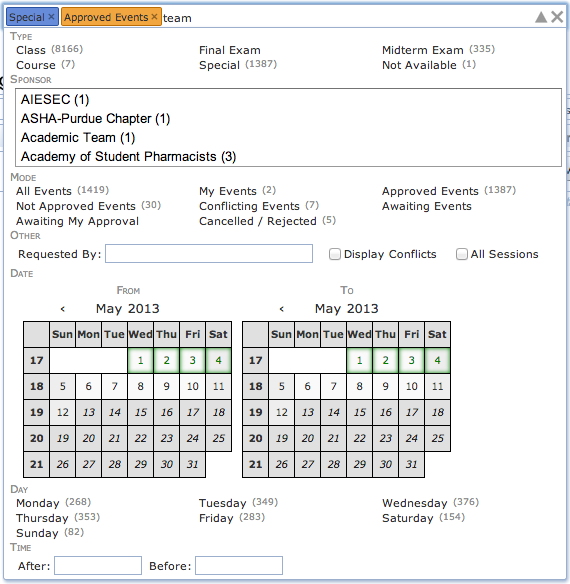
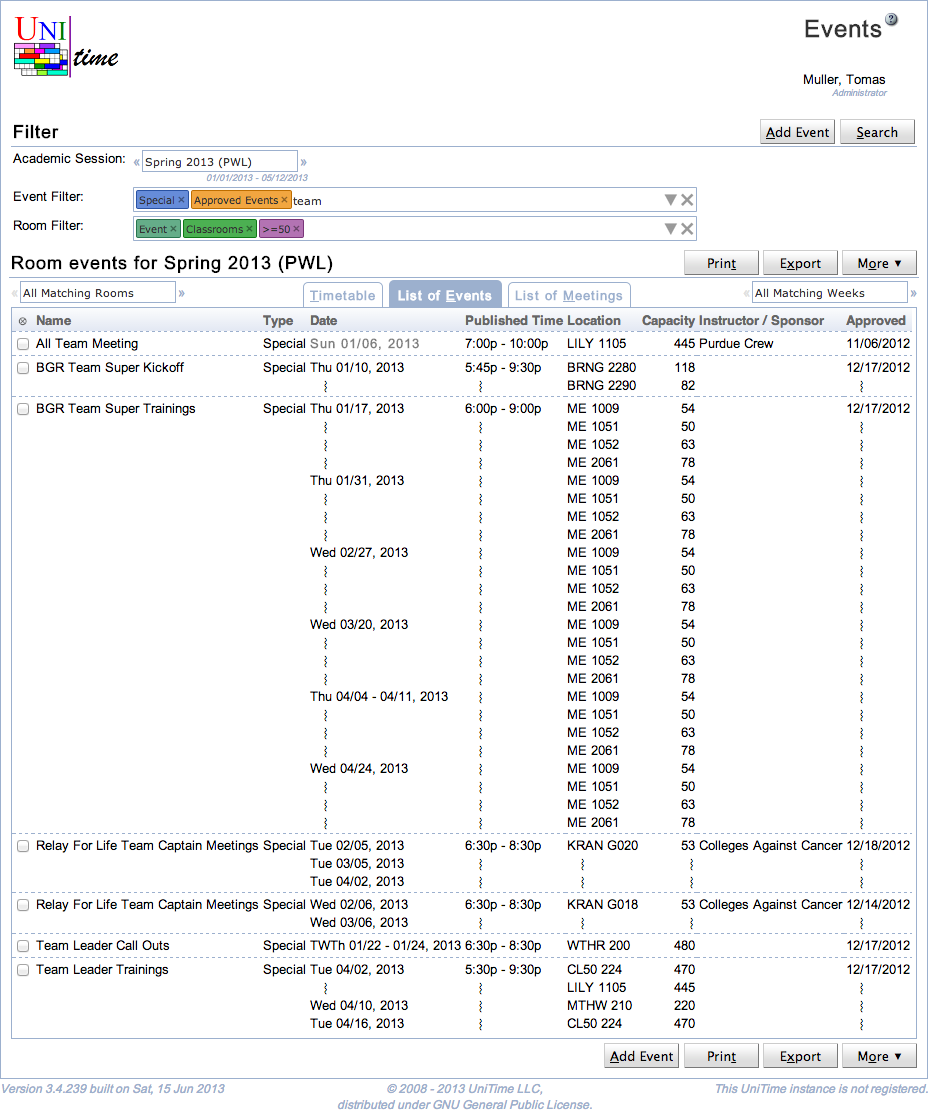
While the event filter appears as a single text input area, it has a lot of functionality. Information can be entered as text using just the keyboard. While typing, a list of matching suggestions is displayed below the box. These suggestions include matching events along with other filtering options (e.g., an event type or a sponsoring organization that all the matching events must have). Suggestions can be browsed using the Up and Down arrow keys. A suggestion is selected by typing Enter or by clicking on a suggestion using a mouse. If a selected suggestion is an event, its name is entered in the text field; otherwise, it is added to the filter as a colored box (called a Chip) just before the text entry area. This allows filtering events by several criteria at once. For instance, in the following example, we are looking for all special events (event type is Special) that are already approved (Approved Events mode) and contain “team” in their name. Some chips of the same type (e.g., event type or a day of week) can be combined together (a meeting must be on Monday or Wednesday, for instance), some chips are allowed only one for each type (indicated by the color of the chip, e.g., mode or the start date). A chip can be removed from the filter by tapping the little x on the right side of the colored box, or by pressing Backspace at the beginning of the text area (i.e., when there is no character to remove). All of the entered data can be removed from the filter by clicking the big X button on the right-most side of the filter box. A list of suggestions appears automatically as the text is being entered in the text field, or when the Down arrow key is pressed at the end of the entered text.
The filter can also be used with a mouse. By clicking the drop-down (triangle-shaped) icon on the right side of the input area, a window opens displaying all the options. This is a very useful feature for someone not very familiar with existing event types, modes, sponsoring organizations, etc. The window is closed by clicking the drop-down icon a second time (note that it rotates when the window is opened) or when the event filter component loses focus (e.g., when clicked outside the component or when another component is focused by pressing the Tab key). The list of available options is automatically updated based on the current content of the event filter (e.g., a sponsoring organization with no matching events will be removed from the list). The number in the brackets next to the option shows the number of events (among those already matching the filter) that match the option. A selected chip can also be unselected by clicking the appropriate option again. For instance, if the Special type is selected, clicking on the Special type for the second time will remove the Special type from the filter (the Special chip will disappear).
Besides the name of an event, the event filter allows for the following options:
Type: Type of event. There are Class Events that correspond to classes, along with Final Examination and Midterm Examination Events that correspond to final and midterm examinations, respectively. These events cannot be created on the event management pages; instead, they are controlled through the course and examination timetabling functions of UniTime. Ordinary events are called Special Events. There are also Course Related Events that are like special events but can be linked to a course or class (in a similar manner to examinations). When a course-related event is set up, it will show the related students (based on the event’s courses or classes) and their conflicts. Also, if a course-related event requires students to attend the event, it could show as a conflict for other events that overlap in time and for examinations during their timetabling. This is useful, for instance, for setting up special midterm examinations that do not follow the pre-defined examination periods. Finally, administrators and event managers may also set up unavailability events that mark a particular room or rooms as not available for event management during certain periods. Unlike all other events, unavailability events show as a grayed-out area on the timetable.
Sponsor: Sponsoring organization of the event.
Mode: Only events of a certain manner are to be displayed. There are the following modes. Please note that some of them are only available to certain users (event managers and administrators).
All Events: All events are to be displayed (no filtering)
My Events: Only events requested by the user are to be displayed. These are all events where the user is listed as the main contact of the event.
Approved Events: All events that are approved. There is an approval process. Newly created events are usually in a pending state until the appropriate event manager approves, cancels, or rejects the event. During this time, the owner of the event can delete or cancel the event (or some of its meetings). Once an event is approved, it may only be cancelled.
Not Approved Events: All events that are not approved. These are all events that are in a pending state.
Awaiting Events: All events that are awaiting approval. These are all events that are in a pending state that have not happened yet. That is all the pending events that meet today or in the future. In other words, the difference between Not Approved Events and Awaiting Events is that Awaiting Events do NOT contain events that already took place (and there is no point in approving them anymore).
Awaiting My Approval: Events that are awaiting approval and that can be approved (or rejected) by the user(only available to event managers and administrators).
Conflicting Events: Event meetings that conflict with another event. That means that there is another event that uses the same room and overlaps with the meeting in time.
Cancelled / Rejected: Event meetings that are cancelled or rejected. Usually, cancelled or rejected meetings only show in “My Events” mode, or when looking at events requested by a given user (event manager only).
Expiring Events: All events that are awaiting approval and have an expiration date set. These events, if they are not approved by the given expiration date, will be automatically cancelled (expired). This mode is only available when there is an expiring event to be displayed.
Requested By: All events (including cancelled and rejected meetings) requested a particular user. This option is only available to event managers and administrators.
Display Conflicts: For an event, if there is a conflicting event, it will be displayed with the event in the list of events or meetings.
All Sessions: The search will return events from other academic sessions (that have the same academic initiative) as the selected academic session. This is particularly useful when requesting events of a particular user, sponsoring organization, or a given name.
Date: First and/or last day of the event meeting(s) to be displayed.
Time: Start and/or end time of the event meeting(s) to be displayed. When used, all meetings that overlap with the given time frame will be returned. So, for instance, when events between 8 am and 9 am are requested, 7 am - 8:30 am will show up as well.
As mentioned above, when an event meeting is created, it is in a pending (awaiting approval) state until the appropriate event manager approves the meeting. While a meeting is awaiting approval, it is still blocking the desired room for other events (another event trying to use the same room at the same time would have a conflict). Once a meeting is approved, it also blocks the room from course and examination timetabling. A meeting awaiting approval can be deleted by the owner (leaving no trace in the system). Once approved, it can only be cancelled (and it will show on the event as a cancelled meeting).
The Room filter is a component used on the Events page and several other pages to filter the list of rooms that are displayed on the page. It allows selection of rooms by department, room type, room feature, room group, building, and size. It also allows displaying only rooms that can be used for events (i.e., rooms that have the event management enabled) and rooms that are nearby to a selected building or buildings.

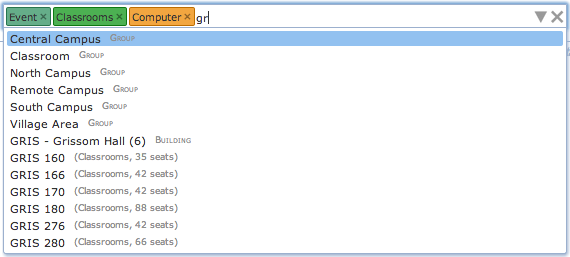
While the room filter appears as a single text input area, it has a lot of functionality. Information can be entered as text using just the keyboard. While typing, a list of matching suggestions is displayed below the box. These suggestions include the matching rooms as well as other filtering options (e.g., the name of a room feature that all the matching rooms must have). Suggestions can be browsed using the Up and Down arrow keys. A suggestion is selected by typing Enter or by clicking on a suggestion using the mouse. If a selected suggestion is a room, it gets entered in the text field; otherwise, it is put into the filter as a colored box (called a Chip) just before the text entry area. This allows filtering rooms by several criteria at once. For instance, in the following example, we are looking for all event rooms that are classrooms (room type is Classrooms), that have a computer (Computer feature), and start with “gr”. Some chips of the same type (e.g., room feature) can be combined together (meaning a room must contain both selected features, for instance, or be in one of the selected buildings). Some chips are allowed only one for each type (indicated by the color of the chip, e.g., selected department or size restriction). A chip can be removed from the filter by hitting the little x at the right side of the colored box or by pressing Backspace at the beginning of the text area (i.e., when there is no character to remove). All entered data can be removed from the filter by clicking the big X button on the right-most side of the filter box. The list of suggestions appears automatically as the text is being entered in the text field, or when the Down arrow key is pressed at the end of the entered text.
The filter can also be used with a mouse. By clicking on the drop-down (triangle-shaped) icon on the right side of the box, a window is opened displaying all of the options. This is a very useful feature for someone not very familiar with existing room types, features, groups, etc. The window is closed by clicking on the drop-down icon for the second time (notice that it changes its orientation when the window is opened) or when the room filter component loses its focus (e.g., when clicked outside of the component or some other component is focused by pressing the Tab key). The list of available options is automatically updated based on the current content of the room filter (e.g., a room feature that is not present in any of the matching rooms will disappear from the list). The number in the brackets next to the option shows the number of rooms (out of the rooms already matching the filter) that match the option. A selected chip can also be unselected by clicking on the appropriate option for the second time. For instance, if the Computer feature is selected, clicking on the Computer feature for the second time will remove the Computer feature from the filter (the Computer chip will disappear).
Finally, the component also allows for Boolean expressions. In these, most of the chips can be used as well, in the format type:value (see the mouseover tooltip on a chip to see how to enter it as text). For instance, the following query

returns all event rooms that are in the ENAD or MSEE building and that are of type Classrooms or have at least 100 seats. If a value of a chip contains spaces, use quotation marks, e.g., feature:”Tablet Arm Chairs”.
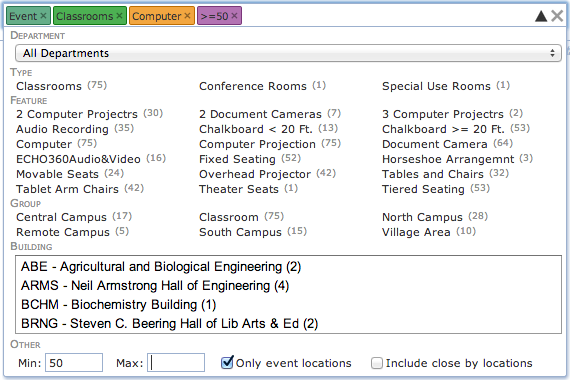
Besides the name of a room (or location in general), the room filter allows for the following options:
Department: Department of the room. If only event rooms are to be displayed, it is the event department of the room. If all rooms are to be displayed (Only event locations toggle is unchecked), room sharing is also used. This means that all rooms into which a selected department can timetable will match the filter. The department drop-down also allows for Managed Rooms for a timetabling manager (this is all the rooms that are shared with one or more departments of the manager), Final or Midterm Examination Rooms (rooms in which a final or a midterm examination can take place).
Type: Type of the room. If used, only rooms matching the selected room types will be accepted.
Feature: A room feature that the room must contain. If multiple room features are selected, a room must contain all of the selected features. It is possible to split room features by type (e.g., seating type features can be grouped together into a “SEATING ARRANGEMENT” block).
Group: Room group of the room. If multiple room groups are selected, a room must be of at least one of the selected groups to be accepted.
Building: Building of the room. If multiple buildings are selected, a room must be in one of the buildings (unless close-by locations are also included).
Size: The minimal and/or maximal size of a room can be defined. For suggestions, start typing in the size, or use <, <=, >=, > operators (e.g., >=100 for all rooms of at least 100 seats). A range can be typed in as min..max (e.g., 10..20 for rooms of size between 10 and 20 seats).
Include event locations: If checked (which is also the default for many event pages), only rooms that are enabled for event management are accepted. These are the rooms where an event can be requested using UniTime. More precisely, they are rooms that have an event department defined, the department has the event management enabled, and the event status is different from No Event Management.
Include close by locations: If checked and at least one building is selected, rooms that are within a reasonable distance from the selected buildings are also included in the list. For the distances, rooms’ coordinates, and travel times (if defined) are used. The distance limit defaults to 670 meters (or 10 minutes).
If there are a lot of room features, it is possible to split room features by type (e.g., seating type, projection equipment). It is also possible to hide some of the types that are more useful for timetabling than events from the event management. See Room Feature Types page for more details.
The close-by locations distance limit can be changed by application property tmtbl.events.nearByDistance (integer number in meters, defaults to 670). For the conversion between distance in meters and travel time in minutes, the application property tmtbl.events.distanceSpeed is used (number of meters traveled in a minute, defaults to 67.0). The default is set so that 1 kilometer roughly translates to 15 minutes of travel, with the nearby rooms being 10 minutes from the selected building.
Suggestions can be used to quickly see the rooms that match the filter. Press the Down arrow key to display suggestions below the filter even when there is no text entered. Only the first 20 suggestions are displayed.
Events can be displayed in a calendar-like Timetable. In this view, multiple rooms and/or weeks can be either displayed together or filtered further using the drop-down boxes to the left and right of the tabs (see “All Matching Rooms” on the left side or “All Matching Weeks” on the right side). When only one room is displayed, or there are multiple rooms (but fewer than 20) in a single week, the Timetable view is changed so that each day in each room is displayed separately.
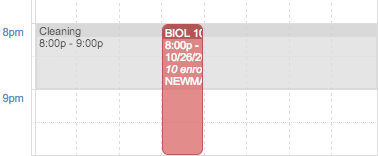
When one or multiple rooms in one week are displayed, the grid allows for a mouse selection of available time that can be used to create a new event when the Add Event button is clicked. The mouse selection is highlighted in light blue, and it can be deleted by clicking on the little x in the top right corner. The selected block of time can also be dragged around the timetable grid or changed by moving its corners or edges. Multiple selections can be made across the requested rooms and weeks. The selection is remembered when a different room or week is selected, but it will be lost when the Search button is clicked or the user leaves the page. Please note that the ability to select a particular time in a room does not necessarily mean that the time is available. For instance, if only Special events are displayed, it is possible that there is a class event overlapping with the selected time. When the Add Event button is clicked, the room availability is checked and any conflicting meetings are displayed in red in the Meetings table of the Add Event page.
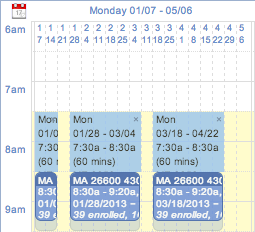
Each meeting is displayed as a box, featuring its name, time, date, and some additional information. Shaded areas above and below each box are used to display any setup and teardown times, respectively, that are associated with the meeting. In the above example, the MA 26600 class event is scheduled from 8:30 am to 9:20 am, but it occupies the room till 9:30 am. This means that any subsequent meeting in this room cannot start earlier than 9:30 am, allowing a 10-minute buffer for the students to move between classes and/or events. For events, we distinguish between Published Time (time printed on the event, i.e., 8:30 - 9:20) and Allocated Time (time blocking the room). The difference between these two times is displayed as Setup Time (at the beginning of the meeting) and Teardown Time (at the end of the meeting).
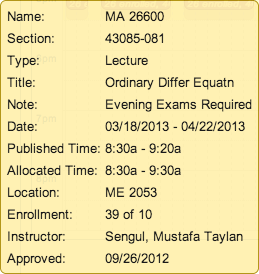
Additional information about a particular meeting can be seen in a small yellow tooltip window that is displayed in the bottom left or right corner when the mouse is hovering over the appropriate box.
The start and end time of the Timetable grid is automatically adjusted to show all the events meeting the filter and the selected room(s) and week(s). If needed, the start and end times can be manually enlarged by setting the start and end times in the Event Filter. Similarly, Saturdays and Sundays are only displayed if needed.
The List of Events table shows all events matching the filter. The list of events can also be filtered further by the room and week selections (to the left and right of the Timetable, List of Events, and List of Meetings tabs). Unlike the List of Meetings table, multiple meetings can be shown in one line. These are meetings that meet at the same time, in the same room, and have the same approval status.
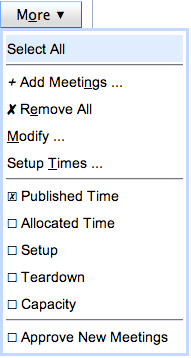
Various columns can be selected. A column can be shown or hidden by clicking on the More button or by clicking on the appropriate column header.
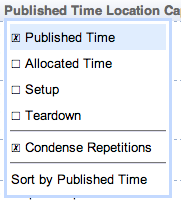
Within an event, the meeting information (date, time, location, approval) can be repeated on each line, or if it is the same as above, it can be condensed by displaying a wavy line instead (e.g., click on the Published Time column header and select or unselect the Condense Repetition toggle). This makes the page a little easier to glance over. For instance, in the example on the right side, all the meetings of the BGR Team Super Trainings event are from 6 pm to 9 pm, on six different days, each in four different rooms. The table can be sorted by a particular column. To do so, click on the appropriate column header and select the Sort by … option. The second click on the same Sort by … option will reverse the order. This is indicated by the arrow next to the column name pointing up or down (reverse order). If allowed, the first column (named ⊗) can be used to select a particular line or lines, and for instance, to approve all the appropriate meetings.
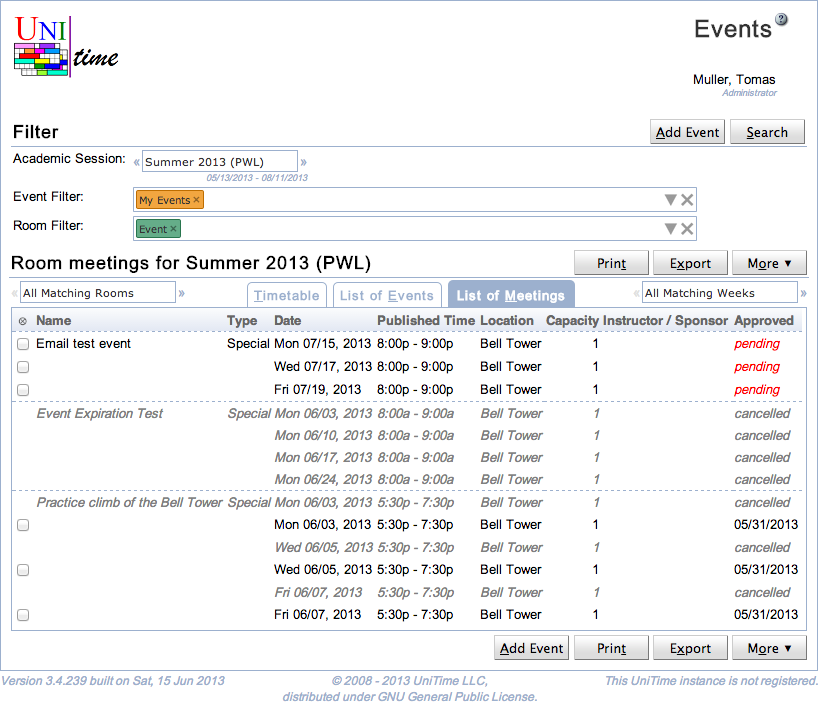
The List of Meetings table is very similar to the List of Events table; however, each line always represents a single meeting. This can make for a much longer table, but it allows selection of a particular meeting or set of meetings to be approved, inquired, cancelled, or rejected.
This view also allows for events to be split by meeting information, providing a nicer view when sorting by date. In such a case, the List of Events would only use the first date of the event (as it always displays an event as one block), whereas the List of Meetings will use all the meeting dates, splitting the events into individual meetings.
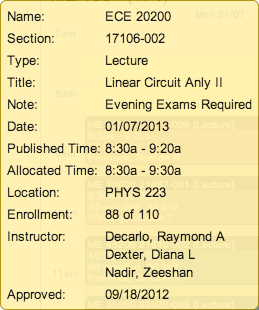
The Event Detail screen provides an overview of an event and its meetings. If allowed, an event can be edited (e.g., new meetings can be added), approved, rejected, or cancelled from this page. Course-related, class, and examination events also show additional information about their related objects (classes and courses), enrolled students, and their conflicts. Event Detail page can be reached from Events or Event Room Availability page by clicking on the appropriate event.

Event Detail page can be reached by the owner of the event (i.e., the main contact), anyone from the additional contacts, or an event manager (i.e., a person who can change the approval status of at least one meeting of the event). Details of class and examination events can also be seen by the course coordinator for the course (or courses) involved, schedule managers (if there is a class/course of the subject area that the manager controls), or examination managers (for examination events).
Besides the event type, contact information, and some additional properties that are filled in (like sponsoring organization or expected attendance), the Event Detail page contains the list of its meetings. Each meeting consists of a date, time, and a room where the meeting takes place. There is also the approval status, which starts as pending (when an event is requested, but not yet approved). Approved meetings show with their approval date (the date when the meeting was approved). Cancelled and rejected meetings can also be included in the list when the “Show deleted, cancelled, and rejected meetings” toggle is checked.
The Notes section contains a history of operations that were done to the event. Each operation contains a time stamp, a name of the user who made the change, a list of meetings that were affected (if applicable), a note, and an attachment (if there was a file attached to an event request, an update, or approval / inquiry / cancellation / rejection of some of the meetings of the event).
Class, examination, and course-related events also have a Relations section, which contains some basic information about the related class (for class event), examination (for examination event), or a list of classes, configurations, courses, or instructional offerings (course-related event, or an examination event). If the user has permissions to open the appropriate Class Detail, Instructional Offering Detail, or Examination Detail page, the line is clickable and leads to the appropriate detail page.

These events (class, examination, and course-related events) also have an Enrollments section, which contains a list of all students enrolled in the related classes, configurations, courses, or instructional offerings. If some of the students have a time conflict between the displayed event and some other events they have (classes, exams, or approved course-related events that require attendance), the conflicts are also displayed in the table.

If allowed, an event can be edited by clicking on the Edit Event button. This opens the Edit Event screen that includes the ability to add new meetings, modify existing meetings, change event properties (like the contacts or its sponsoring organization), and delete or cancel some or all of its meetings. The button leads to the Edit Event page. Please note that it is generally not allowed to delete/cancel a meeting that has already happened (the meeting date is before today), request a past meeting, or modify an event if all the dates of the academic session are in the past. Some additional restrictions may apply based on the user’s permissions. It could be, for instance, allowed for course coordinators, schedule deputies, and/or examination managers to cancel or modify a class or examination event.
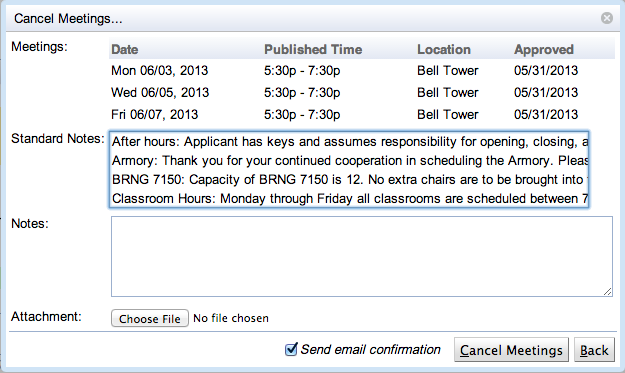
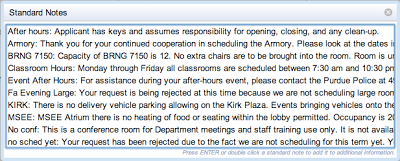
A selected subset of the event’s meetings or all meetings (when no meeting is selected) can be approved, cancelled, rejected, or inquired about by an event manager. To do so, select the appropriate operation under the More button. The appropriate Approve Meetings…, Cancel Meetings…, Reject Meetings…, or Inquiry… dialog will appear. Here, a note can be entered (e.g., explaining the reason for the rejection). It can be either typed in, or one (or more) of the standard notes can be selected by double-clicking on the note. Double-clicking on a standard note will copy the note into the Notes text area (at the end of it, if there is already something in it). It is also possible to attach a file (e.g., a PDF form that needs to be filled in or some other instructions). The file will be attached to the event confirmation email, and it will also be available in the Notes section of the event.
Usually, a pending event can be either approved, rejected, or cancelled. Once approved, a meeting can only be cancelled. An event manager can only approve, reject, or cancel meetings of the rooms that are managed by one of his/her departments. It is possible that an event may require multiple approvals (of different event managers) if it is requesting meetings in rooms of different departments (e.g., a centrally managed classroom and a departmental conference room).
Event Location Approve permission if in a room of the event department of the manager, and the More > Approve New Meetings toggle is checked.Pending meeting can be approved, rejected (Event Meeting Approve permission), cancelled (Event Meeting Cancel permission), or inquired (Event Meeting Inquire permission) by an event manager.
Pending meeting can be deleted (Event Meeting Delete permission) or cancelled (Event Meeting Cancel permission) by the requester or an event manager.
Approved meetings cannot be deleted or rejected; they can only be cancelled (by the requester or an event manager).
Meetings in the past can be requested or deleted only with the Event Edit Past permission. They can be approved, rejected, or cancelled only with the Event Approve Past permission.
Events in a room that is not managed in UniTime (it does not have an event department defined) can be requested only by a user with permission Event Any Location.
Rooms can be overbooked only by a user with the Event Location Overbook permission (for an event manager, the room also has to be from the appropriate event department).
Special events can be requested by someone with Event Add Special permission, course-related events by Event Add Course Related, and unavailabilities by Event Add Unavailable.
Event Set Expiration permission can set the event expiration date.
Class events can be edited with Event Edit Class permission (e.g., course coordinators or schedule managers may be given such permission), or some or all of their meetings can be cancelled with Event Meeting Cancel Class permission. There is also Event Meeting Inquire Class permission that allows sending inquiries about the class event.
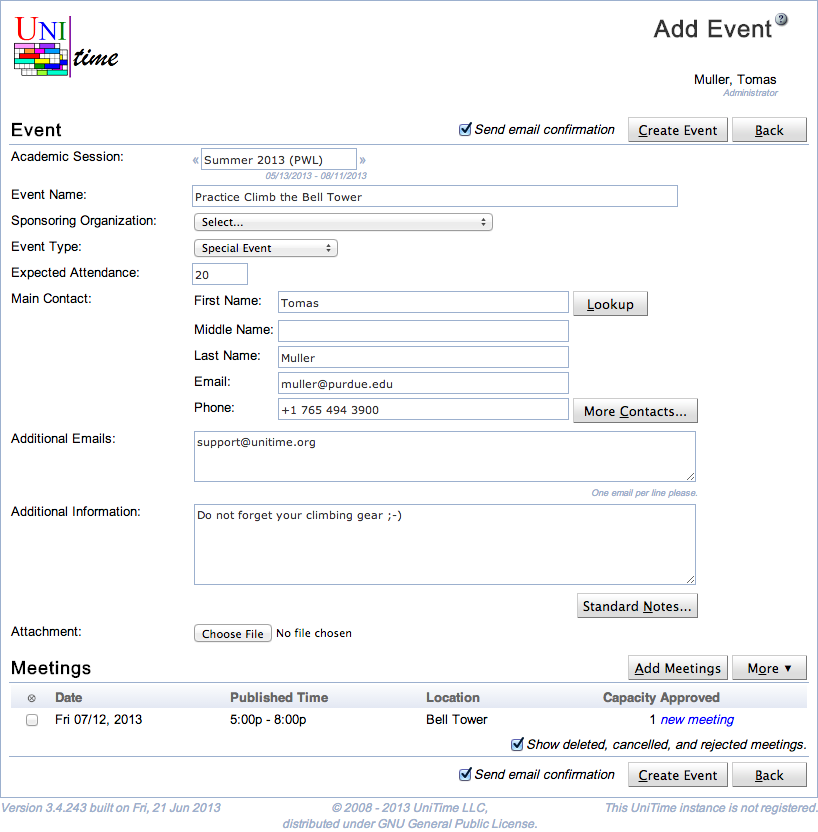
Event Edit Exam permission (e.g., examination managers may be given such permission), or some or all of their meetings can be cancelled with Event Meeting Cancel Exam permission. There is also Event Meeting Inquire Exam permission that allows sending inquiries about the examination event.The Add Event screen is used to request an event. An event can have just one meeting, or there can be multiple meetings that are on the same or on different days, times, and/or locations. Each meeting can also be approved, cancelled, or rejected separately, and it is possible to add additional meetings or cancel/delete some or all of the existing meetings later on as well (using the Edit Event page). The only limitation is that all the meetings must be from the same academic session.
Each meeting of a requested event is in a pending state (i.e., it is waiting to be approved) until the appropriate event manager approves, cancels, or rejects the meeting. During this time, the owner of the event can delete or cancel the meeting. Once an event is approved, it may only be cancelled. Meetings that are deleted will disappear from the event, but cancelled or rejected meetings will leave a trace (e.g., you can see the cancelled or rejected meetings on the Event Detail page). If all meetings of an event are deleted, the event is deleted as well. Each operation done to an event is also logged in the Event Notes section of the Event.
Each event must have a name and a main contact (with an email). There also needs to be at least one meeting of the event. Besides a name, an event can have a specified sponsoring organization. If a sponsoring organization is provided, an email confirmation will be sent to the email address defined with the sponsoring organization as well. While this field is optional, event requests that are backed up with a sponsoring organization may get approved more easily. Expected attendance is also optional, but it may help justify the size of the requested room or rooms.
Events can be of several types. Most events requested in the event management are Special Event type events. These events do not hold any relation to other classes, examinations, or events; they just block a time (or times) in a particular room (or rooms). Besides Special Events, there are also Course Related Events that can be linked with one or more classes and/or courses. This allows us to see potential student conflicts at the event, and the event (when approved) will also show on students’ personal schedules. A course-related event may also require all students to attend the event, which means that the event would show for the affected students when there is a conflict with another course-related event or in the examination timetabling. Usually, only event managers, schedule deputies, and course coordinators are able to request course-related events, though. Course-related events are therefore quite useful for various (individually scheduled) help sessions and similar class / course-related activities. Finally, event managers can also request a Not Available type of event. Such events can be used to mark unavailable times in the rooms. There is no approval process for these unavailability events, and these events, which are shown as grayed out, are on the timetable grid.
Besides the three types above, there are also Class Events and Examination Events. These events cannot be created directly in the event management, and they are linked with the appropriate class or examination from the course and examination timetabling part of UniTime.
It should also be noted that while even pending meetings block a room from other events to be created, in course and examination timetabling, only approved event meetings are considered. So, it is possible to let people request events in classrooms while a course timetable is still being developed. Once the course timetabling is finished and a timetable is committed, these requests (pending special events) can be processed: not-overlapping events can be approved, overlapping (conflicting) events will need to be moved or rejected.
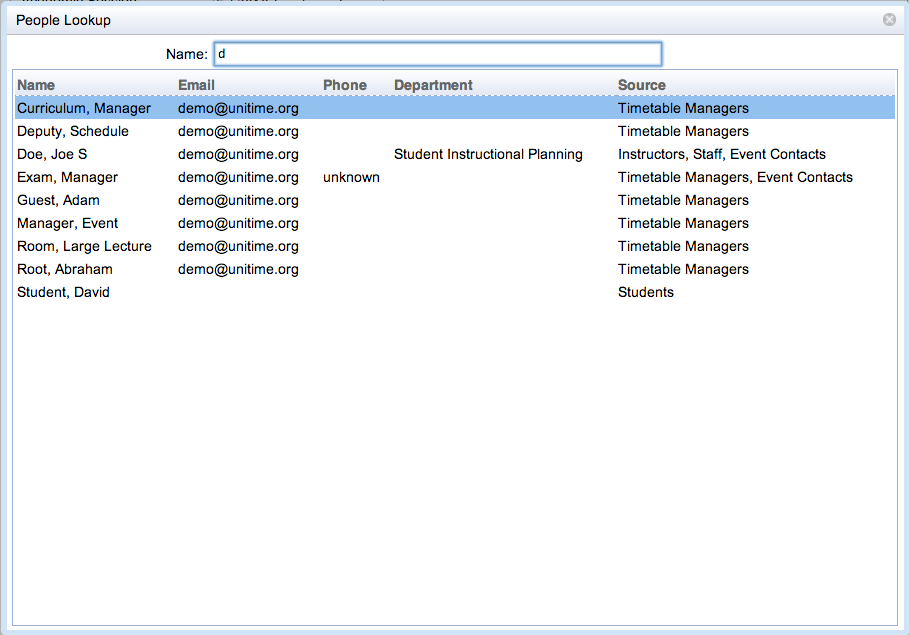
Only event managers and administrators can request an event on behalf of other users. In such a case, the “Lookup” button appears and can be used to find a particular user (see the People Lookup dialog). Event managers and administrators can also look up additional contacts. Other users can only add additional email addresses, which will be carbon copied on all the confirmation emails about the event.
Additional information may be provided. Event managers and administrators can use one or more standard notes. To do so, click on the Standard Notes button, find and double-click the appropriate standard note.
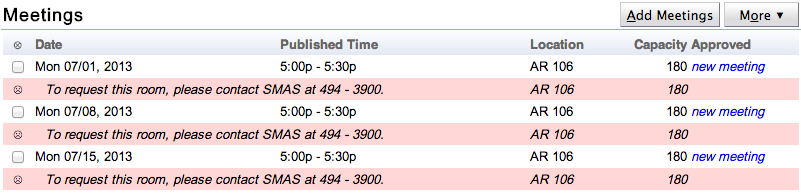
A file can be attached to an event request as well. This can be used to provide a filled-in form or some approval if needed. The need to provide such a file can be listed as a note on a particular room. Such a note will show up below the requested meeting in the Meetings table.

If allowed (permission Event Set Expiration), an event can have an expiration date. If set, all pending meetings will get automatically cancelled at midnight after the expiration date. This could give event managers the ability to tentatively book a room for a particular event. All the meetings that are not approved by the event expiration date are automatically cancelled. It is also possible to change or remove the expiration date later on using the Edit Event page.
Event managers have the option to choose whether a confirmation email will be sent or not by checking the Send email confirmation checkbox. The checkbox only applies to the particular operation (i.e., the creation of a new event in this case), not to the event as a whole. For the next operation (e.g., using Edit Event page, or approving the event from the Edit Detail or the Events page), the Send email confirmation checkbox will also be available. For normal users, an email confirmation is always sent (unless it is disabled globally for everyone by having the application property unitime.email.confirm.event set to false).
If a selection was made on the Events or Event Room Availability page before the Add Event button was clicked, the selection should automatically show up in the list of Meetings. Additional meetings can also be requested using the Add Meetings button. If a meeting conflicts with another meeting, the conflicting meeting will show up in red below the requested meeting. Such a meeting will need to be removed from the request or moved to some other time and/or room, as usually only event managers and administrators are allowed to overbook a room (i.e., request a meeting that conflicts with another, already existing meeting).
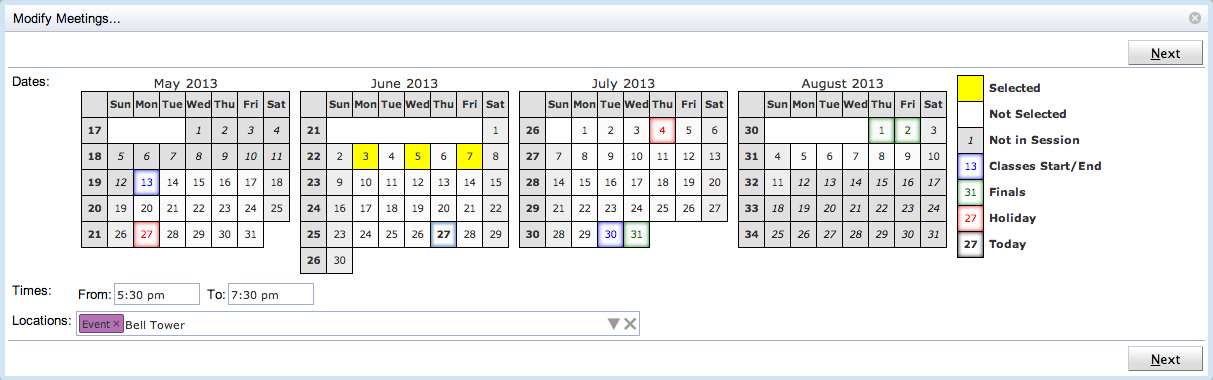
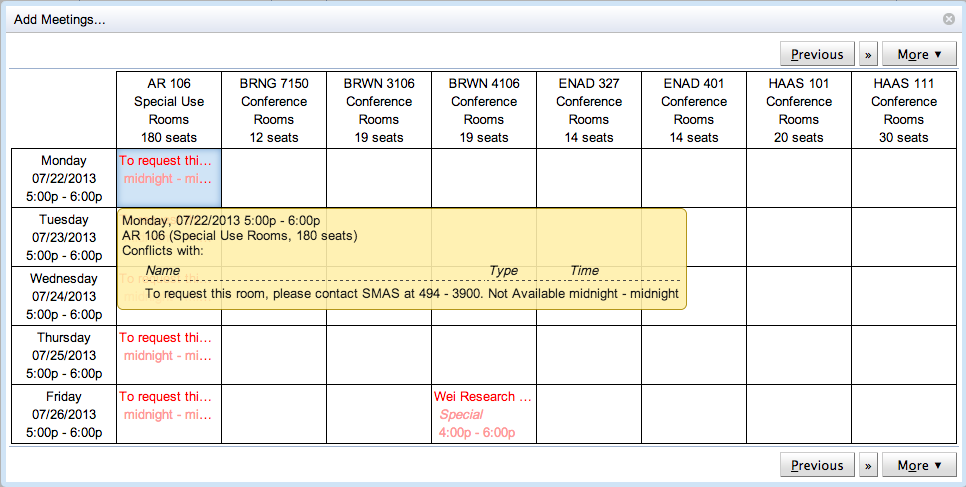
One or more meetings can be added for the event by clicking the Add Meetings button. When clicked, the following dialog will appear. The meeting selection works in two steps: first, the user needs to select possible dates, start and end times for the event, and a room filter for the possible rooms where the meeting (or meetings) can take place. Next, the availability matrix will be shown, and the individual meetings can be selected from the combination of selected dates x rooms. Only event managers and administrators are able to select meetings that are in conflict with some other meeting (i.e., there is a red text in the appropriate box).
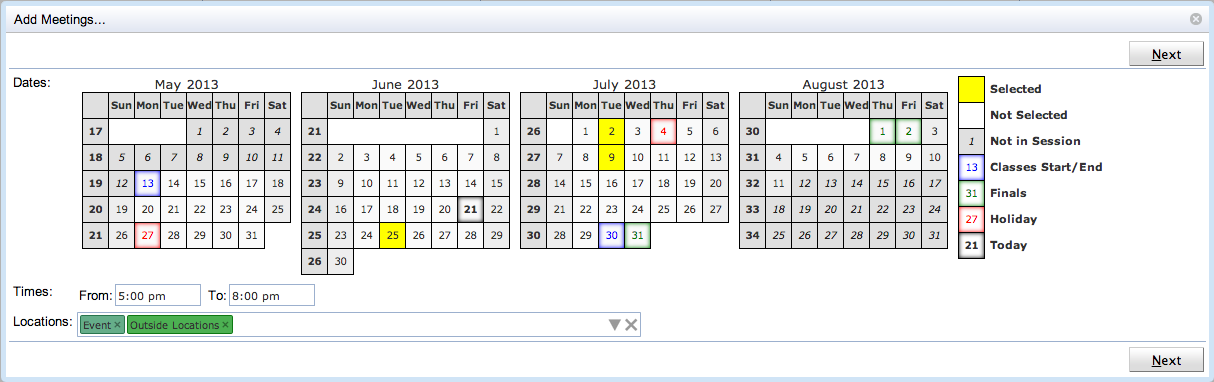
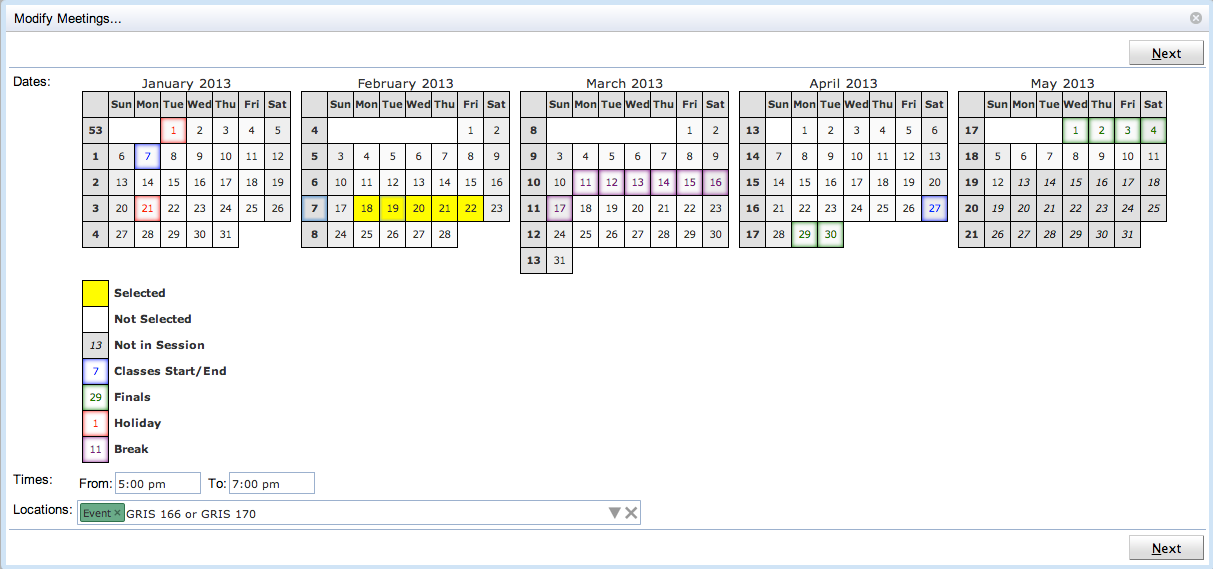
The first page consists of a selection of dates, times, and locations. Dates can be selected by mouse. You can click on a particular day, on a week, on a day of the week, or on a whole month. The second click will unselect the selected day. When clicking on a week, a day of the week, or a whole month, the selection will iterate between all working days since today, all working days, all days except holidays, all days, and no days. It is usually not possible to request a meeting on days before today (though there is a permission that can override that). It is also possible to use the arrow keys to navigate through the calendar and the space key to select/unselect a particular day. It is possible to select only dates from the academic session that was selected on the Add Event page. Times define the starting and ending times of the requested meeting(s). It is possible to use a mouse to select particular times, or the times can be entered by keyboard. While the suggestions are only in 15-minute increments, it is possible to type in a time with 5-minute increments. The “From:” and “To:” time text fields recognize time in various formats (e.g., 7:00 pm can be entered as 7p, 19, 700pm, etc.), the “To:” time can be also entered in the number of minutes or hours from the start time (e.g., 1h for 1 hour, 90m for 90 minutes). The Locations component is explained here (the possible locations are filtered by the same Room Filter as on the Events page). It is useful to keep the Only events locations chip (together with some additional restrictions) in the filter, as these are the rooms in which an event can be requested. Once the Next button is pressed, the following page will appear.
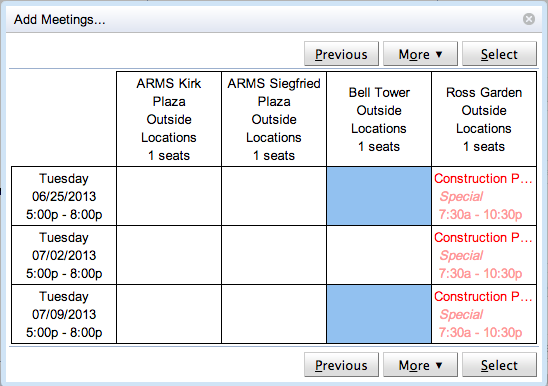
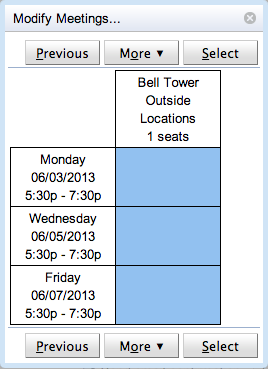
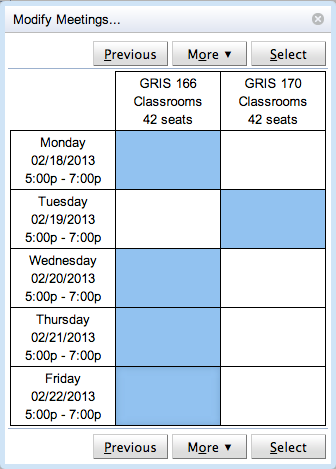
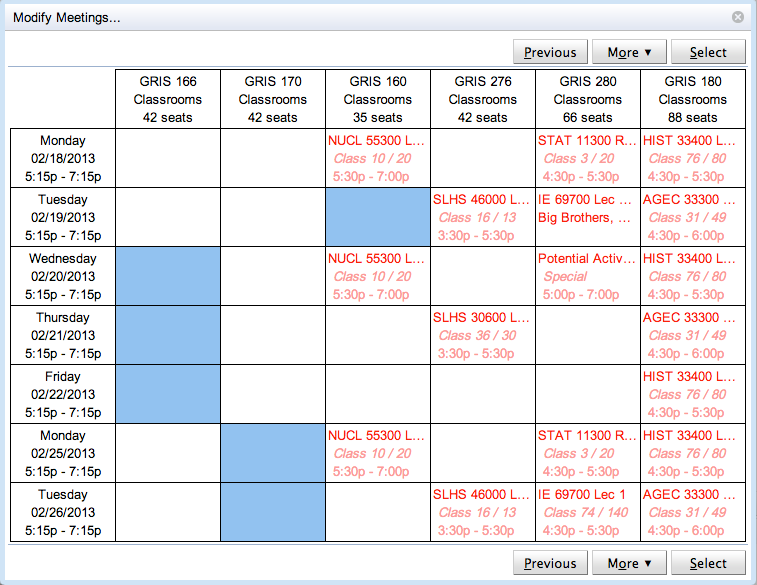
Here, the availability of the requested rooms during the requested dates and times is shown, and it is possible to select the actual meetings. The selected meetings are the blue boxes. A selection can be made using a mouse or a keyboard (use arrows to navigate, enter to select a meeting). A selection is confirmed by clicking on the Select button. The boxes with red text are conflicting; you can see more information about the conflicts while hovering over the appropriate box.

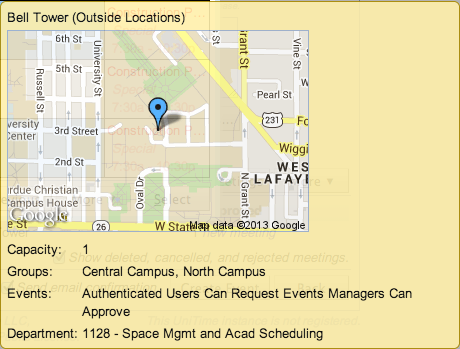
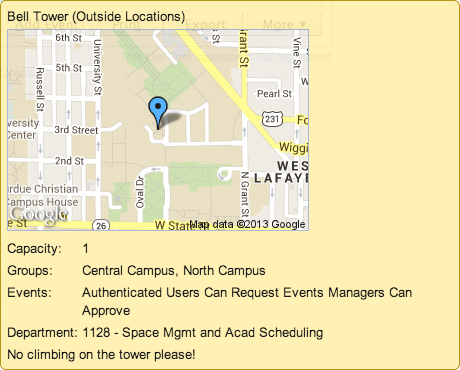
More information about a room can be seen while hovering over the room (first line in the example above).
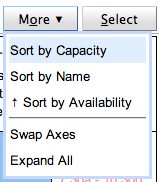
It is also possible to get back to the previous page by clicking the Previous button. If there are more rooms available, the « and » buttons will appear to iterate through all of them. The rooms can also be sorted by name, capacity, or availability. The axes can be swapped (showing days horizontally and rooms vertically), and the conflicting information can be expanded to show more details in the grid. These operations are available when clicking the More button.
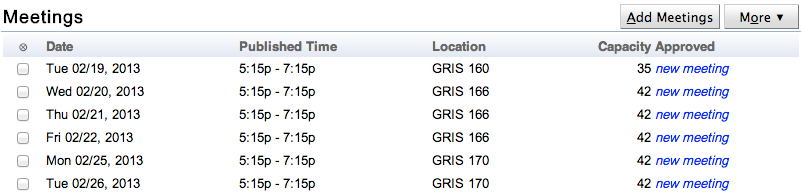
Once the selection is made, the new meetings will appear in the Meetings table on the Add Event page. It is possible to use the Add Meetings… dialog multiple times, e.g., to be able to request meetings with different times on one event. The requested meetings can be removed from the list by selecting them (click on the checkbox at the beginning of each line) and clicking Remove under the More button.
The Meetings table can be sorted by each of the columns (click on the column header to change the way the table is sorted), and some columns may be removed from the table (click on the column header of the first column, or on the More button).
Event managers may choose whether the meetings in their rooms will be automatically approved or not. The meetings will get automatically approved when Approve New Meetings option is toggled under the More button. The last setting of the toggle is remembered. Note that the toggle is only available if there is at least one new meeting that can be immediately approved. Note that if a new meeting is going to be approved right away, there is a new approval instead of a new meeting in the Approval column.
If a room (or all rooms of a particular type and department, e.g., all centrally managed classrooms) has a break time defined (see Event Statuses page), the break time translates into a teardown time of a newly requested meeting (in the appropriate room). This means that, for instance, if an 8 am - 9 am meeting is requested in a room that requires a 10-minute break time, the allocated time will be 8:00 am - 9:00 am, but the published time will be 8:00 am - 8:50 am. This is particularly useful for classrooms, as all classes usually have a break time defined (see Time Patterns), and it can be a good practice to extend this policy (e.g., there are always at least 10 minutes between two consecutive classes) to other events as well.

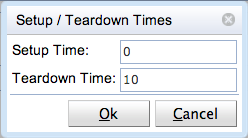
To change setup/teardown times, select a meeting (or meetings) and use the Setup Times… option under the More button. The following dialog will appear, where the setup times and break times can be changed.
When a new course-related event is being created, a Courses / Classes section will appear. Here, one or more classes, course configurations, course offerings, or instructional offerings can be entered.

When a class is entered, students of the class are expected to attend the course-related event, etc. The difference between course offerings and instructional offerings is important when a course is cross-listed. In this case, an instructional offering means students from all courses that are cross-listed, a course offering means students only of the selected course offering. The Students are required to attend this event toggle is important when the course-related event (once approved) should show as a conflict with other events of the same students. Such an event (approved course-related event which requires students to attend the event) will also show as a conflict in examination timetabling if there is an exam placed in an overlapping examination period and there are some students in common.
Once there is at least one class, configuration, or offering selected in the list of Courses / Classes, the Enrollments section will appear at the bottom of the page. Here, all students who are attending the selected classes/courses are listed. If some of the students have a conflict with one or more meetings that are added to the new event, the conflict part of the table will appear as well, listing all the conflicting events (including their names, types, and conflicting meeting or meetings).
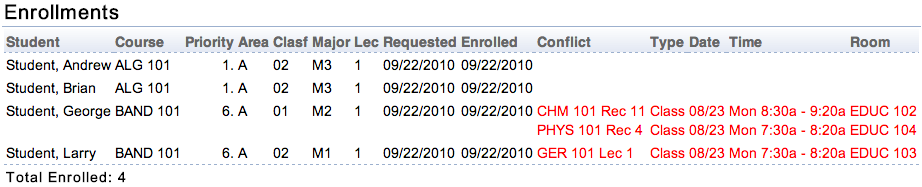
Note that unless the new course-related event is approved and requires student attendance, the student conflicts will only show on the new course-related event. When the event requires student attendance and it is approved, the conflict with the new course-related event will show on the other event as well.
Note that unless the new course-related event is approved and requires student attendance, the student conflicts will only show on the new course-related event. When the event requires student attendance and it is approved, the conflict with the new course-related event will show on the other event as well.
The Edit Event screen provides an interface for changing an existing event. This includes changing its properties (name, sponsoring organization, contacts, etc.) as well as adding new meetings, deleting/canceling, or modifying existing meetings.
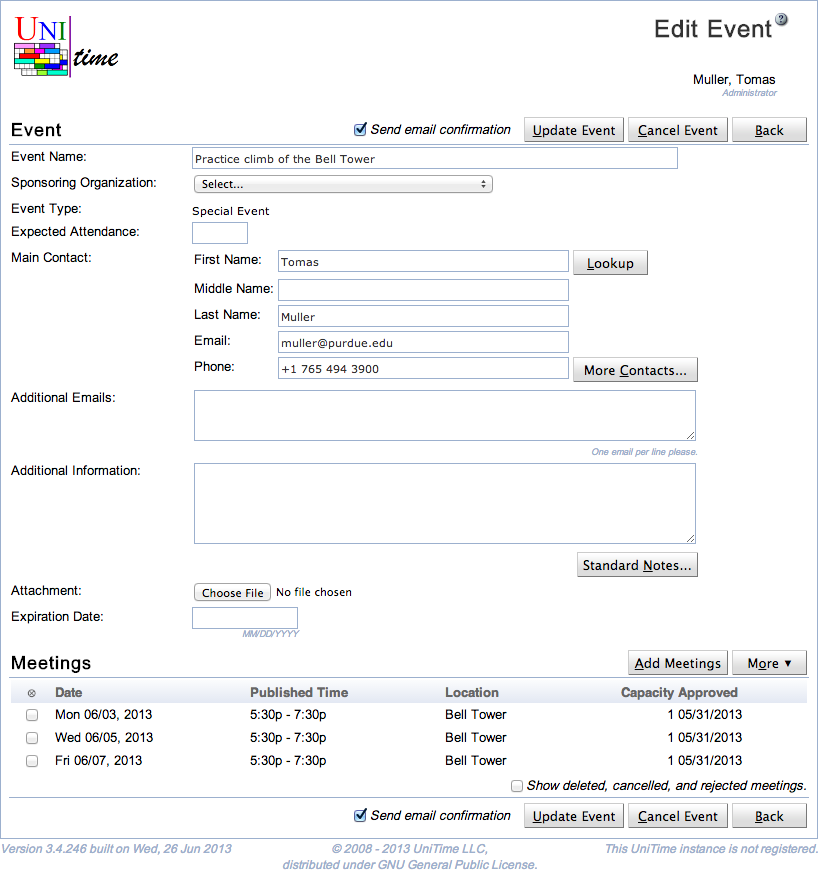
Changes to the event are only made after the Update Event button is clicked. If all meetings can be cancelled or deleted, it is also possible to cancel or delete all meetings of the event by clicking the Cancel Event or Delete Event button. Back button will return on the Event Detail page of the event.
Most of the page works the same as the Add Event page; however, it is not possible to change the type or an academic session of an existing event.
One or more meetings can be added for the event by clicking the Add Meetings button. See the description of Add Event page for more details. Existing meetings can also be deleted (when allowed and if they have not been approved yet) or cancelled (if allowed). To do so, select the appropriate meeting and choose the Delete option or the Cancel option under the More button.
It is also possible to modify one or more meetings. To do so, select meetings that need to be modified (note that all the meetings in the selection have to have the same time) and click on the Modify… option under the More button. One meeting can also be modified by clicking on the meeting directly. The following dialog will appear:
The dialog is the same as the Add Meetings… dialog (described in great detail in the documentation of the Add Event page); however, the selection is pre-populated with the meetings that are to be modified. You can see that the selected dates, times, and locations correspond to the dates of the selected meetings. Also, if nothing is changed, the next page contains the selection that corresponds to the meetings that are being modified.
Once the Select button is clicked, all the changes made in the Modify Meetings… dialog are reflected in the selected meetings. Meetings that correspond to the blue boxes that were unselected on the second page will get deleted (if possible) or cancelled (otherwise). New meetings will be added. If the time is changed, all the selected meetings will get deleted (if possible) or cancelled (otherwise), and a new set of meetings will be added, as it is generally not allowed to change the date, time, or room of an existing meeting.
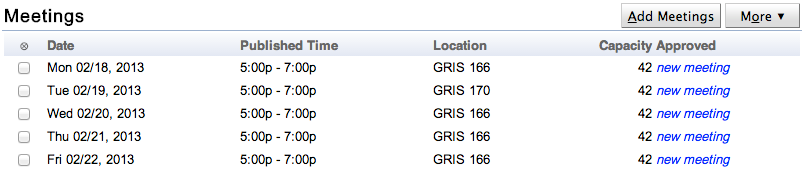
1) For instance, let’s start from the following set of meetings. Please note that the second meeting is in a different room from the others.
2) When More > Modify … is clicked, the appropriate dates, time, and locations are filled in:
3) If you click Next, you can see that the correct meetings are selected. Clicking on the Select button would not change anything; the same 5 meetings will be in the list of meetings.
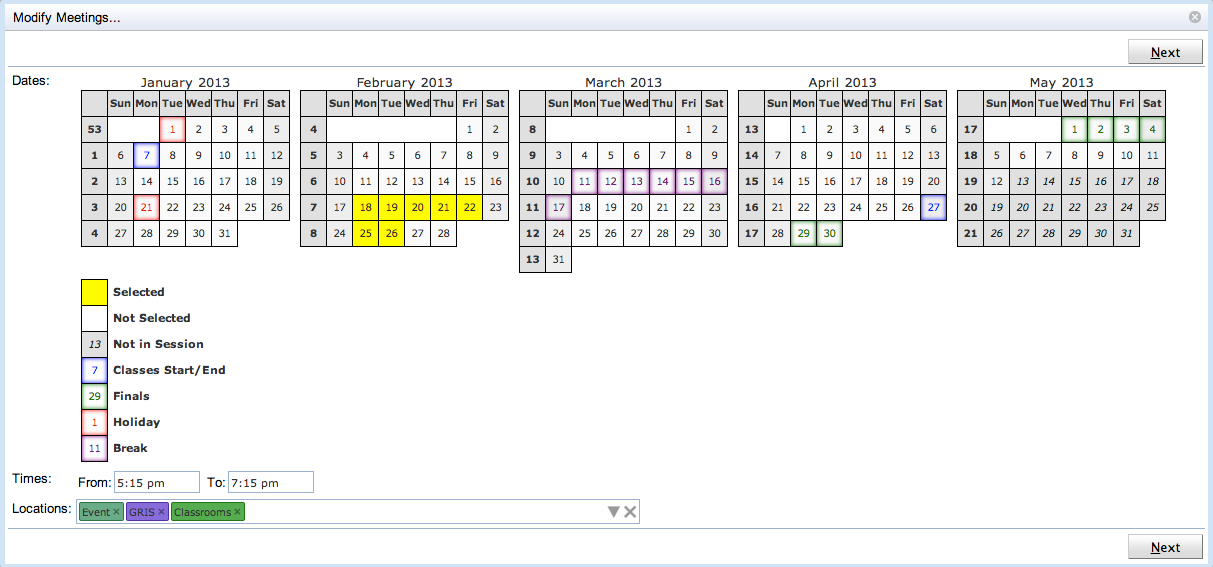
4) Let’s make some changes… Note that two more days have been added, the time was shifted by 15 minutes, and the room filter was broadened a bit.
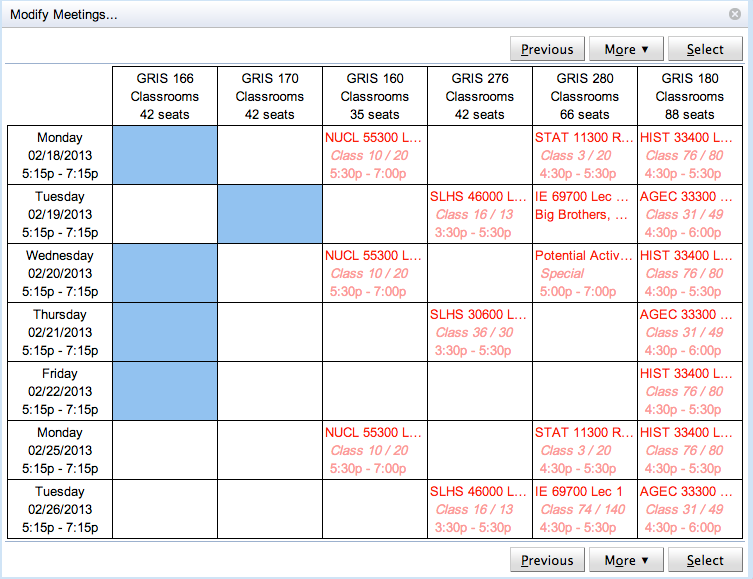
5) Now, on the next page, you can see that the original meetings are still there… Clicking on the Select button would only shift all of them by 15 minutes, regardless of the differences in dates and rooms on the previous page of the dialog.
6) Let’s move some meetings… The first meeting was removed, the second meeting was moved to a different room, and two more meetings were added during the next week.
7) This is the output (after the Select button is clicked).
The Event Room Availability screen lets the user set up dates, times, and location parameters in a similar manner as the Add Event screen. After clicking the Search button, the user can see a time grid with information about the availability of each of the locations matching his/her criteria. It is then possible to highlight available times and request those times for an event.
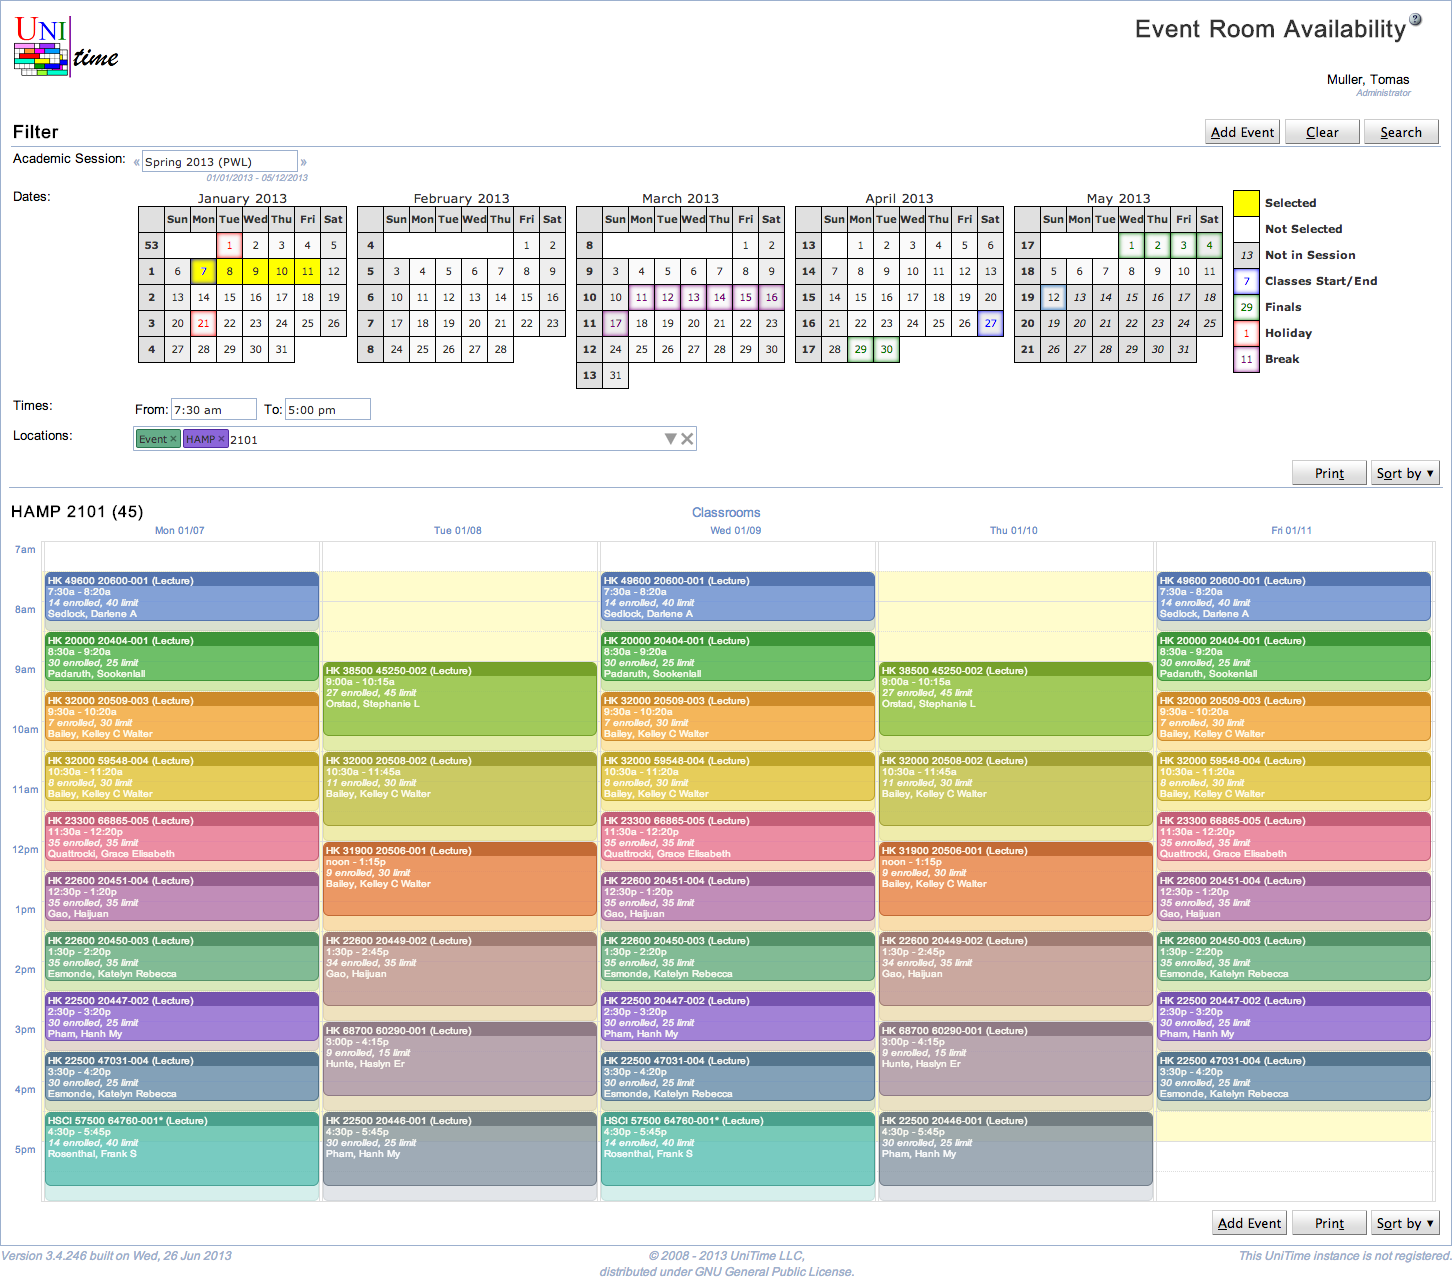
Dates can be selected by mouse. You can click on a particular day, on a week, on a day of the week, or on a whole month. The second click will unselect the selected day. When clicking on a week, a day of the week, or a whole month, the selection will iterate between all working days since today, all working days, all days except holidays, all days, and no days. It is also possible to use the arrow keys to navigate through the calendar and the space key to select/unselect a particular day. Only dates from the academic session selected in the Academic Session selection box can be selected. Times define the starting and end time of the requested availability table (the requested area is marked by a yellow background in the table). It is possible to use a mouse to select particular times, or the times can be entered using the keyboard. While the suggestions are only in 15-minute increments, it is possible to type in a time with 5-minute increments. The from and end time text fields recognize time in various formats (e.g., 7:00 pm can be entered as 7p, 19, 700pm, etc.), and the end time can also be entered in the number of minutes or hours from the start time (e.g., 1h for 1 hour, 90m for 90 minutes). If no times are entered, the availability defaults to a 7:30 am - 5:30 pm time window. The Locations component is explained in the Events chapter (the possible locations are filtered by the same Room Filter as on the Events page). It is useful to keep the Only event locations chip (together with some additional restrictions) in the filter, as these are the rooms in which an event can be requested. Once the Search button is pressed, the availability table(s) will appear.
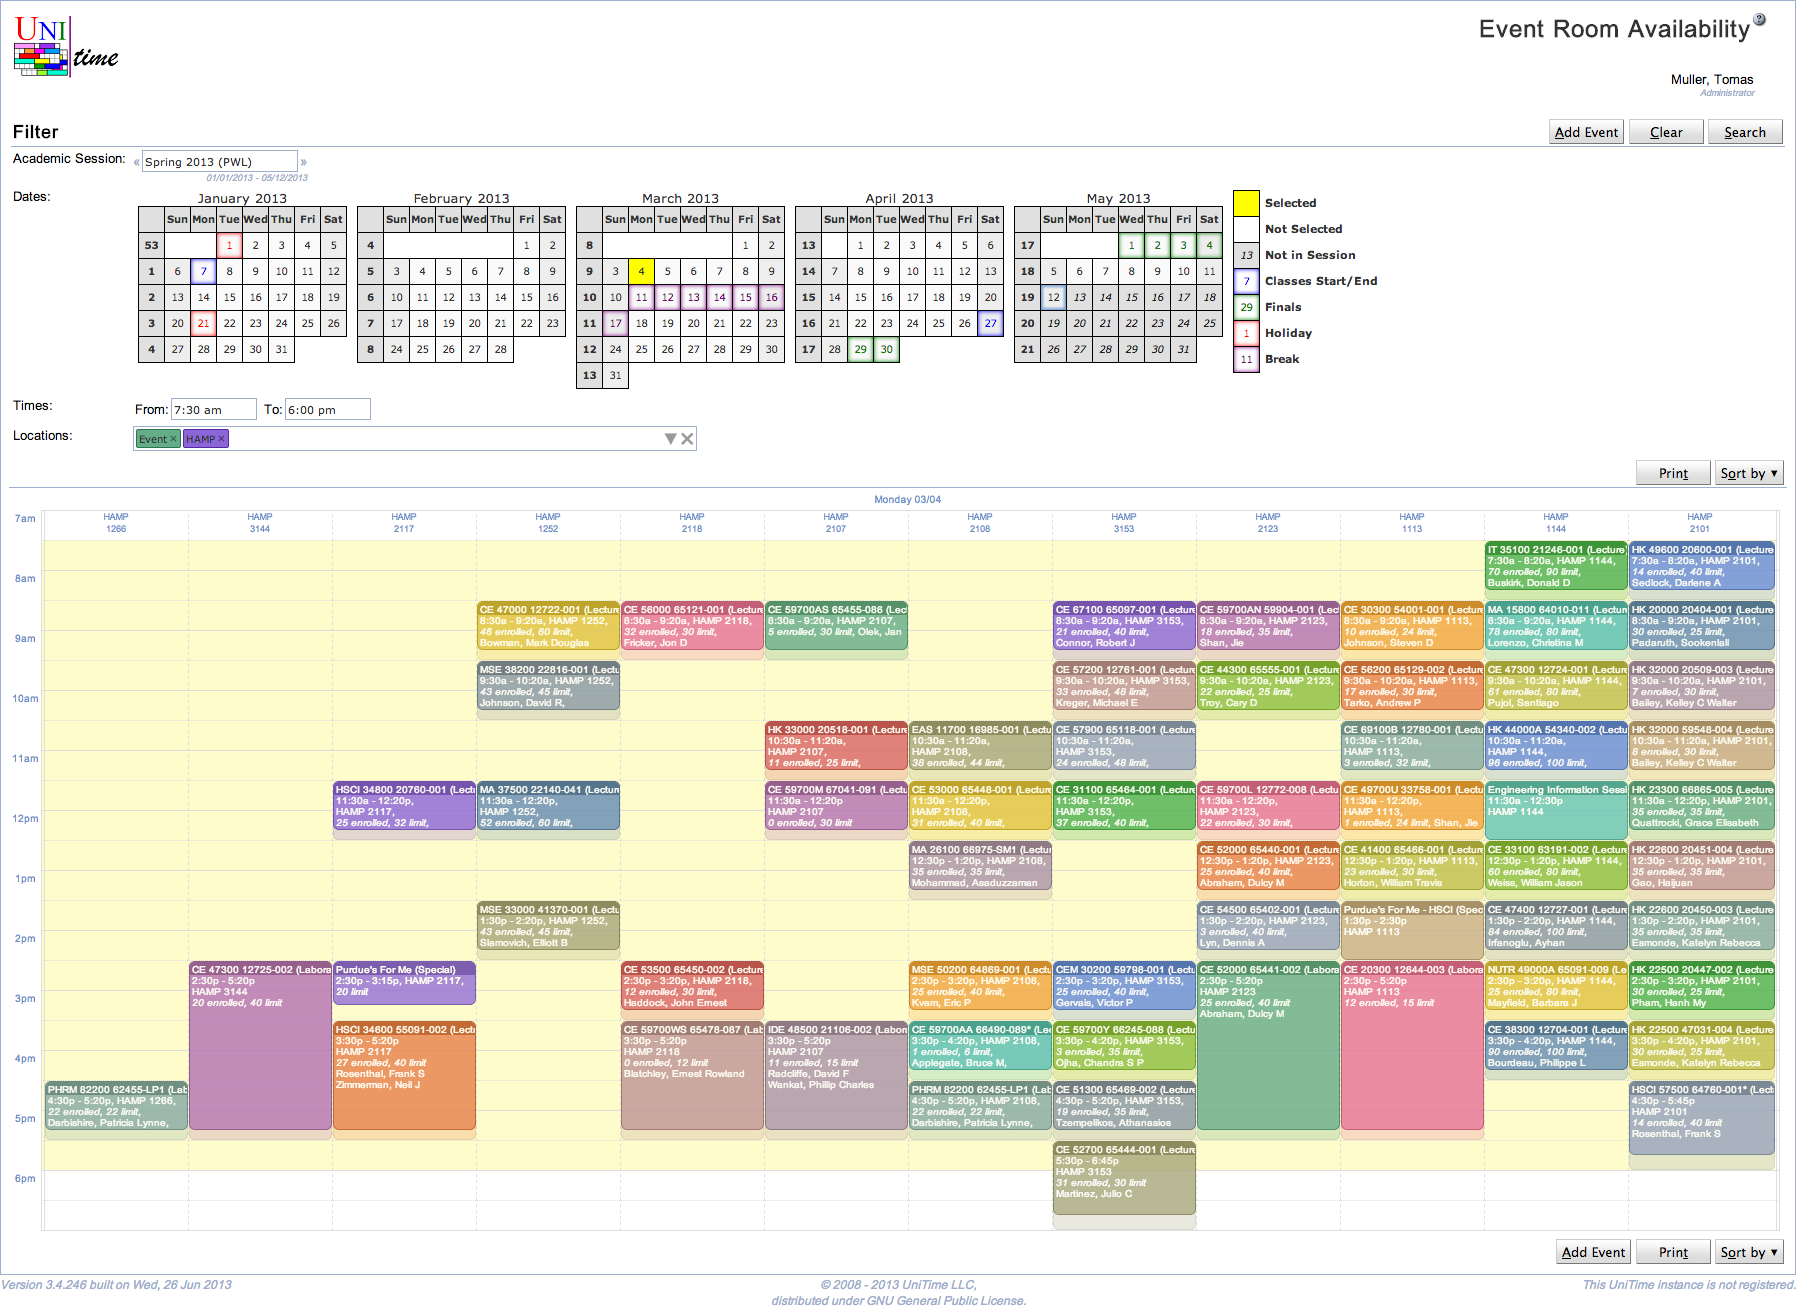
When two or more dates are selected, there is one table for each room matching the room filter (one after another). If there is only one date selected, all the rooms that match the room filter are displayed in one table. The last selection is reflected in the page URL (page can be refreshed without losing the last selection) and remembered in the browser cookies.
The availability grid allows for a mouse selection of available time that can be used to create a new event when the Add Event button is clicked. The mouse selection is in light blue, and it can be deleted by clicking on the little x in the top right corner. It can also be dragged around the timetable grid or changed by moving its corners or edges. Multiple selections can be made across the requested rooms, times, and dates; however, the selection is lost when the Search button is clicked or the page is left. It is generally not possible to make a selection (and request meetings) on the dates that are in the past (before today). Such dates are slightly grayed out.
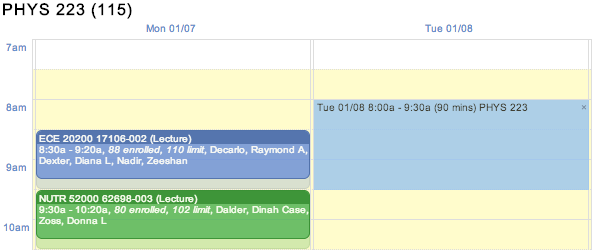
Each meeting is displayed as a box, featuring its name, time, date, and a few additional information. The shades are used to display setup (on the top of the box) and teardown (on the bottom of the box) times. In the above example, the ECE 20200 class event is scheduled from 8:30 am to 9:20 am, but it occupies the room till 9:30 am. This means that the following meeting in this room cannot start earlier than 9:30 am, and there is a 10-minute buffer for the students to move between classes and/or events. On the events, we distinguish between Published Time (time printed on the event, i.e., 8:30 - 9:20) and Allocated Time (time blocking the room). The difference between these two times is displayed as Setup Time (at the beginning of the meeting) and Teardown Time (at the end of the meeting).
Additional information about a particular meeting can be seen in a small yellow tooltip window that is displayed in the bottom left or right corner when the mouse is hovering over the appropriate box.
It is possible to change the order of the displayed rooms. To do so, click the Sort by button and select the sort criterion (capacity, name, availability, or distance when nearby locations are searched as well). To print the room availabilities, use the Print button. It gives better results than printing the page directly, as the availability grids are formatted to better fit the printed page(s).
If allowed, clicking on a meeting will open the Event Detail page for the appropriate event.
Room / Subject / Curriculum / Departmental / Personal Timetable page is a variant of the Events page that allows to see a timetable of a particular room, subject area or one of its courses, curriculum or one of its classification, department, or a person.

Besides the ability to filter events and rooms (see description of the Event Filter and Room Filter), the page allows selecting a particular resource type. Besides a Room Timetable (in which case the page works exactly like the Events page and a particular room can be selected in the Room Filter), one of the following options can be selected:
Subject Timetable (all class, examination, and course-related events of a subject area or a course offering)
Curriculum Timetable (all class, examination, and course-related events of a curriculum)
Departmental Timetable (all class, examination, and course-related events of a department)
Personal Timetable (all events of a person)
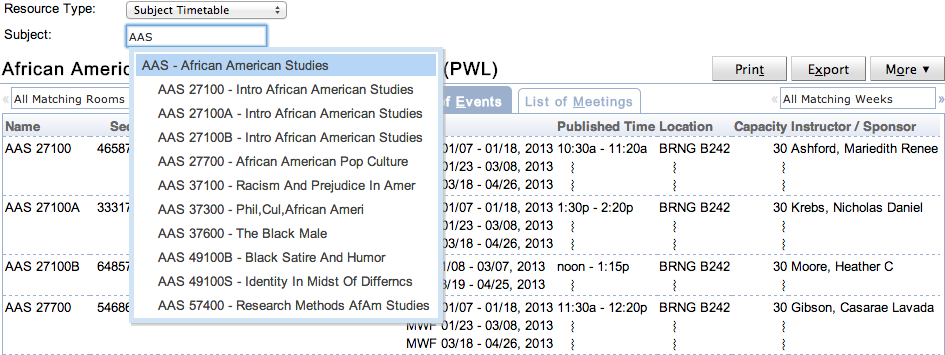
When the Resource Type is changed to Subject Timetable, one can see all classes, examinations, and course-related events that are related to a particular subject area or a course offering. The subject area or course can be entered in the Subject field.
When the Resource Type is changed to Curriculum Timetable, one can see all classes, examinations, and course-related events that are related to a particular curriculum. Either events for all classifications (years of study) or just one classification can be displayed. This list can be filtered further using the Event Filter and Room Filter.

When the Resource Type is changed to Departmental Timetable, one can see all classes, examinations, and course-related events that are related to a particular department.
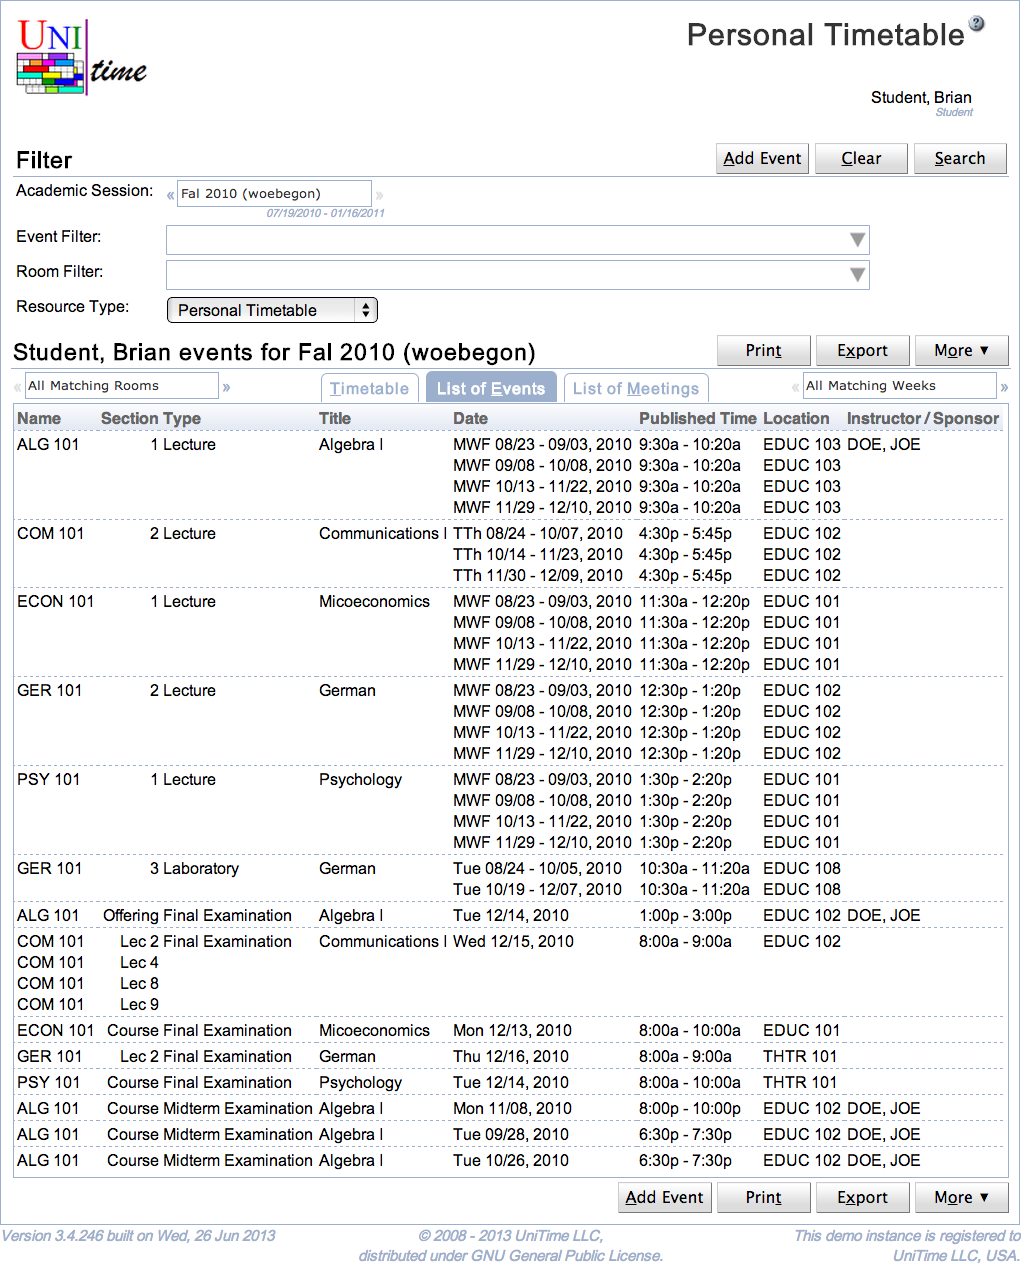
The page displays a personal timetable of the user. This includes all events requested by the user. For students, it also includes all classes and examinations he/she is enrolled in and the related course events. For instructors, it includes all classes and examinations they are assigned to.
Users with Event Lookup Schedule permission can look up a timetable of another person using the Lookup button.
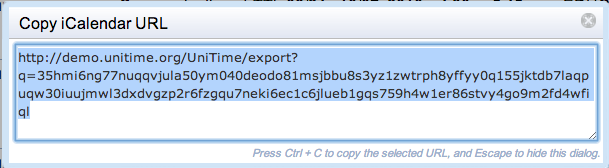
A useful feature is the ability to export the personal schedule as an iCalendar URL that can be inserted in your favorite calendar application and that always returns an up-to-date calendar for the selected academic session. To get the URL, select the Copy iCalendar URL option under the Export button. The following dialog appears, and the URL can be copied into the clipboard.
The Event Statuses screen provides an overview of the statuses in which a given event room type (or a particular room of that room type) can be for a given department. This is a way to specify what each department can do with each room type or room in the given academic session. The page is available not only to administrators but also to the event managers, who can see only the lines for their departments.
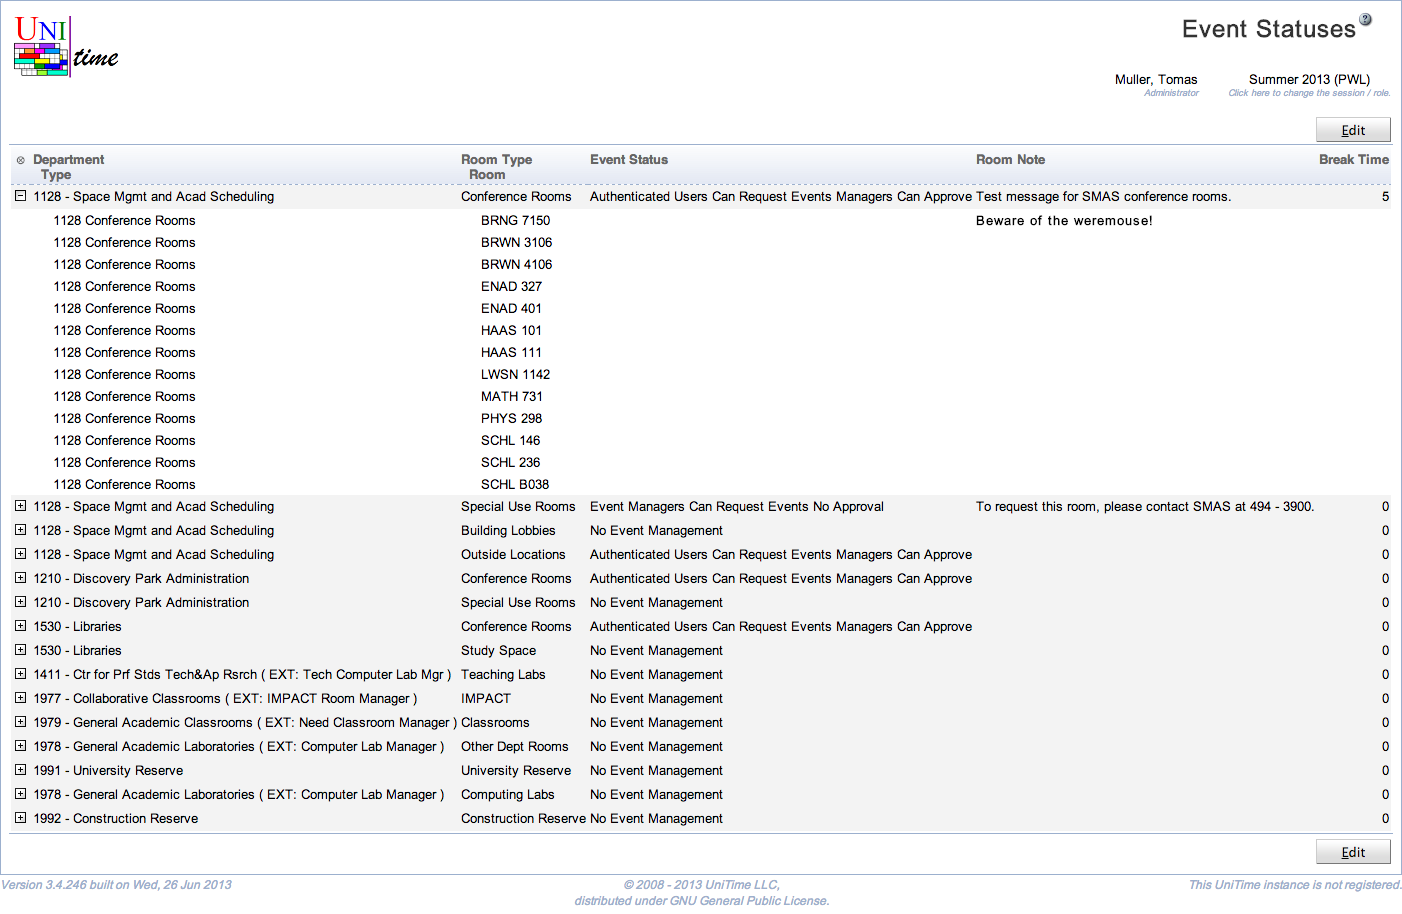
The table of event statuses contains those pairs of “department, room type” for which the department has at least one room of that room type available for event management. A line with a department can be unfolded by clicking on the small plus sign at the beginning of that line - a list of rooms of that department and the room type will be displayed below. The table consists of the following columns.
Clicking on the table header provides a menu for sorting and for indicating which columns should be visible in the table. It is also possible to collapse or expand all departments/types by clicking on the lightbulb sign in the upper left-hand side corner of the table, then on Collapse All or on Expand All.
Click on any line to get to the Edit Event Status screen for the corresponding combination of a department and room type or room.
If a room has no event status, room note, or break time defined, the fields default to the values that are set on the room type & department pair based on the type and event department of the room.
For a particular room (or a room type & department combination), one can specify whether all users (that have the permissions to request an event – which is all authenticated users by default), only users associated with the appropriate department (using the room’s event department), or only event managers (also associated with the department) are allowed to request an event.
The event status can be set to one of the following:
There is a minimal set of permissions an authenticated user must have to be able to request an event (see the default event permissions for a No Role user). For departmental users, besides timetabling managers, instructors of the appropriate department are also included (if the instructor role is allowed to request an event). For the event status check, event managers are all users with the Event Meeting Approve permission (which by default are users with the event manager role). Administrative users with Event Any Location permission override this status (they can request any location at any time).
A room note shows in the tooltip of a room (many pages, whenever a mouse hovers over a room name).
While a new meeting is being requested, if a room is not available for the user, it is shown as an unavailability on the next page of the Add Meetings… dialog.
Or in red below the requested meeting in the meetings table (e.g., when a selection was made on the Event Room Availability page).
If the room is available to the user, the message shows in yellow below a meeting requesting the room on the Add Event, Edit Event, and Event Detail pages.

If a room (or all rooms of a particular type and department, e.g., all centrally managed classrooms) has a break time defined, the break time translates into a teardown time of a newly requested meeting (in the appropriate room). This means that, for instance, if an 8 am - 9 am meeting is requested in a room that requires 10 10-minute break time, the allocated time will be 8:00 am - 9:00 am, but the published time will be 8:00 am - 8:50 am. This is particularly useful for classrooms, as all classes usually have a break time defined (see Time Patterns), and it can be a good practice to extend this policy (e.g., there are always at least 10 minutes between two consecutive classes) to other events as well.

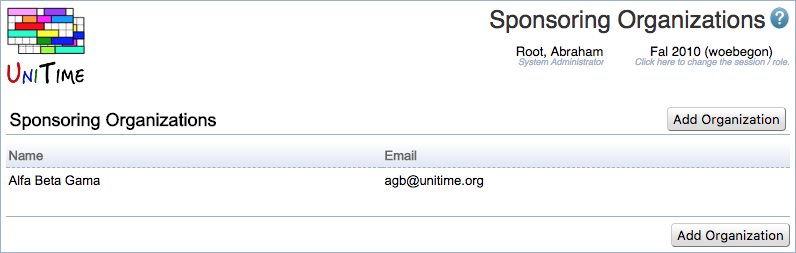
Each event can be associated with one sponsoring organization. Each sponsoring organization can have an email address (and all event confirmation emails are also sent to this email). It is also possible to search events by sponsoring organization.
Sponsoring organizations are defined on the Sponsoring Organizations page that is available at Administration > Other > Sponsoring Organizations. One list of sponsoring organizations applies to all academic sessions.
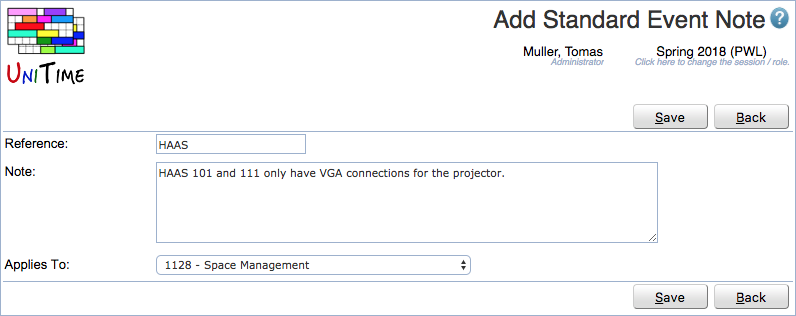
A list of standard event notes that can be used by an event manager or an administrator when approving/rejecting an event. For administrators, the page is available at Administration > Other > Standard Event Notes in the menu. For event managers, the page is at Preferences > Standard Event Notes.
Standard event notes provide a quick way for event managers to fill in the event notes without the need to type the same message over and over.
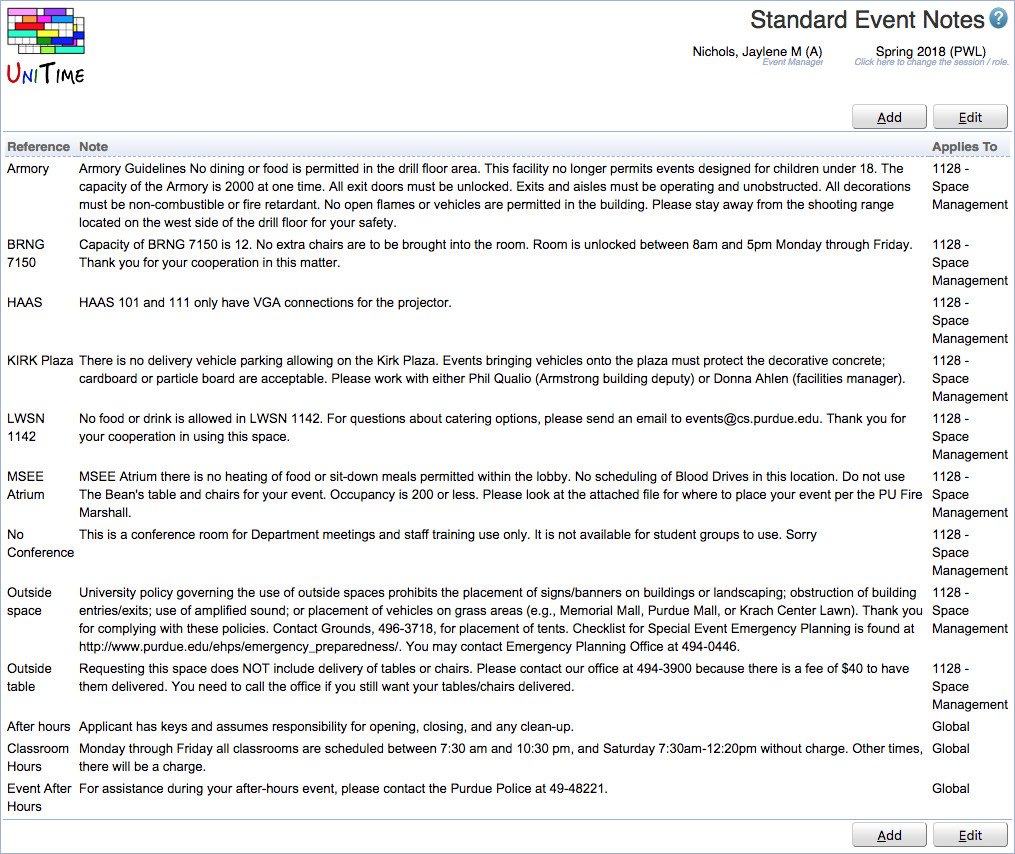
Standard notes can be global (available to all event managers across all the academic sessions), related to a single academic session, or to a particular department. Event managers can only create, edit, or delete departmental notes (standard notes that apply to their department).
It is also possible to create event service providers. These can be used by users when they are requesting an event to request additional services, like catering. They can be created using the Event Service Providers page, menu Academic Session > Other > Service Providers.
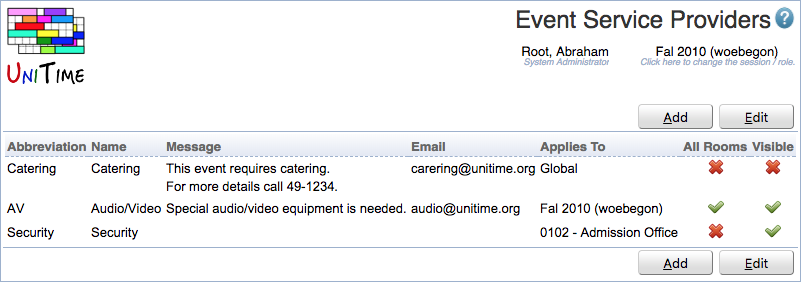
A service provider must have an abbreviation and a name. Message and email are optional. It can be global (applies to rooms across all the academic sessions), for an academic session (applies to rooms in the academic session), or just for a particular department. A service provider can be used for all rooms (for which it applies) or only for a subset of rooms. When it does not apply to all rooms (the All Rooms toggle is not set), the service provider can be selected for one or more rooms. This can be done using the Edit Room page or on the Event Statuses page.
Now, when an event is being requested, a toggle for each service (that is applicable) is shown on the Add/Edit Event page

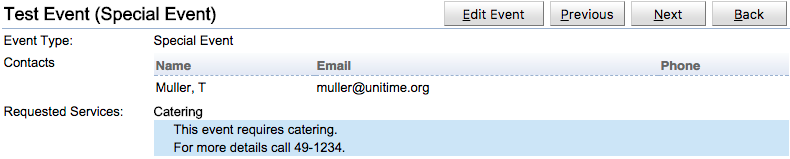
The Requested Services section is only visible when there is one or more service providers defined and available. If a message was provided, it shows when the service is selected. It can contain HTML links to additional forms, etc.
If the email is provided, the service provider is CC-ed on the event confirmation email when a meeting is committed or cancelled. This also includes cases when a room is automatically approved or when a service provider is selected on the event (Edit Event page) after one or more of its meetings have been approved.
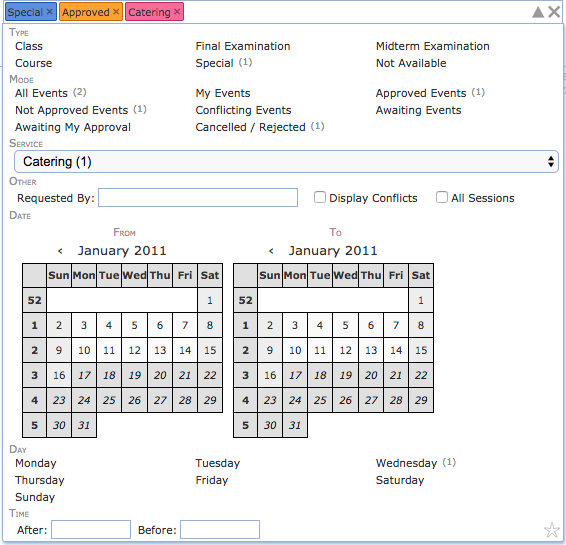
The selected services also show on the detail page, as a column on the Events page (List of Events, List of Meetings tables), in the event tooltip, and in the Event Filter (so one can only display approved events requesting a particular service).
Event Detail Page
Events Page, Requested Services column has been added

Event tooltip

Event Filter, a service can be selected
| Back to UniTime Online Documentation | © UniTime 2026 | Content available under GNU Free Documentation License 1.3 |