Edit Class
Screen Description
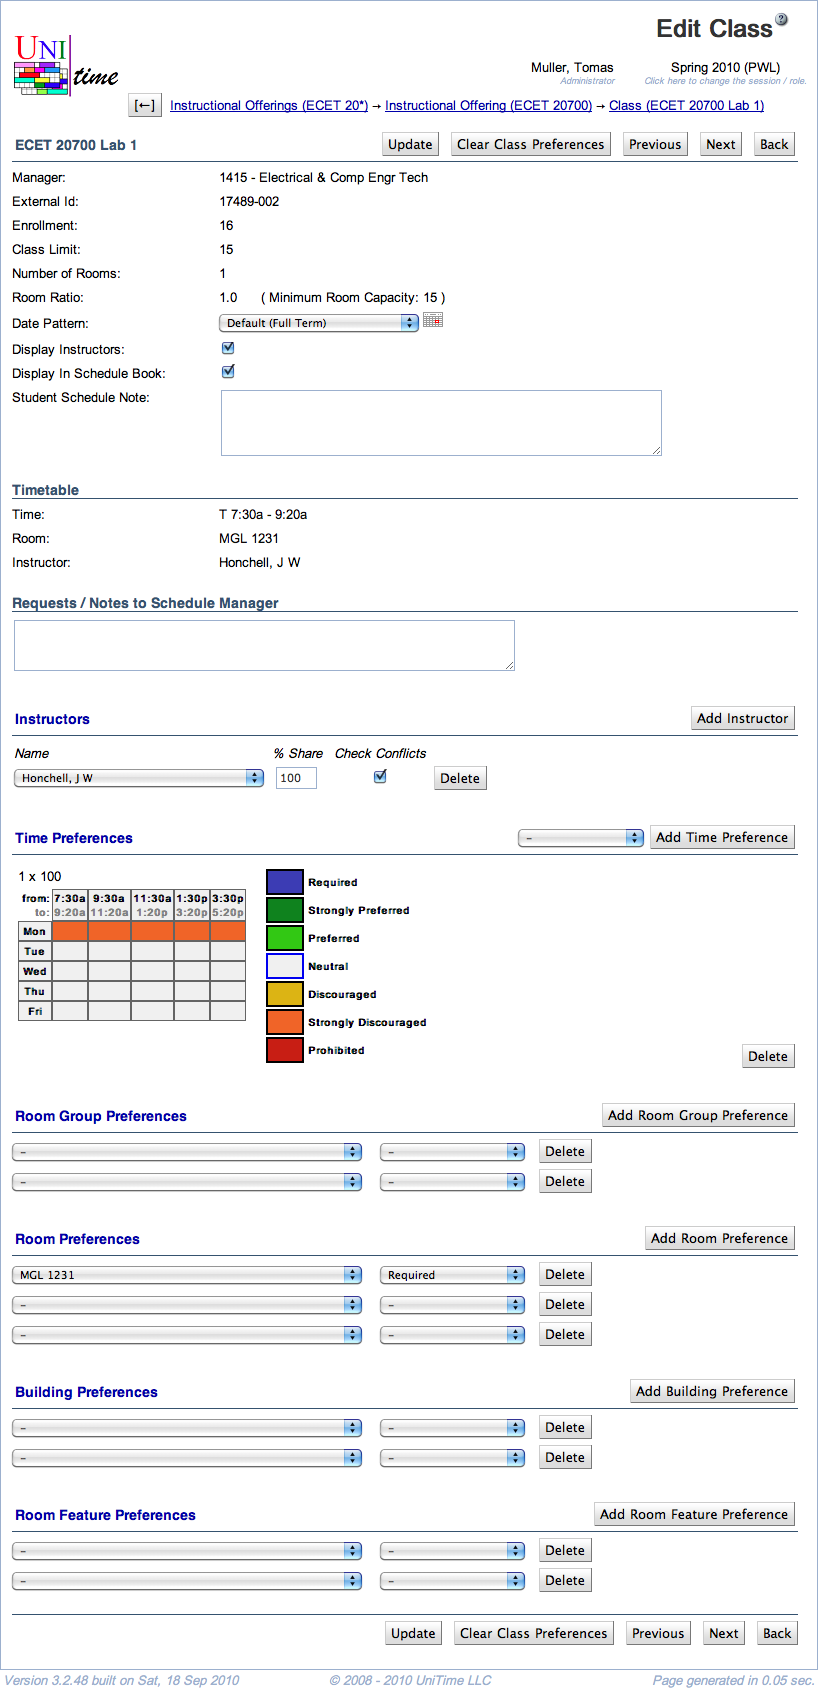
In the Class Edit screen, you can change a few properties of the class and enter preferences. The rules explaining how preferences are applied to classes are located in Application Of Preferences. Changes made to this screen are not saved until you click on the Update, Previous, or Next button.
Details
The following fields are displayed in the upper part of the screen (below the name of the class):
- Manager
- Enrollment
- Number of enrolled students (if available)
- Class Limit
- Number of students that should be able to register for a given class
- Editable in the Multiple Class Setup screen
- Snapshot Limit
- Number Of Rooms
- Room Ratio
- The ratio of the required room size to the class limit
- Room Ratio = Room Size / Class Limit
- In almost all cases, this is one
- Some exceptions to the norm
- You need a room for fewer students than the class limit (Room Ratio is less than one)
- You need a room for a class with zero limit. In this case, Room Ratio needs to contain the required room size
- In parenthesis after the room ratio, you can see the minimum room capacity required for this class (for Class Limit <> 0, it is calculated as Minimum Room Capacity = Room Ratio * Class Limit; if Class Limit = 0, then Minimum Room Capacity = Room Ratio)
- Editable in the Multiple Class Setup screen
- Attendance
- When there are two or more rooms required for the class
- Split Attendance means that students are expected to split between the two (or more) rooms. That is the total capacity of the assigned room × the room ratio must be equal to or greater than the class limit.
- Alternative Attendance means that all students are expected to be able to fit in any of the assigned rooms. That is, the room capacity of any assigned room × the room ratio must be equal to or greater than the class limit.
- Editable in the Multiple Class Setup screen
- Funding Dept
- The department providing funding for this class.
- This field is not visible by default. To enable this field, the
unitime.courses.funding_departments_enabled application property must be set to true.
- Editable in the Multiple Class Setup screen
- Date Pattern
- Days/weeks throughout the semester during which this class will be taught
- To change the date pattern, select the new date pattern from the drop-down list
- You can click on the icon of the calendar to see which dates belong to the selected date pattern
- By default, a drop-down is used. It can be changed to a searchable box by setting
unitime.classEdit.searchableDatePattern to true
- Display Instructors
- When checked (and it is checked by default), the instructors for this class will be displayed in the online Schedule of Classes
- When not checked, the instructors will not be displayed in the online Schedule of Classes, and his/her name will have to be re-entered for reporting purposes
- Student Scheduling
- When checked (and it is checked by default), the class will be available to students during student scheduling
- When not checked, the class will be treated as with zero limit during student scheduling (only students with individual reservations will be able to get in) - the class not to be displayed is in italics wherever it is listed
- Student Schedule Note
- The class note that will be displayed in the online Schedule of Classes
The text field in Requests / Notes to Schedule Manager is there for Requests/Notes for the manager who will timetable this class.
In the Instructors, the following information is displayed and can be edited.
- Name
- Select an instructor’s name from the drop-down list
- If a name is missing from this list, you need to add the person to your list through the Instructors screen
- Share
- The percentage of teaching activity for this class associated with this instructor
- Check Conflicts
- When checked, the instructor’s preferences are considered during departmental timetabling; also, checks are performed for this instructor to make sure there is no conflict for them between this class and their other classes (such as teaching two classes at the same time)
- When not checked, the instructor’s assignment to this class is ignored during timetabling; no conflict checking will be performed between this class and their other classes
- Responsibility
- When teaching responsibilities are defined, the instructor’s teaching responsibility can be selected here.
- Teaching responsibilities can be defined on the Teaching Responsibilities page in the administration.
- Operations
- Add Instructor (Alt+I)
- Add another instructor to the same class
- Delete (
 icon)
icon)
- Remove a given instructor’s name from the class
Preferences
Time
- If you don’t see any time grid, you need to select a time pattern from the drop-down list and click the
 plus icon
- You can have more than one possible time pattern for your class - in that case, perform the previous step again to add another time grid
- Indicate the time preferences by filling in the time slots with appropriate colors (click on the colored square in the legend and then on the squares in the time grid that you want to fill in with this preference level)
- Click on the day of the week (or combination of days of the week) to fill in the grid for the whole day (or combination of days)
- Click on a particular time to fill in the grid for this time (across all the days)
- Click on the upper left-hand side corner (which has “from:” and “to:”) to fill in the whole time grid
-
To delete a time pattern, click on the cross icon next to the pattern name
-
Note: Only time patterns that match the duration set on the scheduling subpart (on the Instructional Offering Configuration screen) are available in the drop-down. When Minutes per Week is used, that means that the number of minutes per week set on the subpart must equal the number of meetings per week × minutes per meeting set on the time pattern.
- Note: To express that, e.g., the classes of this scheduling subpart can only be taught on Monday, Wednesday, and Friday, fill in Tuesday and Thursday times as “Prohibited” (as opposed to setting Monday, Wednesday, and Friday as “Required”); this leaves you the flexibility to indicate preferred or discouraged times within Monday, Wednesday, and Friday
Date Patterns
- Select a date pattern from the first drop-down list and the preference level from one of the options
- To add more lines for additional date pattern preferences, click the plus icon
- To delete a line with a date pattern preference, click on the cross icon on that line
-
Blank lines are ignored
- Note: Date pattern preferences are only available when a date pattern of the Pattern Set type is selected on the scheduling subpart (containing a list of time patterns, such as 1x for all one-week date patterns)
Room Preferences
- Select a room from the first drop-down list and the preference level from one of the options
- You can see only those rooms that are listed in the Rooms screen for the department managed by the manager listed in your Edit Scheduling Subpart screen (look at Rooms to see how to add new rooms to your list of departmental rooms)
- To add more lines for additional room preferences, click the plus icon
- To delete a line with a room preference, click on the cross icon on that line
-
Blank lines are ignored
- Note: If a class requires two or more rooms, you can also select which room (s) the preference applies to in an additional drop-down.
Building Preferences
- Select a building from the first drop-down list and the preference level from one of the options
- You can see only those buildings that are listed in your Rooms screen for the department of this scheduling subpart’s manager
- To add more lines for additional building preferences, click the plus icon
- To delete a line with a building preference, click on the cross icon on that line
-
Blank lines are ignored
- Note: If a class requires two or more rooms, you can also select which room (s) the preference applies to in an additional drop-down.
Room Feature Preferences
- Select a room feature from the first drop-down list and the preference level from one of the options
- You can see only those room features that are listed in the Rooms screen
- If you need to add another room feature for your departmental rooms, go to the menu, to Courses → Input Data → Room Features
- To add more lines for additional room feature preferences, click the plus icon
- To delete a line with a room feature preference, click on the cross icon on that line
-
Blank lines are ignored
- Note: If a class requires two or more rooms, you can also select which room (s) the preference applies to in an additional drop-down.
Room Group Preferences
- Select a room group from the first drop-down list and the preference level from one of the options
- You can see only those room groups that are applicable to classes of the given manager (for example, for LLR classes you can see groups of large lecture rooms); for your departmental classes, you can see only those room groups that are listed in your Room Groups screen - if you need to add another room group, go to the menu, to Courses → Input Data → Room Groups
- To add more lines for additional room group preferences, click the plus icon
- To delete a line with a room group preference, click on the cross icon on that line
-
Blank lines are ignored
- Note: If a class requires two or more rooms, you can also select which room (s) the preference applies to in an additional drop-down.
Operations
- Update (Alt+U)
- Clear Class Preferences (Alt+C)
- Clear all the class preferences in this page and go back to the Class Detail screen (where you can see that the preferences have been cleared)
- Preferences will be inherited from the scheduling subpart and/or the instructor
- Previous (Alt+P)
- Save changes and go to the Edit Class screen for the previous class
- Next (Alt+N)
- Save the preferences and go to the Edit Class screen for the next class
- Back (Alt+B)
- Go back to the Class Detail screen without saving any changes
Notes
Room Groups vs. Room Features
The difference between room groups and room features is as follows:
- If you require more than one room group for a given class, it is sufficient if the assigned room belongs to one of them
- If you require more than one room feature, the assigned room has to have all of them