Multiple Class Setup
Screen Description
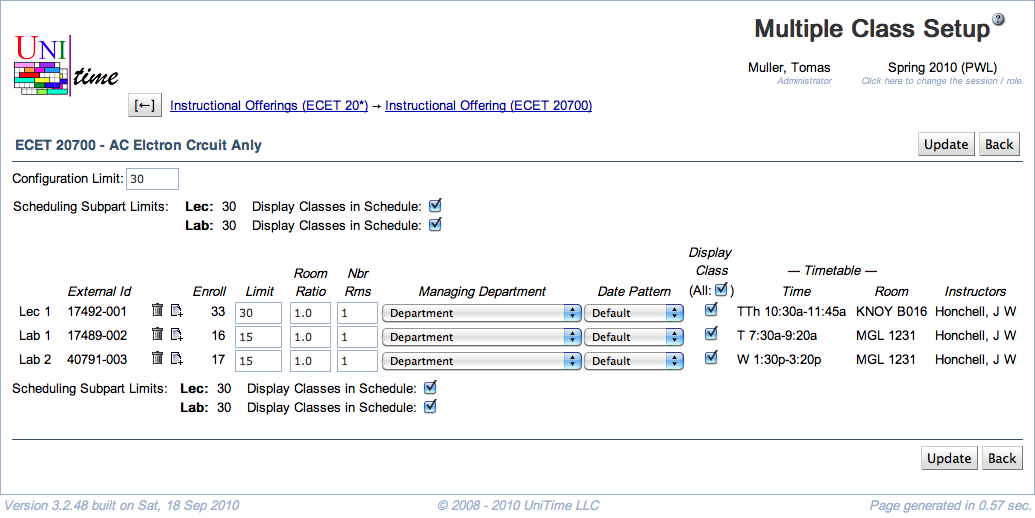
In the Multiple Class Setup screen, it is possible to set properties on the class level (as opposed to setting them on the scheduling subpart level in the Instructional Offering Configuration screen). There is a line for each class for a given configuration in the instructional offering.
Details
- Instructional Method
- An optional instructional method for the configuration (such as Traditional, Online, or Hybrid)
- Instructional methods are defined on Instructional Methods page in the Administration
- Unlimited Enrollment
- Check this checkbox if the configuration has unlimited enrollment
- When Unlimited Enrollment is selected, all classes are unlimited and have no rooms assigned
- You have the option to indicate a room to print on the student schedule by requiring that room in the scheduling subpart or the class preferences. However, please note that there is no verification check for the room’s availability; it is simply printed on the schedule.
- Configuration Limit
- Number of students you want to allow to register for the instructional offering in this configuration (in most cases, same as the instructional offering limit, which is in most cases the same as the course limit - except cross-listed courses)
- Student Scheduling Disclaimer
- An optional field, only available for users with the Instr Offering Config Edit Disclaimer permission.
- When an instructional offering configuration has a disclaimer, it will show to the students when they request the course on Student Course Requests or try to enroll in the configuration using the Student Scheduling Assistant page. The student must acknowledge the disclaimer in order to proceed.
- A list of standard scheduling disclaimers can be defined, see Standard Scheduling Disclaimers for more details.
- Scheduling Subpart Limits
- The totals of class limits for each scheduling subpart (class limits can be changed on this screen)
- The individual subpart limits should match or be greater than the offering limit
- Use the Display Instructors and Student Scheduling toggles to change the settings for all classes of the scheduling subpart (displayed only when enabled).
- External Id
- External id of a class (sometimes also referred to as class suffix).
- The column is only visible when
tmtbl.class_setup.show_display_external_ids property is set to true.
- External ids can be edited when
tmtbl.class_setup.edit_external_ids property is set to true.
- Class Icons
 and
and  arrows
- When classes are grouped, it is possible to move a class to a different group (under a different parent class) - for example, if recitations are grouped with lectures, you can move a recitation from one lecture to another
- Useful when, e.g., adding a recitation to a lecture in the middle of the list of classes
 cross icon
- Click on this icon to delete the class on the same line as the trash bin
- If you delete a class that has other classes grouped underneath, the grouped classes will be deleted as well
- It is not allowed to delete a class that has students enrolled. Such a class can only be canceled.
 plus icon
- Click on this icon to add a class of the same instructional type with the same parameters
- If you click on this icon on the line with a class that has more classes grouped underneath, the whole group is added (for example, if you click on a lecture that has a recitation underneath, another lecture together with another recitation is added)
 cancel icon
- Cancel the class
- Students cannot be enrolled in a canceled class. If re-scheduling or wait-listing is enabled, students will be automatically re-scheduled to other available classes within the course or dropped and wait-listed if there is not enough space or a time conflict exists.
 reopen icon
- Note: Some operations may not be available (not shown) to ensure consistent results (e.g., there is no parent class left without any child classes).
- Enroll
- Number of enrolled students (if enrollment data is available)
- Limit
- Set up the limit for a given class
- If you need to set the limit for a class to zero, make sure that you set the Room Ratio to the size of the room that you want for the class - in this case, Room Ratio has a special meaning
- To be able to set variable limits per class, you need to change the property “Show the option to set variable class limits” in the Manager Settings screen (menu: Preferences → Settings) before you edit this configuration
- Snapshot Limit
- The limit for the class at the time the Limit and Projection Snapshot was taken (using the Limit and Projection Snapshot page).
- Can be editable when
tmtbl.class_setup.edit_snapshot_limits is set to true.
- Number of Rooms
- Number of rooms that you need for a class (usually one)
- Split Attendance
- When two or more rooms are needed
- If checked, students are expected to split between the two (or more) rooms. That is the total capacity of the assigned room × the room ratio must be equal to or greater than the class limit.
- If unchecked, all students are expected to be able to fit in any of the assigned rooms. That is, the room capacity of any assigned room × the room ratio must be equal to or greater than the class limit.
- Room Ratio
- The ratio of the required room size to the class limit
- Room Ratio = Room Size / Limit per Class
- In almost all cases, this should be one
- Some exceptions to the norm
- You need a room for fewer students than the class limit (Room Ratio is less than one)
- Example: A course has a PSO class for 100 students, but the schedule deputy knows that there will never be more than 50 students at a time in this PSO. Hence, this PSO can be set up with Limit per Class = 100 and Room Ratio = 0.50, which means that the application will look for a room of size 50 or more (0.5*100=50).
- You need a room for a class with zero limit. In this case, Room Ratio needs to contain the required room size.
- Example: You set up a course with zero limit where all students require name raises. You plan on enrolling 20 students per class. Then, the Room Ratio should be set to 20. In this situation, the above formula for Room Ratio does not apply. The Room Ratio will be used as the room size needed.
- Managing Department
- Determines who will assign time and room to this class (for example, whether it is the Large Lecture Room manager, the departmental schedule deputy, or the Computing Lab manager)
- The managing department also determines the set of rooms and/or times (time patterns) that you can use when you set up preferences
- For Managing Department other than “Department”, you usually cannot set the preference level “Required” in the preferences on the subparts or on the classes (in the Edit Scheduling Subpart or in the Edit Class screens)
- Date Pattern
- Indicates which weeks during the semester the class is taught
- “Default” means that the date pattern is inherited from the scheduling subpart
- If you need to use a pattern that does not appear in the list, use the form in the Contact Us screen (under Help)
- Timetable
- Time and Room assigned to the class if a timetable has been created (the loaded timetable is displayed; if none is loaded, the selected one is displayed; if none is selected, then the committed timetable is displayed)
- Display Instructors
- When checked (and it is checked by default), the instructor’s name will be displayed in the online Schedule of Classes
- When not checked, the instructor’s name will not be displayed in the online Schedule of Classes - the name not to be displayed is in italics wherever it is listed (Instructional Offerings, Instructional Offering Detail, Scheduling Subpart Detail, Classes, …)
- Only visible when
tmtbl.class_setup.show_display_instructor_flags is set to true
- Student Scheduling
- When checked (and it is checked by default), the class will be available to students during student scheduling
- When not checked, the class will be treated as with zero limit during student scheduling (only students with individual reservations will be able to get in) - the class not to be displayed is in italics wherever it is listed (Instructional Offerings, Instructional Offering Detail, Scheduling Subpart Detail, Classes, …)
- Only visible when
tmtbl.class_setup.show_enabled_for_student_scheduling is set to true
Operations
- Update (Alt+U)
- Back (Alt+B)